
I have a very, very small studio which doesn't really afford me the luxury of separate stations for different aspects of my work. This means that before I can start a bronze clay session I have to gather all my tools and paraphernalia around me so here's a little insight into what this entails...

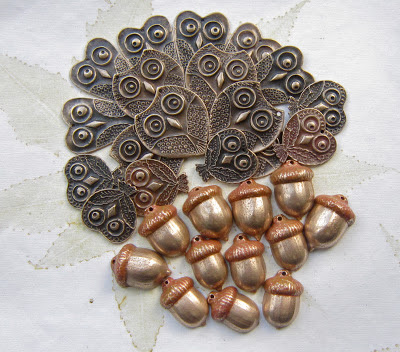
The blue striped box holds some of my commercial texture plates plus anything else that takes my eye including wallpaper, fabric and lace and an onion net! In front of that are moulds that I have made myself. The blue ones are made from 2 part silicon gels - very expensive but much the best for moulding soft (or bulky) materials like plant matter which I'm very fond of using in my work. The green ones are made from polymer clay which is much cheaper and suitable for harder materials. I also use Polymer clay to carve original forms like these little owl pendants...

The tray contains all my lotions and potions and my tools. The 1 Cal Olive Oil spray never got used when it sat in the kitchen cupboard so I moved it into the workroom. It's a godsend as I'm a bit of a klutz and have knocked over oil bottles countless times as I never put the tops on while I'm working. 'Gloves in a Bottle' is a barrier cream which helps me avoid the horrible brown stains metal clay can give you and the lavender oil is for conditioning the clay but also has the added bonus of making the room smell nice.
Tools include commercial shapers and cutters but are supplemented with more cost effective bits and bobs like knitting pins, cocktail sticks, emery boards... just about anything that comes to hand really. The little black box with the white balls contains cocktails sticks with cheap plastic beads glued to the top of them - I use these as forms for bead caps which I then poke into a block of florists foam to dry - necessity is the mother of invention as they say!

The
little white artist's palettes are used as forms for domed
pendants and clasps as they cost just a fraction of the price of the
commercial forms like the copper one you can also see in the first picture. They're also
great for holding tiny items I'm working with and mixing slip. For
larger pieces I also use dead light bulbs as forms again stuck into florists
foam!
The coloured strips are the spacers I use to get
an even thickness when rolling the clay and these are one of the
commercial tools that I do prefer. I was taught metal clay using playing
cards as spacers but these come in graduated depths, are easier to
clean and I've had much more even results since using them.
Earlier this year I received a surprise gift from my friend Cilla in British Columbia. Cilla is a Dental Hygienist and thought I might find these dental picks and scrapers useful for my clay work and she wasn't wrong - they're brilliant for getting into tight spots especially on delicate pieces.

I love, love, love silicone baking sheets for rolling metal clay on. I cut them into small pieces and then I just move the sheets to a drying surface with the pieces in situ and they just slip off when dry. Not having to move clay from one surface to another avoids the risks of distortion or marking. And finally, to the left is one of my tins of cutters - again an assortment of clay and culinary cutters mixed with bits and bobs that I've picked up along the way. There is a huge variety of commercial tools available for clay work (I spend hours in sugar craft shops) but you can find some sort of substitute for many of them around the home or garden.
Inevitably, this scene quickly becomes unrecognisable once I start work and eventually resembles something akin to a small bomb site - as you can see, bit of a messy worker me!

But hopefully it's all
worth it when I end up with lots of goodies ready to go into the kiln
like these...

And finished pieces like these...
So, do you have any interesting items you use as tools or unusual sources for acquiring them...do let me know if I'm missing a trick won't you.
Lesley
The Gossiping Goddess

The blue striped box holds some of my commercial texture plates plus anything else that takes my eye including wallpaper, fabric and lace and an onion net! In front of that are moulds that I have made myself. The blue ones are made from 2 part silicon gels - very expensive but much the best for moulding soft (or bulky) materials like plant matter which I'm very fond of using in my work. The green ones are made from polymer clay which is much cheaper and suitable for harder materials. I also use Polymer clay to carve original forms like these little owl pendants...

The tray contains all my lotions and potions and my tools. The 1 Cal Olive Oil spray never got used when it sat in the kitchen cupboard so I moved it into the workroom. It's a godsend as I'm a bit of a klutz and have knocked over oil bottles countless times as I never put the tops on while I'm working. 'Gloves in a Bottle' is a barrier cream which helps me avoid the horrible brown stains metal clay can give you and the lavender oil is for conditioning the clay but also has the added bonus of making the room smell nice.
Tools include commercial shapers and cutters but are supplemented with more cost effective bits and bobs like knitting pins, cocktail sticks, emery boards... just about anything that comes to hand really. The little black box with the white balls contains cocktails sticks with cheap plastic beads glued to the top of them - I use these as forms for bead caps which I then poke into a block of florists foam to dry - necessity is the mother of invention as they say!

Earlier this year I received a surprise gift from my friend Cilla in British Columbia. Cilla is a Dental Hygienist and thought I might find these dental picks and scrapers useful for my clay work and she wasn't wrong - they're brilliant for getting into tight spots especially on delicate pieces.

I love, love, love silicone baking sheets for rolling metal clay on. I cut them into small pieces and then I just move the sheets to a drying surface with the pieces in situ and they just slip off when dry. Not having to move clay from one surface to another avoids the risks of distortion or marking. And finally, to the left is one of my tins of cutters - again an assortment of clay and culinary cutters mixed with bits and bobs that I've picked up along the way. There is a huge variety of commercial tools available for clay work (I spend hours in sugar craft shops) but you can find some sort of substitute for many of them around the home or garden.
Inevitably, this scene quickly becomes unrecognisable once I start work and eventually resembles something akin to a small bomb site - as you can see, bit of a messy worker me!


So, do you have any interesting items you use as tools or unusual sources for acquiring them...do let me know if I'm missing a trick won't you.
Lesley
The Gossiping Goddess
A great read! I love looking around people's workspaces! Good to see you're just as messy as me Lesley ;)
ReplyDeleteA great tool I have is a broken aerial from a radio. It's a perfect small circle for making holes in pendants without squishing your design!
I love peeking into your workspace! The last picture looks so familiar to me....it could be my space! I use all kinds of household items for mandrels - my favorite is a knitting needle for making jump rings. And emery boards...tons of emery boards! I LOVE your bronze work - the owls and acorns are spectacular!
ReplyDelete*snort* - love the photo of the mess during the process LOL. Great post & fantastic finished pieces!
ReplyDeleteHi Lesley,
ReplyDeleteThank you for the tour of your workspace and giving us all some insight in how you make your beautiful creations.
When I am bead weaving a spiral I will use anything that is sturdy enough to weave the spiral around such as straws, paint brush handles, crochet hooks, wooden dowles... okay I think you get the picture.
Therese
Awesome!!My room looks like the last pic too! So happy my old dental tools are useful to you! Love your creativity and beautiful work!
ReplyDeleteAwesome post as always! So happy my old tools are still of good use. Keep creating beautiful work.
ReplyDeleteWonderful informative post. Had not thought of the silicon paper--i have been using acetate but the paper is so much easier to deal with I imagine. Love your work!!! For making holes in pendants etc. I found a great hole cutter on Rio in their metal clay tools section. It works great and comes with a little stick for cleaning out the clay. I just looked it up. It is called The Clay Punch, Small Circles. It also works great on ceramic clay. Here is the url http://www.riogrande.com/Product/The-Clay-Punch-Small-Circles/111595?pos=55
ReplyDeleteThanks Mary - I'll take a look at that.
DeleteVery interesting, informative post, Lesley! Thanks so much! (I see they tease you about the messy desk, but at least you STARTED the process with a tidy one! More than I can say for myself. Mine is in a perpetual state of clutter. UGH!)
ReplyDeleteI had a little chuckle to myself when I finally scrolled down to the second picture, my workspace looks like that one most of the time.
ReplyDeleteI just bought a ball end cake dec tool, I find it easier than a finger for pressing and smoothing clay in small moulds.
A great read Lesley, thank you
I love the things you use to make these. They are so creative. Your beads are beautiful. I would like to use some in my wire wrapping.
ReplyDeleteChandra
Good stuff Lesley!! I have been meaning to have a go at carving in Polymer Clay but never got around to it. I'm enjoying my scratch foam but I think I could do more intricate stuff with PC. Thanks for sharing!
ReplyDeleteI love the pics! My workbench looks just like this not long into a creative session! Your creations are awesome and would love to use them in my designs! Thanks for sharing!
ReplyDeletedj2isme@aol.com
Love this post! And sooooooo glad to know that I'm not the only one who works messy. In your case, the end result is absolutely worth it! :-)
ReplyDeleteI love the idea of using the silicone paper! I hadn't thought of that one. Since it's made to withstand high oven temperatures, it would be perfect for placing on a cup warmer. (Which happens to be a tool I can't live without when working with metal clay. Faster drying time.)
ReplyDeleteThat busy bench shot could be mine too. It sounds like most of us recognize it!
Yay for your blue silicon molds--and plant matter. I particularly love your pieces that must've come from them. However, I'm taking notes on EVERY innovative detail at your "messy" workspace--I think you've just tipped the scale towards my getting a kiln... Besides admiring your results, I'm jealous that your glasses seem to be in the vicinity of your work. Why can't I ever find mine?
ReplyDeleteThat made me laugh! I know where every tool is on my workbench, but I can't ever find my glasses.
DeleteLove the post Lesley! An unusual tool that I use is a brass screen. I extrude clay through it to make little squigly pieces. I use these pieces for texture. I do not own an extruder, but this works well for short pieces.
DeleteYep looks just like my work space too!!! Loved the insight into your work and picked up a few good tips from it!!!
ReplyDeleteI absolutely adore those owls!!! I really should and have a go and carving polymer clay sometime seeing as that is my material of choice!! Any recommendations for what to use to do the carving?
Great post Lesley! I love the before and after pic of your workspace. Lol! Love all the tips for working with clay. Thanks for sharing!
ReplyDeleteLesley you totally know I love your work and now having a piece in my possession and seeing the tools and process involved in creating them I love them even more!!!!
ReplyDelete