Wednesday, April 29, 2015

Headpin + Wire Chain Tutorial

Trying out new ways to use murrini headpins is fun. I've been thinking about different ways to use them as part of a chain. Here's one of those ideas, plus a tutorial so you can try it too. 

headpin chain necklace jen cameron glass addictions

Flush cut 1.5" sections of 14g wire. I used sterling silver, but feel free to use your metal of choice. 

headpin chain tutorial jen cameron

Using a chasing hammer, begin to hammer each end flat, flipping the wire over so hammering occurs equally on both sides of both ends. 

headpin chain tutorial jen cameron

Hammer the center section to slightly flatten it. The ends should flare out more than the center. 

headpin chain tutorial jen cameron

You can leave it as the hammer texture, but I chose to use a different stamping tool on each segment to create a different texture. 

headpin chain tutorial jen cameron


To check the texture, color with a sharpie, then use steel wool to remove the high spots. I will patina later, but once the headpin is added, you cannot alter the texture. So I want to make sure I'm happy with it first. 

headpin chain tutorial jen cameron

Once you know you're happy with the texture, make a dot where you want to add holes to each end and then punch the holes with your tool of choice. 

headpin chain tutorial jen cameron

Take the headpin you're going to use, and bend the wire 90 degrees as close to the glass as possible. 

headpin chain tutorial jen cameron

Slide the hammered link into the bend of the headpin. I tried to hold it in the smallest portion of the link (in the center). 

headpin chain tutorial jen cameron

The next part is very fiddley and difficult to photograph while performing the action. Wrap the wire as tight as possible one time around the link while holding the glass on the flat surface of the link. 

Next, wrap the copper wire around the base of the glass, between the glass and the wire. This helps to snug and stabilize. 

headpin chain tutorial jen cameron

Once you've wrapped the wire around the base of the glass, wrap the wire around the link tightly a couple times next to the glass (again, to help stabilize and snug in place). Then wrap in a more loose organic fashion up one side of the link, leaving space for a spiral. 

Depending on the size spiral you want, cut off any excess wire. I left about 1/2"-3/4" length. 

Take chain nose pliers and holding the end of the wire, create a spiral with the wire. When creating more than one link to the chain, you may want to pay attention to spiral direction being the opposite on each side. It's personal preference. 

headpin chain tutorial jen cameron

The photo below does a better job of showing how the wire is wrapped onto the link and around the base of the glass. 

headpin chain tutorial jen cameron

Here's the (almost) finished piece with a special pendant I got from Staci Louise Smith 1.5 years ago. I still needs to finish the clasp, give it a bath in liver of sulphur, and a massage in the tumbler (removing the pendant first!). I can hardly wait to wear it. 

headpin chain necklace jen cameron glass addictions

jen cameron bio

Tuesday, April 28, 2015

May Component of the Month Giveaway! Beaded Beads!

It's my turn to provide the May Component of the Month, and after taking a poll of the AJE team members, I decided to offer a pair of beaded beads! 

I've really enjoyed making beaded beads in the past using round wood beads and size 15 seed beads.  I had purchased this tutorial from Datz Katz on Etsy (Debra Schwartz) and really enjoy coming up with different color combinations!


These are the beaded beads that I will choose from. Want to play along?  Here are the rules:

  • I will give away 1 pair of beaded beads in the colors of my choice to each of 3 winners selected randomly from those who leave comments below this post. Your comment must include your EMAIL address and BLOG url so we can contact you should you win. Please note, this is required, I can't choose you if you don't provide both.
  • Please — only leave a comment if you can commit to creating a finished piece and blogging about it on the reveal date.
  • The names of the 3 winners will be announced on Saturday, May 2, 2015.
  • This giveaway is open to US and international countries, but please be aware that international addresses will have longer postage times… sometimes up to 3 weeks.
  • The blog reveal will take place on Sunday, May 31, 2015.
Good Luck!

Susan Kennedy


Monday, April 27, 2015

Learning to Sculpt

I don't sculpt.  I should say, I've never tried to sculpt before.  A few weeks ago I decided I would start teaching myself.  My cousin had been posting photos of her new pet hedgehog so I figured that was a good place to start.
My first two stoneware hedgies
These were my first two tries.  Not so great but not so bad as to make me quit trying right then and there (my complaining would suggest otherwise).  I took some advice from friends and kept going.
Silly stoneware hedgehog with tiny body
I don't know what happened here.  He came out with a big head and almost no body.  Ok, let's try some more.  
Two stoneware frogs and a hedgehog
This little guy made me happy.  His head to body ratio was better and I changed the shape of his mouth (also based on feedback from friends).  After I made a couple of hedgehogs I played around and made those little frog heads.  

Start of a stoneware cat face 
After the hedgehogs and frogs, I decided to try a cat face.  I made little silly-looking cat face charms a few years ago but decided it was time to up my game.  I rolled out a base and then attached two balls of clay for ears and began shaping them.

Cat face before eyes
I kept adding and taking away clay, adding more and taking some away.  Eventually I was left with a face with no eyes.  I couldn't decide how to make them.
Cat faces with two different types of eyes
Originally I made faces with the eyes on the left.  They didn't look right to me so I got more feedback and then made a change to one of them.  I carved out the eye area and then rolled two little balls and pressed them in.  I left the other one as-is just so I could see how the finished pieces would look.
Some of the finished test pieces with oxide and glaze
After all the pieces were sponged, bisque-fired, stained and glazed, I glaze-fired them and these were the end results.  I'm happy with the hedgehogs and frogs but the cat faces need some further adjustments.  

I started working on some more last week.  Here's a little hedgehog in porcelain.  I want to test a specific glaze on him.
Porcelain hedgehog
So my goal this week is to make some more in stoneware with the necessary adjustments and hopefully have a batch of them ready sometime next week.  It's been a fun (and at times frustrating) process trying to teach myself something as simple as these little animals.  I'm excited though to see what else I'll be able to create as I gain more experience.

Happy Beading!

Sunday, April 26, 2015

Sketching - Designing - Coloring?

Greetings, fellow bead addicts!  Since my last post I have been spending my time recovering from minor surgery.  Unfortunately this has not meant time beading...most of my bead boxes are too heavy for me to move around while I'm in the recovery period.  Here's some eye candy anyway!!!
What I've been up to instead is a bunch of coloring and thinking about what projects I have coming up in the near future.  Collecting and using new drawing and coloring utensils has sparked some new thoughts about the way I sketch and plan out my beadwork.  Now, I don't sketch every piece beforehand...or even most of them.  But when I feel my ideas are lacking or jumbled, often I reach for paper and pen to help organize my brain.  Let me show you the different ways I've sketched in the past:
I have random pages like these sprinkled through all my sketch books.  When I become focused on a theme or idea (like beetles or faces) I like to document all the different variations I can find - but in my style.  This gives me a jumping off point for all of my different art beads that encompass the the theme...or tells me if I need to break out the polymer clay and make my own.  I like to flip through these pages when I need an idea.
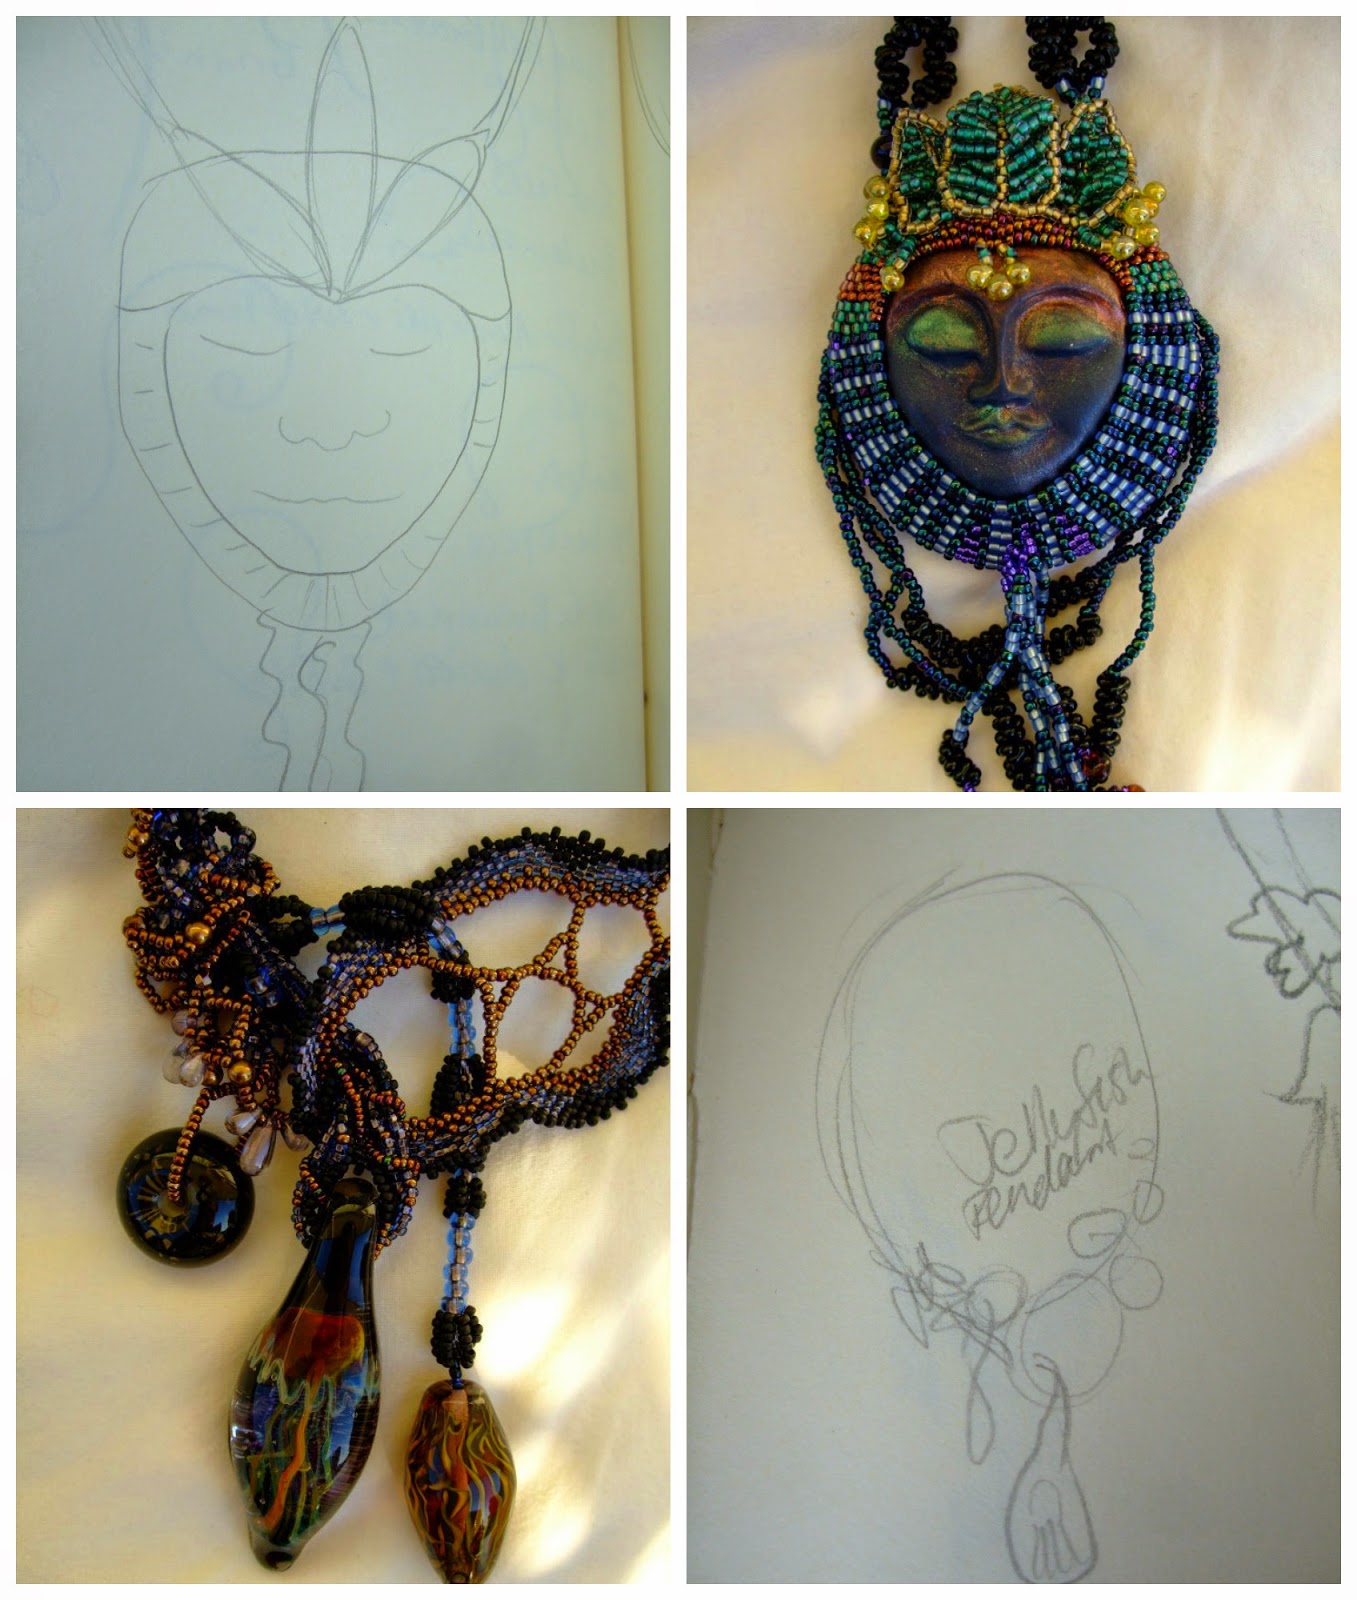
Sometimes a basic sketch leads to a finished design.  Both of these simple sketches were based around the focal (the face or the jellyfish).  As you can see, there's not a lot of detail or notes on these sketches...what you can't see on the rest of the page is all the other variations that I quick sketched for the same focal.  I like doing these thumbnail sketches - possibility sketches - when I don't have a specific idea for the focal in question.  They help me narrow down the overall shape of the design so I can start getting an idea of the seed and accent beads I might want to work with...and then usually, the beads take over.
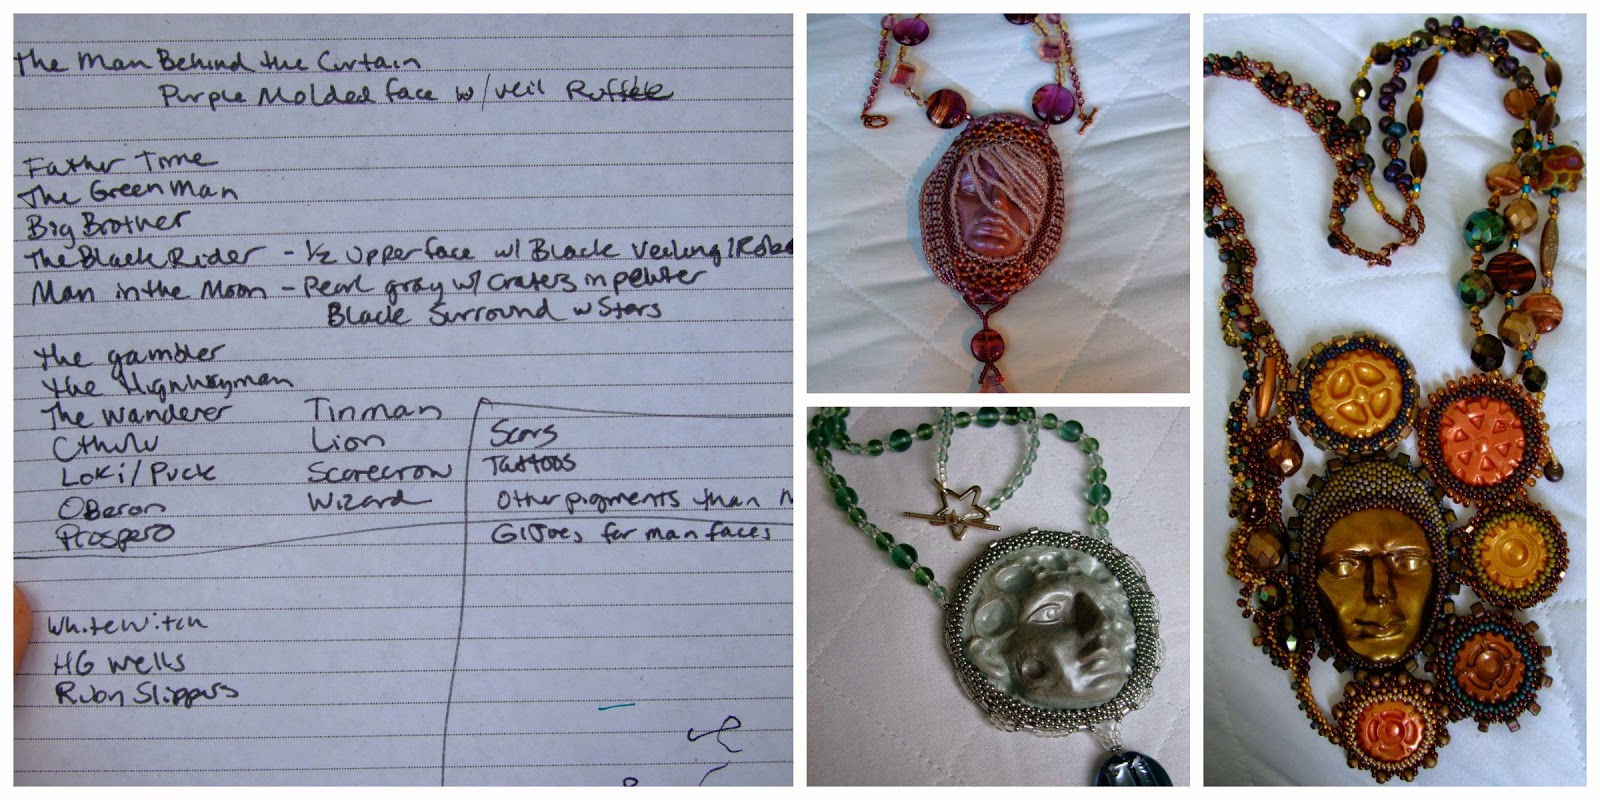
Man Behind the Curtain, Man in the Moon, and Man in the Machine were all conceived from this concept list.
Sometimes I riff with words - on this page you can see lists of concepts or titles that I was considering investigating.  On the left are three finished necklaces that were born from the sketchbook page!  You can see my brain went from fiction and folklore to Shakespeare and old country songs.  A stream of consciousness like this often leads me to design epiphanies.
On larger, more epic scale pieces, I often find the need for a more detailed sketch.  In these cases I try to make as many notes about color, shape, structure, and bead choice as possible.  This helps me to know what I need to pull out of my stash, if I need to buy anything new, if there are going to be any structural issues I'm going to have to solve, etc.
These are a couple of more current sketches.  On the right, shows some of the research I've been doing on prayer beads.  Writing down information like this helps to cement it into my brain, so that when I am out in the world and encounter beads, I will remember things like I need 108 of the same bead if I want to make a mala (Buddhist prayer beads).  On the left, shows a necklace design that I've got in the works, including a list of words that make me think of the focus of the piece - the color red.
What have these got to do with coloring?  Well, (in my copious online recovery shopping) I discovered the super cool blog over at Jetpens.com.  In becoming obsessed with coloring utensils and reading all of their guides and reviews, I found THIS post, a super cool guide to help students improve their note taking skills.  Well, I thought, why can't I apply this to my bead sketch books?  Oh, wait...I can!  I'm actually wondering now why the concept of using color to aid my design sketches never occurred to me before now.  Doh!  I also really like the idea of using sticky flags to note recurrent themes...perhaps I will use little blue flags for ocean themed designs, green for flora designs, pink for people, etc.  It sure would be neat to be able to pick up a sketch book and be able to quickly flip to the ideas I was thinking of...instead of having to flip through the entire book.  

Do you ever sketch designs?  How does it help you?  I'm not trying to say that you should sketch...I know a lot of people think they can't "draw", and therefore sketching causes more anxiety than it should.  The reality of sketching for yourself like this is that you are the only one your drawing needs to make sense to.  No one ever needs to see your sketchbook!  I find sketching most useful when I have either too many ideas, or not enough.  For some reason, putting a pen to paper just helps get my creative juices flowing.  If you haven't tried sketching lately, you might give it another go...you never know what ideas might emerge from the ink and paper!

Happy sketching (and beading...and coloring?),
Lindsay
Facebook
Blog
Etsy

Saturday, April 25, 2015

Inspiration from the East

I’ve always been a little bit in love with Japanese culture. Their dress, traditions and landscapes are truly inspiring. They seem to create everything just perfectly, from gardens to architecture to art. You can feel their heritage running through it. 

Every year they celebrate the flowering of cherry trees. The tradition is called Ohanami and means  'go and watch the Sakura blossoms'
I think it’s the sense of history that runs through their lives that I find most appealing. Traditions started thousands of years ago are still followed to this day.

Koishikawa Korakuen garden in Tokyo was created in 1629 and is now surrounded by office buildings.
And they proudly pass these traditions through to their children to keep them alive. Our house is currently joining in with some of their culture by watching Totoro on repeat… a wonderful animated story of two Japanese children who befriend woodland spirits and are rewarded with nuts and seeds to plant in their garden. The Japanese believe that the world is fully spiritually alive which I think is a wonderful belief to have!

Totoro and friends making the trees grow.
Their traditional dress is Kimono. It literally means ‘thing to wear’ 

A little bit fancier than it's name suggests!
They are made from silk and can be suited to any occasion, including weddings, geisha and maiko, and were even part of the armour worn by samurai.


Vintage Japanese doll in Samurai armour
Kimono have no pockets, so to carry their medicines, brushes, tobacco or money, wearers would either tuck them in to the sleeves, or wear them on their belts in hanging Sagemono (little boxes). The boxes were hung from a cord with ojime (a sliding bead) and the cord was passed behind the belt and held in place with a netsuke to stop it from slipping through. It’s the netsuke that particularly appeals to me. They are little carvings, made from wood, precious stones, ivory, shell or metal and could be seen as a giant bead. 

Wearing an Inro (medicine box) held in place with a netsuke.
Manjunetsuke
There are many different types of netsuke and are carved to represent all kinds of objects including flora and fauna, heroes, mystical beasts and daily activities and many were believed to be talismans. 

Plum Blossom Netsuke
Street performers
Ivory Dragon
Rabbit with the moon
I’m currently waiting for a book delivery from Amazon on some of the carving techniques which I hope will transfer to clay sculpting, but already inspired by these tiny carvings, I have been trying out some miniature designs of my own. 

New tools!
I recently treated myself to a new set of tools so tested them out on some porcelain clay. 

Forest Bead
Trees
My favourite subject - a running hare
They're not a patch on the proper netsuke, but I really like how they turned out, a little 3dimensional picture you can wear! I hope to have some free time to make more soon! 
Disclaimer: This post does not in any way condone the use of ivory. The sample shown is purely for art appreciation purposes and should be viewed in the context of the time in which it was created.