Thursday, August 30, 2012

FiberWire and a Fiber Studio Tour

About 6 months ago my daughter Nellie, a talented fiber artist and owner of Spin Culture and Yarn Sweet Yarn, started playing around with spinning her own fiber creations onto some of my jewelry copper wire.  The result was what is now called "FiberWire". It consists of copper wire as the core with hand-dyed fiber spun onto it. After spinning, Nellie felts it to secure the fiber snuggly onto the wire. When she showed it to me, I knew it would be fabulous for jewelry making. It can be wrapped, sculpted, used like cord, woven into chain, and who knows what else!


We put our heads together and decided to introduce it as a small initial offering in my shop (Starry Road Studio). I also took some with me to Bead Fest in Philadelphia a couple of weeks ago to see if any of my designer friends would like to try it. Lorelei Eurto was among the first to express interest and Nellie and I were thrilled with her recent designs using it! She tried some ideas I hadn't even thought of - so exciting! I can't wait to see what comes forth from other designers out there!


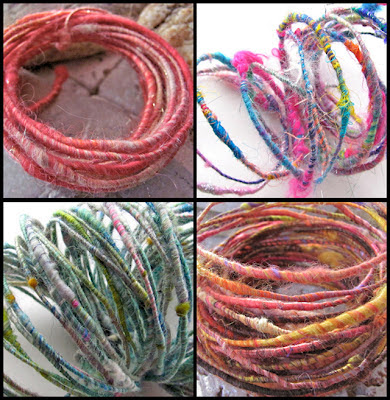
Jewelry made with FiberWire by Lorelei Eurto


I thought you might like a little peak into a fiber studio - to see where FiberWire is made.


First here's Nellie. The door behind her leads into her studio...


Coffee station - very important - and that large contraption in 
front of  the window is the drum carder - this is used to 
create batts. Batts are where wool is straightened and combed. 
This is also the stage where Nellie mixes colors of her own 
hand-dyed fiber together. These batts get 
spun into yarn and other goodies like FiberWire.


Here are batches of wool - some carded 
into batts, others (below) ready to be dyed and carded.
That little gizmo to the lower right is a spin dryer. 
After fiber is dyed, while still wet, it is put in there to 
have all the water spun out of it - kinda like 
a washer spin cycle only much gentler.


Pots of fiber getting dyed - don't worry we do 
not eat out of these pots - they are only for dying!


More dying going on - a different process using crockpots. 
Don't ask me I have no idea why.


Here are several lots of newly dyed and dried fiber. 
As you can see its all kinda jumbled, not yet carded. 
These batches will go onto the carder machine.


Here's a few batts created using variations in color, fiber type, etc. 
The color play is amazing to me - its as though Nellie is painting with fiber!
These and tons more are sold in her shop Spin Culture.


Finally, here's where the last step happens. 

This is the wheel. 

Nellie sometimes sits out on the deck to spin, 
with Casey (our dog) at her side.

I hope you enjoyed this little tour of a fiber studio!


Monday, August 27, 2012

September Component of the Month Giveaway: Clay Button Charm

It's my turn to host the Component of the Month!  Sadly, summer is coming to an end so I thought it would be best to offer up a component that would go nicely with the coming autumn weather. This month's component is a porcelain button charm in either my copper patina glaze or root beer glaze.  If they remind you of a vintage leather button that's because I made a mold of one from my vast vintage/antique button collection!

 Several AJE members will be participating in this challenge but I wanted to open it up to two randomly selected participants as well.  One of you will win a copper patina charm and one shall win a root beer charm.

How this challenge and blog hop will work (please read all the information below!):

  • I will be giving away 2 porcelain button charms via random selection to those that leave comments below.
  • Please include your EMAIL address in your comment so that I can contact the winners ASAP.
  • Only leave a comment if you can commit to creating a finished piece and blogging within the time given.
  • Winners of the two beads will be announced on September 1st.
  • The winners will not choose which color glaze they receive.  It will be a surprise!
  • This giveaway is open to US and Canadian participants due to a short turnaround time.
  • The blog reveal will be on September 30th.
  • If you already have one of these charms and would like to show your finished piece in the blog reveal, please email me (suburbangirlstudio2 @ yahoo.com) and I will add your blog to the link list.
Good luck!


Saturday, August 25, 2012

Art Charm Swap to benefit Beads of Courage

Glass Addictions by Jen Cameron 

Swapping art beads or art charms from other artisans is one of my favorite things, so I try to host an art charm swap every year. Last year I decided to combine it with a charity that I think every person in the art bead/component/jewelry world can get behind...Beads of Courage. If you've never heard of, or don't know much about Beads of Courage, please visit their website and get acquainted with it.

You can find detailed information and rules over at Glass Addictions. However, the basic concept to divide the participants into groups of 6-10 (depending on how many sign up),  you make a charm for everyone in your group (including yourself) PLUS one extra. You send your charms to me, I divvy up the charms, and keep the extra one to auction off.

I also challenge everyone to create their charms to fit a theme. Here's what I wrote about this year's theme:

Because the extra set of charms will be auctioned off to benefit Beads of Courage and the main beneficiaries of BOC are children, the theme for this charm swap is “laughter”. There is no sound as joyful, no medicine stronger, than laughter.

If you are interested, please read the blog post carefully so you know what you are agreeing to and what the dates are. The blog post also has my email address, which is how you let me know you're signing up. The deadline to sign up is August 28th.

Have a great weekend!

Jen

Thursday, August 23, 2012

Bead Fest: A Vendor's Perspective

Last year I decided to take the plunge and sell my beads at a bead show.  I figured Bead Fest was the perfect place to do it since I'd been attending as a buyer for years.  Go big or go home, right?

On Thursday, we headed out from NJ to the convention center.  It seemed so strange wheeling my stuff in and seeing everyone setting up their tables.  I admit, I squealed when I saw my empty booth.
 Getting the tablecloths, lamps and jewelry on the table wasn't too bad but figuring out how to lay the beads took awhile.  The tables they provide are much narrower than what I had practiced on at home.  Eventually, I had a layout I was happy with.
When I saw all my beads on the table I started to spazz out, thinking I didn't have nearly enough stock.  I slept that terrible feeling off that night.

When the doors opened on Friday morning I felt so anxious.  I really wasn't sure what to expect.  I put on my biggest smile and waited...  It wasn't long before my booth was hopping.  I had friends, online friends and total strangers come over.  It was pretty cool when people held up their lists, pointed to my business name and said they came to see my beads.
Funny faces greeting customers.
Friday ended up being a wonderful day for sales AND a great day of meeting new people and making connections.

I shared the booth with my bead partner-in-crime, Jan Onipenco/Molten Mayhem.  Here she is with Colin (aka The Suburban Guy).
Colin was a wonderful help.  He handled all the transactions and provided Jan and I with much needed shopping/social/bathroom/food breaks.  We really couldn't have done it without him.  He was an important part of this well-oiled bead machine.

So, what kinds of important things did I learn during this experience?  Well for one, you never really have any clue if you have enough or too much inventory.  It's a learn as-you-go thing.  Friday was a bang-up day for business but then Saturday slowed and Sunday was almost a dead stop as far as sales were concerned.  Make what you can make.  You can't ask for more than that.
The reality of what it looks like inside your booth.
  
Also, smile at your potential customers.  A warm smile welcomes people AND you never know who might be shopping your table.

While I didn't make my goal, I did do pretty well for my first time out.  I also made some excellent connections and just had a real fun time.  I certainly recommend every bead maker try a show at least once.
Keep the cloth down and no one will ever know.
It was a great experience and I can't wait to do it again next year.

Tuesday, August 21, 2012

Everyone Starts Somewhere

I recently received an Etsy convo from someone who really wants to make lampwork beads, but is intimidated. Not because of the flame or an explosion (although those are pretty good reasons...). She was intimidated by those who are already doing lampwork, already creating beads that are amazing.

Who hasn't felt that way? I feel it sometimes when I see other lampworkers' beads.

So I thought doing a blog post showing photos of my first beads would be fun (and very very scary). But then I decided it would be more fun to invite everyone to share their first beads, jewelry, whatever media you happen to work in.

Write up a blog post about your first pieces, share photos, follow the directions towards the bottom of this post for how to link up for the blog hop. We want to see part of your journey. FYI~I will check and comment on the links. If you link up something totally unrelated, I will delete it. 

I will be sharing my photos later. After searching for the incriminating evidence, I realized a hard drive crash a few years ago must have eaten photos of my first beads. This means I have to go through the torture of retaking the pics. However, I want you all to get the party started. I will be along shortly.

ETA-a teaser photo for my first ever lampwork bead and piece of jewelry made with that bead:


When you have written your blog post, follow these directions to link up below:


1. Write up a blog post including photos of some of your first creations; whether it's beads, jewelry, even painting. Also show some recent work to demonstrate how far you've come. Include how long you've been working in this particular medium. 

2. Copy the direct link of your blog post.

3. Come back to this post and scroll to the bottom where it says "This is a Blog Hop" below that is says: "You are next...Click here to enter." Click on it.

4. Follow the instructions to add your blog post.

5. Do not forget to select which photo from your post you want as the thumbnail or linky tools will select something random. 

6. To add the blog hop to your post, click on the "get the code here" below the thumbnails and below "what is a blog hop". Click it and copy the link provided to add the blog hop to your blog (this is in lieu of placing a list of blogs on your blog post and it updates itself automatically).

7. Add the link to your blog post in html mode and republish. 

Make sure you visit all the other blogs featuring their first pieces:


Monday, August 20, 2012

Inspired By Life at the Lake Design Challenge Reveal and Blog Hop

A few weeks ago, I shared this photo and challenged you to create a piece inspired by it:


Untitled

The photo was taken just outside the back door of our "under construction" lake house (which we will close on sometime in the next 1.5 weeks depending on the speed of the tile installation team-originally we were supposed to close on Wednesday). Someone commented on my Glass Addictions blog that this flower is called Marsh Mallow and is the origin for...you guessed it....marshmallows. While the flowers are beautiful, I am not a fan of marshmallows except melted in a fire and made into s'mores. But I live with a bunch of crazy people who think marshmallows are a food group.


How to join this blog hop:


1. Create something inspired by the photo and blog about it.

2. Copy the direct link to your blog post.

3. Come back to this post and scroll to the bottom where it says "This is a Blog Hop" below that is says: "You are next...Click here to enter." Click on it.

4. Follow the instructions to add your blog post.

5. Do not forget to select which photo from your post you want as the thumbnail or linky tools will select something random. 

6. To add the blog hop to your post, click on the "get the code here" below the thumbnails and below "what is a blog hop". Click it and copy the link provided to add the blog hop to your blog (this is in lieu of placing a list of blogs on your blog post and it updates itself automatically).

7. Add the link to your blog post in html mode and republish. 

Monday, August 13, 2012

Inspired by Design Challenge...Life at the Lake

Finish this sentence: August is.....

If you finished the sentence how I would finish it, it would be something like August is (family time, vacation, last days of summer, back to school, wistful, busy, party time, meteor showers) It's amazing how much my family is trying to crunch into a short time. I'm hearing the same from friends...online and in real life. The AJE team is feeling the crunch too. 

I am making the executive decision to delay the inspired by blog hop one week. So here's your chance to take a look at the inspiration photo and play along by creating a piece of jewelry inspired by the photo below and using at least one handmade component (by you or by someone else)
Untitled

If you've already completed it, GREAT! We can hardly wait to see it. If not, you still have loads of time :-) 

Never stop creating...

Jen

Monday, August 6, 2012

Metal Clay & Color Book Review


I recently purchased Metal Clay & Color by Mary Wohlgemuth on Amazon.
I'm always trying to find ways to add color to my metal clay,
aside from adding other art beads which I love to do!

This book has a ton of ideas I'm looking forward to trying a few of them.

Most of the projects are geared towards silver Metal Clay but I look forward to experimenting and seeing what works for copper since that's mostly what I do these days.

Patricia Kimle showed Filled Frame Beads using polymer clay and silver.
This is definitely one I can use with Copper.
I especially like that she shows this technique using several different shapes.

Patricia Kimie

Sandra Butchko project, Metal Leaf Magic
uses variegated metal leaf embedded in UV Resin.

Sandra Butchko


Pushing Polymer by Cindy Silas,
is a beautiful piece and I think I'd like to try it too!

Cindy Silas


And I think my favorite project has to be
Prairie Blossom by Barbara Briggs.
Not only for the color she adds by making polymer beads but I really like the silver bead she made.

Barbara Briggs

To be honest the list goes on, there is a ton of great and varied information in this book!
I am happy I purchased Metal Clay & Color
it's given me so many ideas I look forward to giving them a try.

Kristi


Friday, August 3, 2012

Your Etsy Shop: Keeping it Organized

As I'm preparing for Bead Fest, organization weighs heavily on my mind.  The other day I got to wondering how everyone else stores their inventory.  Not for a big show but just for your day to day Etsy/Artfire/Big Cartel shop.

Awhile back I was surfing Nile Corp. when I found this cabinet meant to hold standard size trays.
I knew this would be perfect for keeping track of all my inventory.  Up until then, I was using printer's cabinet trays that I had found while antiquing.  In theory, they should have worked well but since I didn't have an actual printer's cabinet to keep them in they weren't that great.
All my pendants and charms are stored in small plastic bags.  Everything is then sorted by clay type (stoneware, porcelain, raku) and then by color.
When someone places an order it's so easy for me to find and grab the correct pieces.
I will say though, this particular cabinet was a bit pricey and did come slightly damaged.  Nile Corps customer service was somewhat difficult to deal with but they did refund me some money for the damage.  All in all it's a great way to keep my shop inventory organized.

How do you store and organize your shop inventory?

Thursday, August 2, 2012

Book Review - Skunk Hill Studios


I know that most of you that do not play with seeds will not know who my friend Karen Williams of Skunk Hill Studio is.  Well let me tell you a bit about her.  I have been following Karen on her blog Baublicious for a couple of years.  She is a freeform goddess.  She lives in Seattle and teaches at Fusion Beads and she will be teaching her Lacework Cuff at BeadFest in Texas this year.  

Now I will tell you that I sort of still consider the word Freeform a swear word but she is working on that with me.  So she wonderfully sent me her book "Freeform Peyote Beading"  Now I was totally nervous in accepting this book because of my fear and aversion to anything freeform so when it came there was excitement and apprehension to say the least.  Oh what a book it is.  

Here is Karen's definition of Freeform...

"Freeform peyote is an abstract, organic art form based upon color, value, texture and line; each piece a unique creation unsuited to specific instructions or pattern."

Okay so any of you that know me know once I read that I thought no way, no how, not going to happen.  I will never be able to start without a pattern.  Okay Karen what are you thinking.  So since it came just before I had to take my little guy to swim I thought okay I will read on.  

Here is where she has changed my outlook on not only freeform but jewelry making in general.  In her description of design element, color values and principles of design I was completely blown away at what she taught me.  Here is a snippet of one of my favorite pages...

I could not get a grasp of using a color wheel.  I read about it, saw how others used it and still could not understand.  She has cleared up not only my confusion with the color wheel but color values, depth and contrast that I never thought I would grasp.

So I thought sharing this book with all of you would be great because it not only tells you about freeform but it can also bring the artist out in all of us.  

Thank you so much Karen for sending me this amazing resource and yes maybe just maybe I will attempt a freeform piece!  LOL

Kristen