Showing posts with label metals. Show all posts

Friday, February 5, 2016

Artist interview: Jane Salley

Hello - Jenny here. As some of you may know, I had the pleasure of an art retreat to start this year. Held at Hacienda Mosaico in Puerta Vallarta, Mexico - a sublimely gorgeous location, gracious hosts, all needs anticipated and provided for... a true creative haven. The class I took was with Richard and Jane Salley. It was creatively challenging and invigorating, and you can read more in my blog. I am pleased to bring you a two part interview with the dynamic duo! 
_____________________________________________________________________
The lovely Jane Salley

Please introduce yourself! Do you have a descriptive term that encapsulates your style?

I’m Jane Salley, I make lovely things for personal adornment, these days it’s mostly jewelry but I design and make clothing and handbags too. I refer to my style as bold and whimsical.

For anyone new to you and your work - how did you get started in jewelry making? Are you formally trained? (And as an aside - what was your career path prior to this?)

Since childhood, I’ve made things to make me or my surroundings prettier, I can’t remember a time that I wasn’t sticking “pretty” things together to wear. Sometimes it was a necklace, sometimes a hat, or maybe a whole dress. When it came time to make a living I chose to train as a dental laboratory technician. It fulfilled my need to make things and it felt so good to see someone smile when they had their new dental restorations in place. Many of the skills I used in the dental laboratory translated to jewelry making, such as wire bending, soldering and polishing.

Older work: from her ArtBliss class in 2011 and during her tenure on the Ice Resin Design team. 

What is currently sparking your new ideas? …do you ever suffer from creative droughts and if so how do you deal with it to stay inspired?

My latest thing is setting stone, especially the sparkling ones. I very seldom suffer from a creative drought, my problem is I have too many ideas all competing to be brought to fruition. I will admit that some of them aren’t practical, some are way out of my skill range, and a few stick around and become reality. If I am having a hard time coming up with something to make I just start cleaning and rearranging my studio. Then I come across one of the lovely (or odd ball) things I’ve bought or collected and I’m inspired - I think of it as The Muse nudging me. By the way, my studio never seems to get cleaned up.

What are you favorite mediums/materials to work with?…do you have a favorite or unusual tool?What are you working on now? What materials would you like to explore in the future?
When did you start integrating found objects into your work?

I like silver because it is so easy to make a stunning piece of jewelry with it, but I have a real affinity for copper and brass. I like etching and layering different metals. I enjoy the challenge of attaching them together with a found object in a way that is esthetically pleasing and appropriate for each material. The first jewelry workshop I attended was taught by Keith LoBue and it was all about found objects and cold connections.

My new favorite tool is the hydraulic press and I hope to find ways to use what the press can do in interesting ways, otherwise its just a really big, expense way to avoid sawing.

Mixed media jewelry (c) J. Salley

Your husband, Richard, travels often for teaching/classes. When you do not go to assist, or teach at a venue yourself - what occupies your time most when you are solo?

I don’t mind solitude at all, so when Richard's away for a few days I’m quite content to make jewelry and have the soldering bench all to myself.

What short piece of advice would you give someone trying to find their creative voice and push forward?

My first piece of advice is to find something that speaks to you and learn to do that. Develop skills and knowledge in that area, take classes, read books, watch videos about the thing for which you are developing a passion. I say this because no matter how much natural talent you have, if you can’t handle the materials successfully you will never be able to express yourself fully. Last of all practice, practice and practice, and in that practice you will find your style and your voice. Remember your “practice” may be making a dozen rings, practice doesn’t have to be the jewelry equivalent of practicing the piano scales.

Mixed media jewelry (c) J. Salley

What artist ( living or dead) would you most like to meet and have dinner with?

Paul Revere, he was an amazing artisan. He was also a brave and bold man who was stood for what he believed in and it change the world.


Where can we see your work?

My work can be seen at GVG Contemporary Gallery in Santa Fe, New Mexico and on FaceBook.

Mixed media jewelry (c) Jane Salley

From Inside the Actor’s Studio: (short and simple)

What is your favorite word? Joy
What is your least favorite word? Can’t
What turns you on creatively, spiritually or emotionally? I see beauty in what’s around me and if there is none I do what I can to create it by thought, word, deed, or Art.
What turns you off? Arrogance and pettiness
What profession other than your own would you like to attempt? Actor - I don’t know if I’d be any good
What profession would you not like to do? Corporate middle management
If Heaven exists, what would you like to hear God say when you arrive at the Pearly Gates? “Welcome home, my dear child.”

Thank you Jane! Your work always inspires this mixed media woman. Please stay tuned for Part 2 with Richard Salley ( date TBD as he is headed to teach in Tucson!)


Wednesday, January 13, 2016

No excuses soldering

So I decided this year that I will challenge some of my self imposed restrictions. Excuses I make... obstacles I present to myself. One of these is soldering. I studied metals in college. I fabricated things in sterling from simple to complex. Why aren't I soldering NOW as my work cycles back to jewelry from ceramic sculpture? Excuses.

All materials present and accounted for... note dust on pickle pot. 
Excuse #1 - The tools and materials are all so different from those that I learned on...
Sure they are! I was in art school 25 years ago! I learned on large propane and oxy/acetylene torches in a fully outfitted metals studio. We had a separate room for pickle, polishing and sand blasting.

As seen above - I HAVE the materials I need for an in home/studio soldering set up. Soldering pad, charcoal block, torches, pickle pot... Flux, solder... OK. So no excuses here.

1. Caroline's simple yet effective set up. 2. Niky's portable, fully functional set up. 3. Lesley's permanent soldering station
Excuse #2 - Safety and space
The picture above is a compilation of images from my dear UK team mates showing their soldering spaces. Umm. if Niky can do ALL she does in like 6"... OK no excuses there. 

Safety - Protect your work surface. Have a fire extinguisher in the studio. Don't wave the torch around... Hmm. I can do that. So no more excuses there. Lets set up a space shall we?

Ok - let's make this happen. 
What to make? Hmm. I have some great bangles from Nunn design that need charms. Yes - something good to wear to MEXICO when I take the Richard and Jane Salley class of a lifetime. Something to remind me that I am there to learn/relearn soldering.

A 2016 charm with soldered bail. a sweat soldered crescent. and sterling spiral. OK. Lets do this.

3 charms ready to assemble. one soldered loop, 2 sweat soldered layered pieces. 
DONE! Excuses vanquished. See below - pickle and patina! Not perfect,but a personal success. 

pickled and patina - NOT perfect! 

An auspicious start to the year... 

* Footnote - since originally writing this post I have spent that week in Mexico and SOLDERED ALL THE THINGS. Victory is mine! Details and eye candy coming soon!

Saturday, October 5, 2013

Coming full circle...

Last weekend I had the pleasure to attend the ArtBLISS retreat for the fourth time! (Four of four - I haven't missed one...) The weekend for me is a chance to replenish, renew, and feel reinvigorated. I try to select classes that will challenge me and inform my body of work. This year I was taking "Three Ring Circus" with Richard Salley and Jessica Jordan; two of the three days of ring classes if not all three. I have worked with Richard before; having met him over 10 years ago at The Shepherdess in San Diego. (Any chance I could get, actually...) and I had the pleasure of meeting Jessica online and recently, briefly, at Beadfest. I knew the weekend was going to be great - but ... 

Spinner band textured and soldered. Day 1. 

I have a tendency to drop into conversation that I studied metal smithing in art school. It was one of my areas of concentration. Like I am name dropping someone famous... while I feel that was crucial to my development as a designer, to creating my sense of self as an artist... I haven't soldered since. Yes, you read that right. 

Bezel soldering demo. Richard in motion. Day 3. 

Why not? When I learned, torches were attached to large tanks, chained to the tables in the studio. Propane. Oxy-acetalyne. I learned all the basics, and love sawing to this day. But the large tank set up wasn't applicable, or acceptable to apartment living after college. And now, 20+ years later, the technology has changed so, making the tools readily available and safe for the home studio. Where to begin? What to buy? Add to that a love of cold connections, the challenges inherent in problem solving the right way to attach and integrate pieces together. Sans glue, of course. Glue is a four letter word. So I can explain away the absence of soldering in my life. 

Enameled focal, bezel, sterling ring shank. Day 3. 
Needless to say this weekend was all about the soldering.
Bezel soldered. Ready to design and saw. Day 3. 

Test fit of enamel. Tube setting in place. Day 3. 

Day 3. Final pieces. 
The classes were a huge success. Student left with 2-3 spinner rings Friday. They were all diverse, and proudly worn. Sunday was triumphant as well - new friendships formed, assistance lent as needed... and the magic happened. Rings adorned dirty fingers, pendants planned for future necklaces.

Top row right - purple and green ring by AJE teammate Melissa Meman

I felt excited, exuberant, giddy even. I was rejoicing - strong word, I know - at being at the torch again. Becoming comfortable with this or that, remembering and accessing long filed away information. It wasn't until the ride home that it hit me even harder. (The ride home is always bittersweet and a bit sad. After a weekend of camaraderie and creating it can be deflating to head home to the mundane. Knowing you won't see these friends in person for a while...)

I got a little emotional, I will admit - to have back what I had thought was gone. Maybe it was not  gone, but not currently accessible. This may not make sense to everyone - if you recently learned _____  ( you fill in the blank ) skill and enjoy practicing it and continuing to learn - that is very different from reawakening a passion. My classmates were happy with their class, their acquired knowledge, the experience, and their pieces. SO was I - but it was deeper than that. It felt like a part of me that I had lost was returned.

But - enough philosophy! I have an order to place, and pieces to sketch... its an interesting journey. As I pick up seed beads to do a bead embroidery piece I am ordering solder and CZ's. Wishing you all a day with joyful contrasts and rejuvenation!


Jenny


www.jdaviesreazor.com


Friday, June 7, 2013

The Evil Fear Bully

♫•´**•♫•*♫•*♪  "Long, long time ago..." (cue Don McLean)  ♫•´**•♫•*♫•*


About 30, or so, long years ago, I started my jewelry adventure by taking some metalsmithing courses at a nearby community college. I really enjoyed it and within a few years I had a pretty nice metalsmithing workshop set up.  I made quite a few earrings, a bangle bracelet, a nice ring with an oval moss agate in it, and a belt buckle.  I only have 2 pictures from that time, (excuse the picture quality).

I made this belt buckle for my brother.  Pretty dull design concept, if you ask me, now.


These were earrings for my mother.  These turned out pretty and I stenciled the little wooden box with my mother's initials and some heart decorations.


It was fun to make gifts for people, but I had a hard time coming up with design ideas and eventually I just stopped metal work and sold all my equipment.  Over the years, I tried my hand at several other crafts, but once I started beading, all other crafts took a backseat to my passion for beads.  

Fast forward through the years. In high school my daughter, Naomi, took metalsmithing classes from the same person who had taught me at the community college nearly 30 years ago. Naomi took to metalwork like a fish to the water.  She went on to study metals at the University of Washington and she is now a professional metalsmith.

Recently, I've become interested in exploring ways to use metals to enhance my work with beads.  So for Mother's Day this year, Naomi gave me a jeweler's saw, blades, a bench pin, some metal and an offer to help me get started.  Or more accurately, she offered to help me get re-started. 


I hadn't done any sawing in over 2 decades and I felt as rusty as an old saw blade. Frankly I was a bit afraid of trying this again.  Fear of failure dogs me like a shadow. It often seems easier not to try, than to risk feeling like a loser.  Do you ever get those feelings when you'd like to try something new?  Can you feel the fear trying to hold you back? 

My mother had a lot of artistic potential, but  poor self-esteem and fear held her back. That makes me sad, so when I get these familiar jitters, I just grit my teeth and make myself move forward.  I do it in honor of my mother and I do it for myself and for my daughter Naomi.  

Fear is an evil bully and I will fight back!  I can fight back by openly sharing my successes and failures, knowing that both are necessary ingredients in the process of learning. Maybe you jump into everything with both feet.  If so, hurray!  But if you are a bit of a shrinking violet, you have to face the Evil Fear Bully head on.  We can do it together.

Soooo, last week I headed up to Naomi's place and she gave me sawing lessons.  I had beginner's luck on the first piece.  It wasn't always easy to saw accurately, right on the line, but there is nothing wrong here that can't be evened out with some trimming and filing.


Next try.  Ha!  Total mess up!  This one is not even salvageable. A few years ago this would have left me feeling dejected.  But now, we just had a good laugh about it and I tried again.  I'm going to keep this piece in a little shrine I have in my studio, so I can remember where I started.


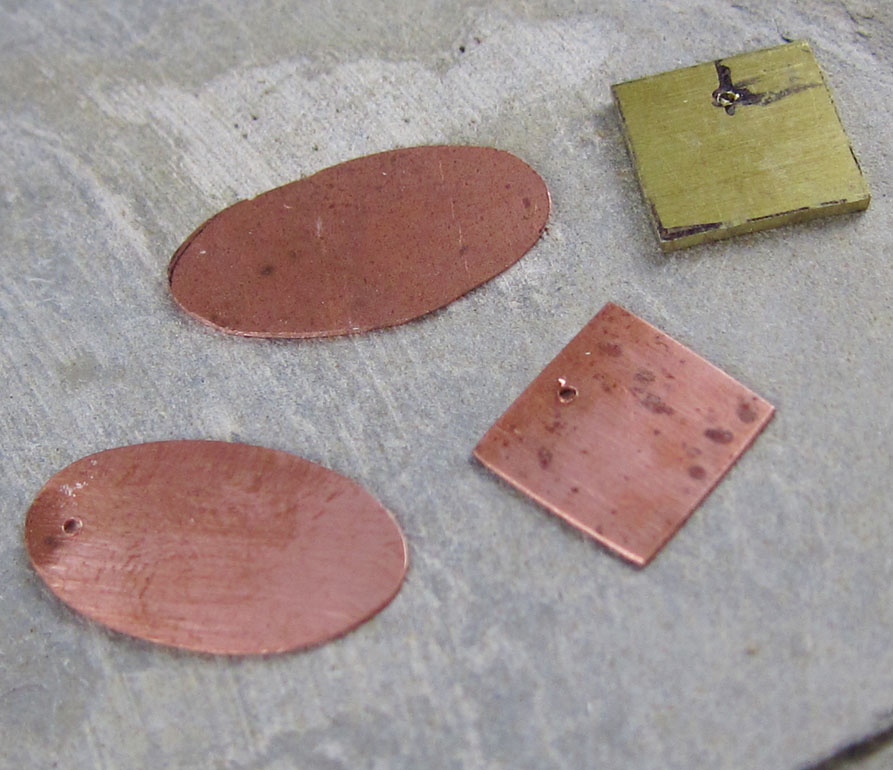
I cut out several shapes that day.  I wanted to learn how to follow curves on the ovals and how to saw angles, such as those in the squares below.  You can also see that I worked with two different gauges of metal, to get a feel for that, too.


Next Naomi showed me how to fix up the rough edges and sand it smooth.  Naomi evened out most of the uneven edges on the first shape I'd sawed out and then I sanded the edges smooth.


But on this copper piece, I did all the cutting and the finishing myself.  I was so proud of this little square.  LOL!


Before I left that day, Naomi used her Dremel to drill holes in my little collection of cut shapes.


On the way home I bought 3 metal stamps and I'm collecting stuff around the house that I can hammer on to add texture.  That's my agenda for the next two weeks:  texture and patina.

Are you gung-ho to try new things, or do you get hung up in fear of failure?  How do you conquer the Evil Fear Bully?  Share your thoughts and experiences, so we can encourage each other and grow.

Linda
Linda Landig Jewelry - ArtFire 
Linda Landig Jewelry - Etsy 

Saturday, April 20, 2013

Saturday Share...Big Shot, the Sequel!

Back in February, I shared some of my experiences with using the Sizzix Big Shot using their embossing folders.


Several of you commented, asking if the Big Shot could be used  with other materials...brass design plates, found objects, etc.  My curiosity sufficiently aroused, I have since been playing around here and there with using other things besides the suggested embossing folders to create texture on metal with it. So, I thought I would share my findings with you today!

As a standard procedure before running a piece through the Big Shot, I anneal my metal with my torch (I used my Lenk butane, but any torch will do), so they would be as soft as possible.

First up, I wanted to try some design plates I found a while back on the cheap at Michael's.  I bought them to try and hammer the texture into the metal, and put them away...I actually forgot I had them!

I experimented with 3 different textures, to varying degrees of success. At the top of the photos are the plate I used, and the bottom is the outcome.  The plates were 2-sided, opposites...indented on 1 side,  raised on the other.  I used the raise side on all 3 tries.


It worked, but it didn't really give me a clean impression...sort of hazy, whch of course could work, depending on your design.

Next, I decided to try some burlap fabric that I had.  I have hammered fabric and screen wire textures in before to mixed success, so I thought I would give it a go.


Again, not a terribly clean impression, but I sort of like it.

The next pieces used a couple of steel components I just got.  The filigree rectangle actually made one of my favorite textures.  Doesn't really look like the filigree design, but it is a cool texture...sort of like concrete block!  The leaf only gave an outline, but it works!


Tracy over at Cinnamon Jewellery (I absolutely love her work!!) commented that she was etching pieces to use as texture plates, so I decided to try that as well.  I used a piece I etched a couple of weeks ago.  I think it needs to be a deeper etch though.  As you can see, it is pretty, but not very prominent.


Well, there you have it.  In my humble opinion, while these worked to a certain extent, it was pretty hard on the Big Shot.  I had to add more layers to get enough pressure to impress the design and it took more muscle.  I may have warped the top plastic layer of my cutting/embossing pad.  The embossing folders that are designed to work with this machine, since they have 2 sides with an interlocking design, tend to give a more defined impression.  I will probably stick to using a hammer and my bench block with the metal texture plates.

But wait, last minute light bulb...what about using a wire design?  I found a copper wire free-form reject in my scrap bin, and decided to give it a go.


Hmm, this actually worked pretty well.  Bonus, like the embossing folders, you get an inverted design on the other side.  I like them both...this is something I will definitely incorporate!

Well, there you have it!  It is possible to use the Big Shot with design plates and other texturing materials, but make sure to anneal the metal really well,  tape the materials and the metal blank to the machine, so that it doesn't slip around, be mindful to make sure you aren't abusing your machine with too much force, and have fun!

Let me know if you have been experimenting with the Big Shot or something similar since my last post...I would love to hear about your results and opinions!

Melissa Meman
Melismatic Art Jewelry
Art. Life. Love.


Saturday, March 23, 2013

Saturday Share - My favorite alternative to LOS

My post today started out so different than it ended up!  I was very inspired by our own Jenny Davies-Reazor's look at the folklore of owls, and all the sweet owls she showed, that I had an idea for an etched owl pendant/necklace that I was going to roll out.  Of course, this idea came late yesterday...yes, right on schedule for a procrastinator who flies by the seat of her pants.

Where is said pendant, you ask?  Uhh, suffice it to say it did not come to pass.  I did design and etch...maybe I will write about that on my personal blog.  For today's purposes, though, I was not happy with the outcome. 


So, today, I decided to share with you my favorite alternative to our beloved liver of sulfur (LOS).  If you know my work, you know I patina everything!  I haven't really embraced the wonderful colors of patina out there...I have tried Vintaj alcohol inks, but haven't ventured into some of the other wonderful patinas that my talented friends use regularly.  I have always been a LOS girl.  I love the vintage or antique quality I get on sterling and copper and LOS delivers that everytime.  But what about on brass, bronze, or other base metals? Not so much!

My "go to" solution for these metals is Novacan Black.  I was introduced to it by Stephanie Lee, when I took her Homesteading class online and later, when I took another class with her at ArtBliss.  If you are familiar with Stephanie's gorgeous mixed-media work, you know she uses hardware store lead-free solder and other base metals a lot.  To get the beloved antique finish that LOS can't deliver on these metals, she uses the Novacan Black.  To be honest, I have never even tried the other ones out there, as I took her at her word on this one. 


This brass disk has been cleaned up after etching, no patina.  


Here are some different pieces (I used the other because I forgot to photograph these raw, duhhh) after I used the Novacan Black...I usually put a bit in the bottle cap, and use a q-tip to rub the solution on.  You may have to change the q-tip frequently...when it starts turning black, I have found it doesn't deliver the solution as readily.  Let it dry completely.

Remove the amount you want with 000 gauge steel wool...available at your local hardware store.


Here are my afters...a cool thing about this kind of solution, is that you can go back in for another layer until you get the depth you desire.  These haven't been tumbled yet, but after that I will probably polish them with Renaissance wax to seal.  Yes, that is the very owl I tried to do...part of him I love, and other parts, not so much!  I'm going to keep trying, though!

The one thing Novacan doesn't work on very well is sterling...it just doesn't go very dark.  If I am using mixed metals, like with my Molten Morsels, I sometimes use LOS first, then go back over the metals that don't change with the Novacan.


So, there you go!  What about you?  What "go-to" patina do you use?  Please share!!

Oh, you can usually find Novacan at stained-glass suppliers, because it is used a lot to patina the solder on stained glass pieces.  It comes in other colors, but I have only tried the black.

Melissa Meman
Melismatic Art Jewelry
Art. Life. Love

Friday, November 23, 2012

Books - under your tree?

Hello, my name is Jenny and I am a bookaholic. I have a Kindle -  I am moving into the current technological age... but some books are meant to be handled, fondled, browsed, and treasured. My in-laws are finally adjusted to the fact that books thrill me for Christmas gifts. For years they would get things from my wish list and then worry I would be disappointed with books under the tree. Nothing better than spending Boxing Day ( Dec 26th) curled up, coffee in hand, sleepy dog at my feet - and a brand new book.

Here are some favorites from my fellow AJE team members, and some we wish were under our tree....


The History of Beads : From 30,000 B.C. to the Present - we all all creating in a form that dates back to the dawn of man, and woman. It is fascinating to see the beads evolve through time, and yet stay universal...


The Penland Book of Jewelry: Master Classes in Jewelry Techniques 


I had the good fortune to study Ceramics at Penland one summer. I would recommend the experience to anyone serious in their medium. It is a transformative experience. And you are taught by the best in their fields...

Enchanted Adornments  by Cynthia Thornton

I have this book, and I love it! Cynthia works magic in a variety of mediums. Inspirational and inventive!


 The New Encyclopedia of Jewelry-Making Techniques: A Comprehensive Visual Guide to Traditional and Contemporary Techniques
 Recommended by AJE team member Lesley Watt - this one looks interesting!


PMC Technic: A Collection of Techniques for Precious Metal Clay by Tim McCreight - also recommended by Lesley - McCreight is a moderm master! Metalsmith who embraced precious metal clays...


Heat, Color, Set & Fire: Surface Effects for Metal Jewelry by Mary Hettmansperger   I personally recommend this book, and I know its on team mate Francesca Watson's wish list!  Phenomenal ideas for patinas, color applications - a must in my mixed media studio. 


The Jewelry Architect: Techniques and Projects for Mixed-Media Jewelry by Kate McKinnon - highly recommended by Francesca!


Creative Bead Weaving: A Contemporary Guide To Classic Off-Loom Stitches by Carol Wilcox Wells - I am not a seed beader, but this looks to be a comprehensive tome!


Masters: Beadweaving: Major Works by Leading Artists - also by Carol Wilcox Wells - a seed bead book of eye candy and inspiration. 


500 Raku: Bold Explorations of a Dynamic Ceramics Technique  - recommended by AJE team mate Karen Totten - although not beads or jewelry - a very inspirational book! I personally love the entire 500 series that Lark books publishes!


1000 Glass Beads: Innovation & Imagination in Contemporary Glass Beadmaking - eye candy of the lampwork variety. I find books or fellow artists work very inspiration, as a jumping off point, of course - not to be derivative, but to be inspired and put MY spin on things...


The Art of Enameling: Techniques, Projects, Inspiration by Linda Darty - a gorgeous comprehensive book on traditional enameling techniques. 


Amulets and Talismans: Simple Techniques for Creating Meaningful Jewelry by Robert Dancik - Confession - This is the most "my style" on the list. I have worked with Robert before, I create with similar goals in mind, creating talismans with meaning and intention. So yes - I am a little biased. 


Foldforming by Charles Newton-Brain
From Francesca's book shelf! I know many metal workers who are using this technique to amazing ends!


So what books do you think YOU would like to see under the tree? 


Disclaimer: I am receiving no special consideration from Amazon or the authors mentioned here. No money, free loot, jewelry, or thanks and appreciation. I simply love books!

And please feel free to browse our shops. As the season starts today with Black Friday we have many sales and tempting treasures... You can find all the details at our Holiday Open House page.