Showing posts with label texture. Show all posts

Wednesday, September 16, 2015

Bronze clay. In the beginning...

You have to start somewhere.

I have tentatively dabbled in silver clay twice. Once in a private class in San Diego over 10 years ago. The instructor was Jonna Faulkner; I was working at the Shepherdess. Then here in Delaware; my good friend Sara Teixido is a metal clay goddess, and I have used the medium under her guidance. But that's as far as I went...

Why? Price? Fear that I would love it SO there would be no turning back? My magpie-like love of all things shiny silver? Then there is the bronze, and the copper. I have had so many gorgeous pieces from my colleagues and AJE team mates. Still I hesitated. Carbon? Firing? Learning curve? Sintering?
Whee! Free rein to test out Karen's stamps! 
This Labor Day weekend a few of us from the blog gathered together for a mini "Art Camp".  With both Karen and Lesley there - Jennifer & I had masterful support to dive into bronze. This post is in no means a how-to! Just my excitement at trying... and succeeding... in a medium that I had longed to try for years.

One picture of me at work where my hands weren't a blur... LOL
First let me say - the stuff is HEAVY. you take a pinch of bronze clay, compared to a similar pinch of polymer or stoneware. Wow. Its dense and feels substantial. Working with it was as expected: lube up your hands and molds as needed. Don't dilly dally as it dried out rather quickly.
Layer after layer. Spacing things in the carbon/ 
Karen made loading the ceramic firing box make SO much sense. Totally demystified the process for me. And while things fired, we went to work with seed beads. ( I introduced them all to peyote stitch beaded bezels and bead embroidery. They may or may not be hooked! )
Cannot wait to see! 
I'M SO EXCITED. Doing a Snoopy dance in my head right now.
Freshly washed: Karen's, Jennifer's and mine all mixed together... 
Post firing? Lesley and great advice on sintering, how it sounds, how to test it...  Its worth it to try to break a piece to see if the clay sintered properly. And the metallic "ring" of your newly fired piece on the sink is music to one's ears! Again I was struck with the heft of the pieces. Sure, mine were a bit "sturdy" and could be thinner, but they feel "real". The image above shows the natural patina resulting in the firing. These were washed off, that's all!
At home now - brush and tumble... 
To tumble or not to tumble? To sand to a satin finish? To burnish high points to a high shine? How do you decide!? The goddess ( top left, below) was burnished with an agate burnisher. The group on the right was tumbled - I loved the subtle satin sheen they have now. The last two ( bottom left) were scrubbed with a brass brush. I think this batch is complete - reminding me of different finishes and possibilities.
The specifics... details and finishes. 
A perfect partnership. 
And this one? Its mine! A wee bronze charm stamped with a eucalyptus pod from San Diego - and my thumbprint apparently! This stunning cab was from Lesley, and the bead work was completed after a great weekend of friends, creativity, techniques... and wine. 

All in all, I think I love bronze. Now to try copper. I was lucky - I know one doesn't get every piece fired perfectly every time. But until next time... 
What new technique or medium are you eager to try? 


Saturday, May 30, 2015

Saturday Share - Polymer Clay Headpins

Recently, I was presented with the challenge of coming up with a headpin component that could be used as a functional embellishment to another flat component.  With our fearless leader, Jennifer Cameron's gorgeous glass headpins as inspiration, I decided to try my hand at polymer clay ones.

My finished pin bouquet!
I started by making balled headpins of 18g copper.  Then I formed small round balls of clay. Initially, I wanted to keep them round and embed the copper pin within the ball, but they kept getting way distorted and plus, I wanted to texturize the clay.  I opted to flatten the balls by pressing them into my rubber stamp, then pushing the headpin through the middle.

Raw clay with headpins, and little balls waiting to be smushed.
I questioned whether just baking them as is would be strong enough for functional use, so I added liquid clay between the pin and clay.

Translucent liquid clay around the base of the headpin.
I pushed the clay base up to the pin, then cleaned off the excess liquid clay.
I also added it to the back of the piece, trying to work it down in the crevice!
I let them dry overnight and then debated how I was going to color them.  I decided I wanted them to have an "old world" feel to them and the texture plate I had used reminded me of a damask-type pattern, so I opted to use Pearl-Ex powder before baking, which left them with an irridescent glow.

After baking, I sealed them with Varathane in a matte finish.  Success!

In a light bulb moment, I thought this design would be cool with translucent clay, and had recently acquired a few packages of  Pardo Translucent clay.  After I first started playing with polymer clay, I purchased a great tutorial by Ginger Davis Allman, of The Blue Bottle Tree, featuring faux glass effects and wanted to give it a try.

After tinting the base clay with various alchohol inks, I made my bases as before.

After adding liquid polymer and  Pearl-Ex, plus some additional texture.

These turned out just ok...not very translucent though.

These, however, turned to molten blobs!

Well, as you can see, I need to go back and figure out my baking time/temperature for these!  My hubby really liked these burned ones, though!  I definitely will be adding some of the original ones to my shop and will be playing with the translucent ones some more...stay tuned!

Thanks for stopping by!


Friday, February 13, 2015

Book review: Textured Bead embroidery

Anyone who knows me knows I adore books. All kinds, all shapes and sizes... and I enjoy building a library of art books for technique, education and inspiration. Jen Cameron sent me "Textured Bead Embroidery" a while back - and I was waiting to really have a chance to dive in, make something, and give it serious thought. I'm a relatively new seed bearer; open to new ideas!
Linda Landy has a book of eye candy here! (I mean that in the best way!) The book at first thumb-through is filled with clear and colorful diagrams, and tantalizing pictures. It was published in October 2014 - so I think some of you may have seen it by now? If not - go! ( available online and at book stores near you.)

My favorite section = The Bead Directory. Daggers! Lentils! Drops! Spikes! As well as the old faithful bugles, hex, keishi pearls... The break down of shapes was informative, and the images were very inspirational! Ways to use these fun shapes in bead embroidery - made all sorts of ideas pop into MY head! (And I hadn't even gotten to projects yet...)

Part of my stash of shapes: Drops, O beads, bugles, daggers, lentils...


The authors projects are informative and diverse. They range from earrings to collar style necklaces. There are even elaborate 3D structures created from interfacing then beaded on... totally breaking the surface plane and creating a unique form to embellish. The instructions are not only clear, including diagrams - but there is a CD of patterns included in the book. 

The image below is a detail of a cuff bracelet - the Sakura bracelet. I love the texture here, the alternating bead shapes... While this isn't my preferred color palette, I can envision using these design ideas. Olive, turquoise and teal, analogous and harmonious... with undulating currents created by alternating bead shapes? Yes. Mermaid cabochon? Yes!


I was also drawn to the artist/author's use of asymmetry. Its one of my biggest (self-imposed) challenges when doing a bead embroidered piece. After a bezel, it seems so logical to continue in concentric patterns around the focal. I am always trying to vary that in my work and create balanced asymmetry. Linda's book has given me ideas in that respect as well. 

The final portion of the book includes pertinent information on sketching, composition, creating harmony/unity in a piece. The arts educator in me was thrilled with this! Technique and design must go hand in hand! 

So - lets put my new knowledge to the test, shall we? 
As you may remember, January was "Use your stash" month here at AJE. I had a Funny Face cab from Diana that I wanted to create hair for. Keeping it silly, irreverent... After reading the Bead Directory mentioned above, I know how to do a "support row" and sew my drop beads in so they would stand... I also gave bugles a try. Here it is... 
Peyote bezel, embellished with O beads, drops, bugles...
While I was working this popped into my head - Empress Theodora from a Byzantine mosaic, located in the Basilica of San Vitale in Ravenna Italy.  (Theodora (Greek: Θεοδώρα; c. 500 – 28 June 548), was Empress of the Byzantine empire and the wife of Emperor Justinian I. She was one of the more influential and powerful empresses of the Byzantine empire. )

It was something about the bugles/crown/halo. LOL. Once an Art History geek, always an Art History geek. 


I'd love to hear your thoughts - on my Funny face, and/or on the book if you have read it! 

* Disclosure - Yes, we received a copy of the book to review. No - we were not paid in money, beads, wampum, etc. for said review. Opinions expressed are mine, but I do think you'd like the book. *

Tuesday, December 2, 2014

Product Review: Rolling Mill Resource

I recently had the great privilege of spending a week in the home studio of metalsmith Melissa Muir. It was a working trip - I am helping her with some photos for her upcoming book about the hydraulic press - but we found plenty of time to play. Among other things, Melissa introduced me to texture papers from Rolling Mill Resource.... and I fell hard in love with the rolling mill all over again. I placed my own order after I got home and finally had the chance to sit down and play with it about 10 days ago.


I am so thrilled with this product that I could not wait to share it with you! Aside from superb customer service (which seems to be in short supply these days), Tracey from Rolling Mill Resource stocks an eclectic assortment of patterns and designs in a variety of sizes. The cost is reasonable, too - small sheets start at $2.50 and options go all the way up to large sheets for $12.60. My first order (shown above) included some small shape templates and - to my surprise - a very generous package of sample designs for testing in my rolling mill.  My second order included even more samples to play with before I committed my paid designs to the metal.


The designs are deeply laser cut into heavyweight paper - the brown patterns in the photos above are the recessed areas, which are crisp and clean even where there is a lot of fine detail. Tracey's free downloadable instructions are super easy to follow and give a great overview of the mechanics of roll printing that's very helpful in learning the process. I invited a couple of my more advanced metals students to have a play date in the studio with me yesterday so we could experiment with the patterns, and even for those who had never worked with a rolling mill before, the results were uniformly excellent. I don't think we got a bad roll print all day!


This is one of my favorites - and it's on a particularly thick piece of copper. The print is perfect.


I also love the subtle matte texture the uncut sections of paper leave on the metal.


Once we printed up a bunch of metal, we used some of the Rolling Mill Resource templates to make some components.


We had such a good time! And although we didn't wind up doing anything ground-breaking with the components we made, it was fun to experiment with shapes and patterns, and everyone left with lots of metal to play with at home.

My friend Dawn's earrings, using a harlequin pattern from Rolling Mill Resource
My earrings using Mikel's Flower pattern from Rolling Mill Resource
If texturing metal and roll printing interests you, Melissa has an excellent video on the difference between the embossing achieved in a hydraulic press and roll printing in a rolling mill. She also has a video on the process of roll printing which will give you a good look at how it works. And when you're ready to try some paper patterns, you won't be sorry if you start with the excellent selection at Rolling Mill Resource. You can even get them to convert your own photos to custom textures, something I plan to try very soon, and although I haven't tried any this way, the patterns are also suitable for use with metal clay.

It's such a pleasure to come across an artist who not only provides top-of-the-line customer service but also an excellent and original product. I have amassed a fairly substantial collection of their patterns in a short amount of time, and I am really looking forward to experimenting more with them. I have some ideas... now where did I put that extra time I was saving?

Until next time -


Edited to add: This is not a sponsored post, and I received no compensation from Rolling Mill Resource for featuring their products. I paid for the patterns I received, and my opinion is based solely on my personal experience with them. Melissa Muir is a personal friend, and all her videos are free to everyone on YouTube.


Saturday, October 25, 2014

Reposting an old favorite… pressed flower bead how-to


Hello again! And welcome to another post re-run. There's not all that much exciting and new in my studio these days—every day is all about making more of the same—sleepy critters, speckle beads, rustic tribal birds, leather feathers, etc, etc… and pressed flower beads. Lots of pressed flower beads.


I really love making them! Especially with winter quickly approaching—I want to enjoy the summer flowers just a little bit longer. And so, today's post is one of my pressed flower tutorials I first shared with you a year ago. I hope you'll enjoy seeing a behind the scenes peek at my work… and maybe you'll be inspired to try making some for yourself! Enjoy!

--------------------------------------------------
I hope you all haven't gotten bored of my pressed flower beads already… I have two more how-tos for you today. These are quite a bit more simple than my last design, but they turn out looking like you put a lot of time into them. And it's all thanks to a nicely textured mold! :-)

Here they are…

1. Choose 2 molds (or texture sheets) of the same or similar pattern. Roll equal size balls of polymer for each bead.
2. Sandwich a polymer ball between the two molds.
3. Press firmly using a small glass dish so you get even texture.
4. Ta-da! your nicely double-sided textured currently hole-less bead!
5. Before removing the polymer from the mold,  gently cut the hole — this way that pressure won't distort the texture. I used a large leather punch for my cutter.
6. Bake for an hour and cool.


Next, paint your donuts…

And enjoy that nice texture…


Now we're going to make some wrapped beads…
1. Chose a mold or texture sheet with a long or repeating pattern. Roll same size pieces of polymer — this time lengthen them into sticks.
2. Press firmly.
3. Wrap to form beads. I used a crochet hook for my beads.
4. Ready for the oven. Bake for an hour and cool.

Paint…

Go make something with them!!

See, that was pretty easy… and made some fun new beads! I hope you'll give these a try. What new creations have you been working on? Making anything with polymer clay lately?


--------------------------------------------------

And… back to the studio I go… all the unfinished beads are calling me! Wishing you each a very creative weekend!

Rebekah Payne


Monday, February 10, 2014

Exploring Polymer Clay

As I mentioned in my New Years AJE post, one of my goals for 2014 is to explore working with polymer clay.  I'm not interested in selling polymer clay components, but I think it would be cool for me to be able to design jewelry that includes pendants and beads that I've made myself.  I'm really intrigued by the opportunity to create layers of color and texture in my own designs.

A couple of weeks ago I went to IKEA with a friend of mine and found several things that I will be re-purposing for use with polymer clay.  My best find was a large set of cookie cutters that cost way less ($6) than the cutters that are made especially for polymer clay.  Some of the cutters are too large, but most of them will work quite nicely.  They come in a great, round, plastic storage box to keep them organized when not in use.
 I also got a silicone baking mat that I can place on my work surface.  The polymer clay won't stick to it and it is easy to clean up. The mat cost $7 at IKEA.  A similar mat costs $20 at Target.
 The next day I gave it a go. I conditioned the clay and then ran it through the pasta machine again with a piece of plastic netting from the grocery store, (I think it had held onions in the store).  It gave the clay a nice texture.  Then I cut out an earring pair using the small square cutter from IKEA. I used pan chalks, which look similar to eye shadow, in that the chalk is in little pans and you use an applicator to apply it.

I didn't know if I should apply the colors before or after I cured (baked) the clay, so I tried it both ways.  I built up layers of colors on the earring pair, using various shades of blue and purple chalks.

Then I cut out a rectangular and round shape for pendants.  I used rubber stamps on these for texture, but I planned to add color to them after curing.

I placed all four pieces on a cookie tray, inside the toaster oven and set the oven for 275F for 30 minutes.  After 30 minutes, it was still really bendy, so I baked it for another 10 minutes and ended up blackening all four pieces. :(

At first I thought the earring pair might be salvageable. I could see the color layers on them and I liked what I saw.  I made them into earrings, but from even a short distance they looked just plain black.
The pendants were even worse!  They had started out as sort of an off white color.  They emerged from the oven like this:
Not even salvageable!  Live and learn.  Nevertheless, I could see that the tree and flower designs have good potential if cured correctly.

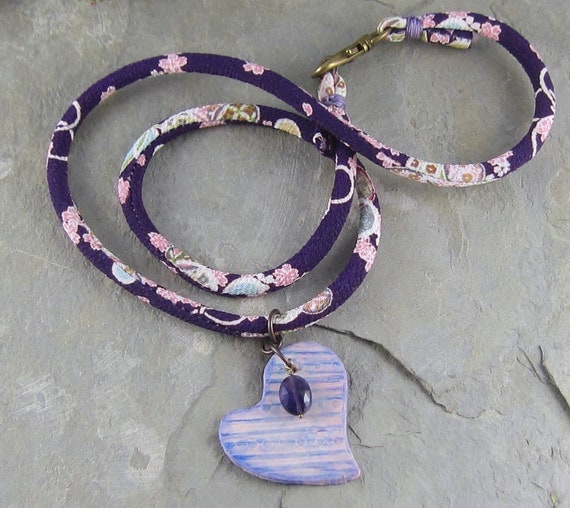
I did some more reading online and in a few days, I tried again.  This time I decided to use the heart shaped cookie cutters from IKEA, since Valentines Day is rapidly approaching. I textured the clay with a stripe and dot rubber stamp and cut out one large heart for a pendant and two smaller hearts for earrings.  I built up layers of pink, purple and violet chalk and edged the sides with the darkest purple.

A friend had suggested that I bake my pieces on cardboard, as sort of a buffer to the direct heat.  I also read that covering your clay helps prevent browning.  So I placed a piece of cardboard on the cookie tray and put the clay on top of that, then I placed an inverted foil loaf pan  over the clay and baked it at the same temperature.  Perfect!  I was ecstatic!

After baking, I used Prisma colored pencils to highlight parts of the hearts and then sealed it.
My first necklace with my own self-made pendant is now listed in my Etsy shop.  The fact that I made my own pendant is really exciting to me.  I can hardly wait to see where this will lead in the months ahead!


In addition to Art Jewelry Elements, I am now writing for the Earrings Everyday blog.  My first post will be on February 12th and I will be sharing the earrings that I designed to go with this necklace

What new techniques are you excited to explore this year?

Linda
Linda Landig Jewelry – ArtFire 
Linda Landig Jewelry – Etsy