Showing posts with label pendant. Show all posts

Friday, August 12, 2016

Enshrined - the Evolution and Reveal.


SHRINE

  1. 1a: a case, box, or receptacle; especially: one in which sacred relics (as the bones of a saint) are deposited.  
    b: a place in which devotion is paid to a saint or deity: sanctuary  
    c: a niche containing a religious image.
  2. 2a place or object hallowed by its associations
A sampling of sculptural shrines I have made over the years. All smaller than 8 x10".
I love the concept of the shrine. A place where things are set aside, reserved, made 'more'... a place where attention and importance are focused on an item. I have been making sculptural ceramic shrines for over 10 years. Small in scale they are intimate, personal - icons of a sort. I fill them with items from nature, found objects, symbolic objects that reference myth, archetypes, and the natural world.

I have been musing on shrines in a miniature format for a while now. How to create a niche? Hanging mechanisms? And most importantly - scale! What is small enough to wear and large enough to enshrine a small treasure? Working with ceramic clay, I work when the slabs are "leather hard" (imagine a firm slice of cheese...). They can support their weight, and be joined in mired corners, carved, embellished. How to translate this to polymer?!

1. First two large hollow shrines. 2. Detail of bail and textured sides 3. 2nd batch - very deep. 4. Making progress! Thinner more wearable scale pieces. 
Polymer as I know it has only two stages - raw/soft and cured/firm. My first attempts were made of elements cured then assembled. I made the niche, the back, the front - cured the pieces. Then I assembled them with liquid clay and added the textured sides/surround. These are my first creations - the two at the top are rather large, in my opinion at app 2.5"tall. While it worked - it was very fiddly, not something that lent itself to small scale production. The fact that they were hollow was great - but polymer is so light. Do they need to be hollow? Back to the drawing board.

Solid construction. Playing with beaded bails. 
Solid construction is the answer! No sagging uncured clay. No sticky assemblage with liquid clay. and solid forms are easier to texture. The shrines above have beaded bails, and an antique enameled element.

Finding things small enough. That is a challenge. There is a sense of whimsy in using these small toys. I am ok with that... but they aren't enough. So I made my own polymer miniatures, made mold, and started creating. ( I need to redo that acorn.)
Small rubber? Plastic? Toys fit in nicely. But I was happiest with my own iconic polymer minis, which will be painted.  
This is where I wanted to be! I am really pleased with these! And they will be making their debut at Bead Fest this month. I am finally ready to share them with you all here, and the world. 

This is where I wanted to be! Stamped copper adds a layer of meaning! Holes run through point of top of arch.


So how is it done? Here is a peak at the steps in the process:

Stages of construction. And playing with pan pastels. 
Comparison: toy hare and polymer mini hare ( still needs painting) 
I really see these as a series  - I have so many ideas for colors, patterns... and inclusions. I'm pretty excited with the results and pleased with the continuity it achieves across my body of work. I would really like to hear your comments! 

And if you are at Bead Fest - stop by and see them in person. I will be at #463 in Artisan's Alley! 

Saturday, April 2, 2016

And the (April COM amulet bead) winner is....

Amulet beads ready to mail to winners... 
On Monday I will be mailing amulet beads to....
Jess Green and Brooke Bock!! Thank you to all who commented and I do so look forward to seeing your creations this month. (I will have more amulet beads this weekend at Bead Fest in Oaks PA - so please contact me is you are interested in purchasing one... )

Until next time - have a great weekend! 


Wednesday, March 30, 2016

Tiny Faux Terrarium Pendant

I'm currently getting ready for two events; the bead cruise and Steampunk World's Fair.  In my prior post I shared what I was making for the cruise.  Now I'm going to share with you a project I'm working on for one of my steampunk costumes!

Photo and hat by Chiki Bird
I purchased this fabulous mini top hat from Chiki Bird Hat Studio  for a steampunk faerie costume I'm putting together.  I have most everything I need for it but I'm missing jewelry.  I love the little mushrooms all over the hat so I knew I wanted the pendant to incorporate them somehow.  In my vast supply stash I happened to have several glass-domed components.

Glass Dome Component
I purchased my stash of them from Ingredients for Lovely.  You can also find them at Make Desert Green if you'd like to buy in bulk.

Tiny Faux Mushrooms
I took a trip over to the local craft store and purchased tiny faux mushrooms in an assortment of sizes. You can find these in the dollhouse miniature aisle.

Moss
I also picked up a bag of moss found in the same aisle as the sand, glass pebbles and foam for wreath-making.

Trimmed Moss
I trimmed down some of the moss until it fit inside the metal base.

Snipped Mushrooms
Then I selected and snipped the wire off of two mushrooms.  I left a tiny stem on each mushroom for adding the glue too.

Moss in base
After playing around with the mushroom placement, I spread a thin layer of glue on the base and pressed the moss down onto it.
Mushrooms in moss
After allowing the glue to dry, I added a dab of glue to the bottom of each mushroom and inserted them into the moss.

Finished Pendant
Once the mushrooms were dry, I put tiny drops of glue onto the inside of the base and covered the mushrooms with the glass globe.  The bail was glued on once the base was secure.

Adding a jump ring
I added a jump ring and some ball chain but you can easily do some beaded wirework if you prefer something fancier!

Finished Terrarium Pendant

If you'd like to go a step further and really customize your terrarium, make your plants from polymer, air-dry or ceramic clay!  

Happy Beading!

Friday, September 4, 2015

Daisy Medallion Chainmaille Workshop Recap!

I had the pleasure of taking a chainmaille workshop this year at Bead Fest Philly.  I selected the Daisy Medallion Chainmaille class hosted by Michelle Brennan of HyperLynks.
Photo by HyperLynks
Can you blame me for choosing such a colorful and fun looking project?

Michelle with Medallion Eyes
I should start off and say that Michelle was a fantastic teacher.  She was patient, witty and funny.  These qualities are especially important with someone like myself in a class as I'm horribly impatient and have quite the sarcastic streak (I'm from Jersey, what do you expect?). 
Project Layout
Michelle came UBER prepared!  She provided everything we needed for the project including Xuron pliers, beading mat and all the rings (in a huge variety of color options).  I should note, I loved the pliers so much that I bought some after class was over. 

Diana & Sue
Oh and I managed to convince fellow contributor Sue Kennedy to take the workshop with me.  That made it extra fun...especially at 8:30 in the morning!

First Step
This was my first time working with rubber rings in a chainmaille project.  The first step was frustrating.  Many bad words escaped my mouth for about 15 minutes as I attempted to get the attachment above to work.  Thank goodness we had a class & teacher with a good sense of humor!  

Six Finished Pieces
The first three gave me angst but the final three weren't so bad once I got the hang of it.  
Adding Sections to the Large Ring
After we completed those little pieces, we had to start adding them to the large washer.  Michelle demonstrated this for us first.  She also included a print-out of VERY detailed instructions for us.  HyperLynks has some of the best instructions I've ever seen, in their kits.  

More Progress

You can see some of the project starting to come together now.  I got further than this but was so in the zone that I forgot to take more photos.  I haven't actually finished the pendant yet but it's on my to-do list.  

After the workshop was done, I wandered my way over to the HyperLynks booth.
Mark & the Walls of Goodies at HyperLynks booth
HyperLynks carries a great assortment of rings, kits and tools.  I picked up the Xuron pliers, rings and some kits while I was there.  

I certainly hope Michelle teaches at Bead Fest Philly 2016 because I'd take another workshop from her in a heartbeat.  

Thanks for a great time Michelle & HyperLynks!

Happy Beading!

~Diana P.

Wednesday, August 5, 2015

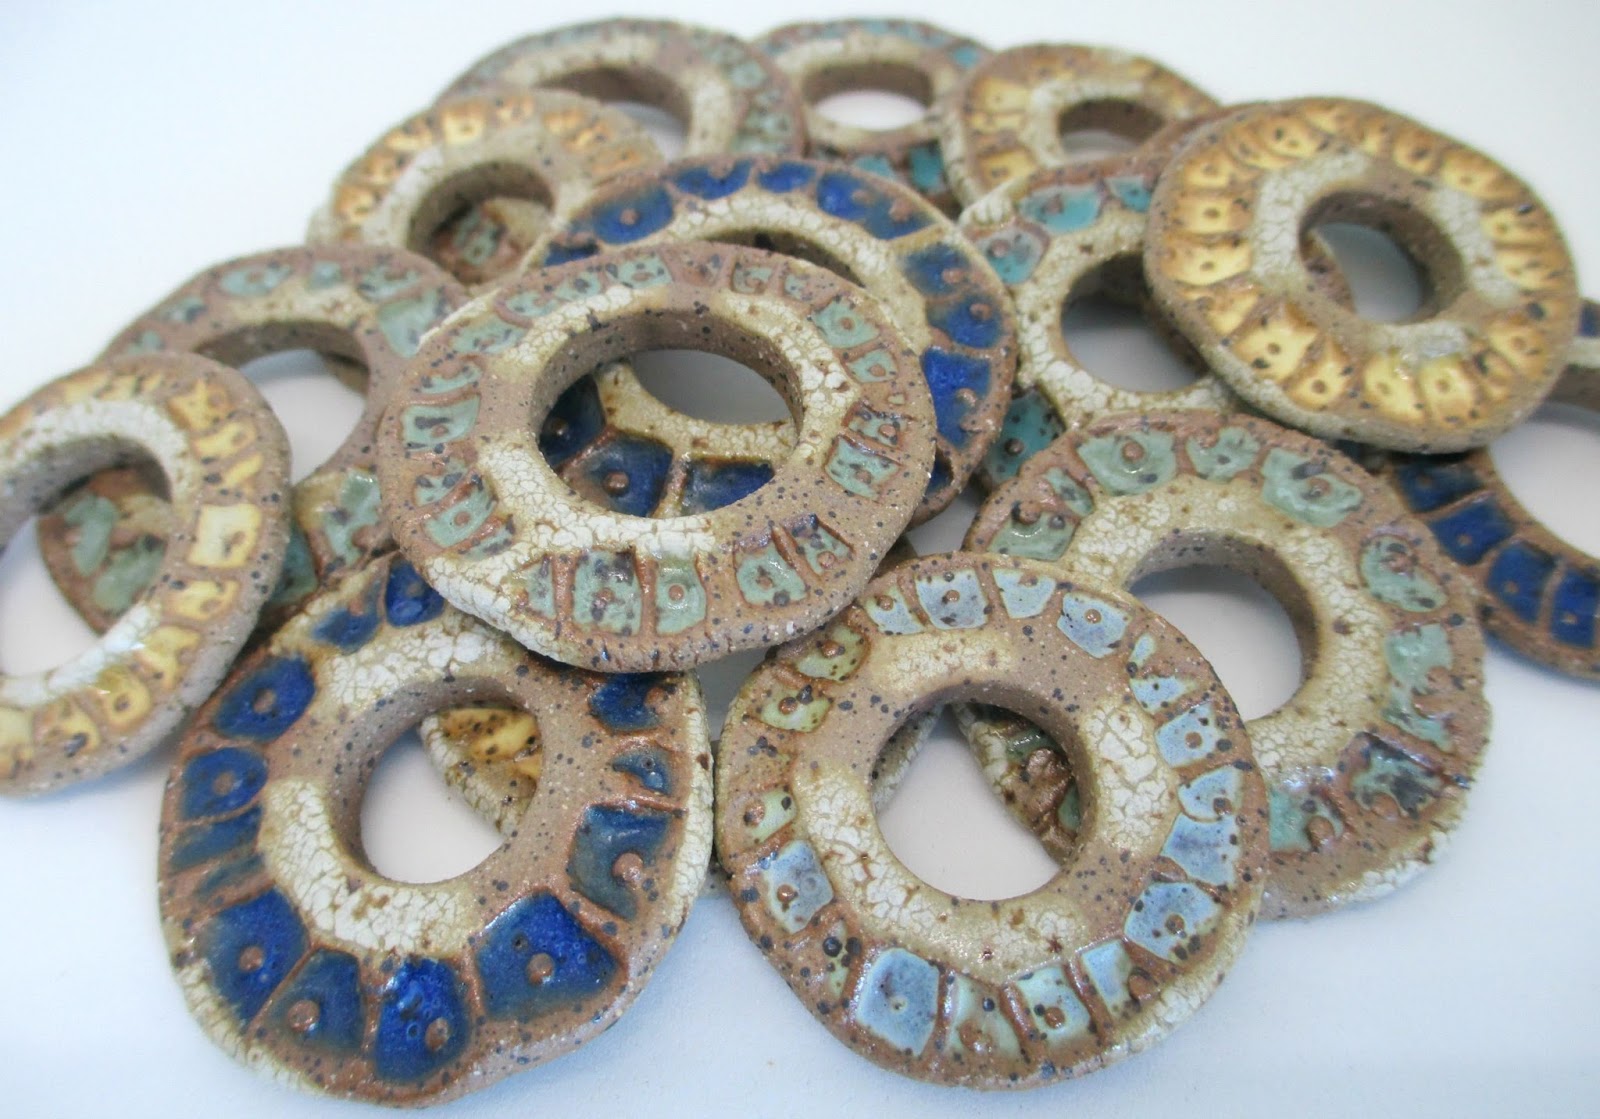
The Making of a Rustic Stoneware Coin Pendant

This month, I am providing my rustic stoneware coin pendants for the August Component of the Month.  I thought it might be fun to show off how these pieces are made.

First 3 Steps
All rustic stoneware coin pendants start their life as a ball of speckled brown stoneware.  I then flatten each ball and impress the texture into it.  I have two texture sizes I use for these pieces.

Removing the center
Once each piece has been textured, I remove the center using a variety of cutters.  

Greenware coin pendants
The pendants are then left to dry for several days.

Cleaning up the pendant
Once the pendants are completely dry, I clean up any rough patches with water and a sponge.

The little kiln and some bisque
After all the pieces are cleaned up, I load them into my little kiln and bisque-fire them.

Glazed bisque
The next step is to glaze the back and the textured portion of the pendants.

A tray of glazed pendants
I then use a wet sponge to remove some of the glaze, leaving glaze only in the textured sections.  This leaves much of the brown stoneware exposed.

Adding crackle glaze
After the initial glaze, I apply a white crackle glaze to each piece.  This helps give the piece that primitive, aged look.

Tray of glazed pieces
Once I have enough pieces to fill my large kiln, I load it up and turn it on.  The kiln will run for several hours and I'll unload it the following morning.

Finished pendants
If all goes according to plan (it doesn't always), then these are the fabulous end result!  Thankfully, we had zero issues with the kiln and all of them came out great.  And that's how rustic stoneware coin pendants are born!

Happy Beading!

P.S. If you are sad that you weren't randomly selected for the COM, I do have some of these pieces available for purchase in my Etsy shop, so you can still play along!  


Sunday, August 2, 2015

August Component of the Month Giveaway!

It's time for the August Component of the Month Giveaway!
Rustic stoneware coin pendants
Up for grabs this month is one of my rustic stoneware coin pendants!  Each piece is made to look like an ancient finding just dug up from the depths of the earth!

Want to play along? Here are the rules…

  • I will giveaway 1 stoneware coin pendant (chosen at random) to each of the 2 winners selected randomly from those who leave a comment below this post. Your comment MUST include your EMAIL AND BLOG address so we can contact you should you win.
  • Please — only leave a comment if you can commit to creating a finished piece and blogging about it on the reveal date.
  • The names of the 2 winners will be announced on Tuesday, August 4, 2015.
  • This giveaway is open to US and international countries, but please be aware that these will be posted from the US and international addresses will have longer postage times… sometimes up to 3 weeks.
  • The blog reveal will take place on Sunday, August 30, 2015.

Good luck!

~Diana P.

Friday, June 26, 2015

Wooly Wire Pendant Tutorial

Today I am replaying my tutorial for making a simple and stunning Wooly Wire pendant.
                                                                             ~ ~ ~
I've been having fun playing with WoolyWire, a wonderful fiber and copper wire product that is handmade by Nellie Thomas of WoolyWire Etc.  Nellie hand dyes fibers and spins them onto solid copper wire.  WoolyWire can be bent and twisted, just as you would do with any 24 gauge wire, and it brings with it so many possibilities for adding color and texture to your jewelry designs.

A couple of weeks ago I got the idea to try braiding three colors of WoolyWire and then wrapping the wire around a large channel bead to create a pendant.  I'm in love with the result!
This pedant is easy to make and the results are stunning.  Here's how.

Materials:
3 packages of WoolyWire in a pleasing color combination (you won't need it all, don't worry)
1 large or medium channel pendant (available at WoolyWire Etc.)
2, 7-8 mm bicones in coordinating colors
1 decorative headpin with a 3 inch long wire, (mine is from Sue Beads)
23 inches of 1.5 mm leather cording in a coordinating color (mine is from Classic Elements)
2, 1.5 mm end caps (all my findings are from Shipwreck Beads)
1 lobster claw clasp
4, 7.25 mm Vintaj jump rings
GS Hypo Cement

Tools:
Flat nose or half round pliers
Round nose pliers
Wire cutters
A clipboard
Binder clip or "bulldog" clip
Large Channel Pendant

Directions:
1.  We are going to work with the full 3 foot lengths of the WoolyWire, so do not cut them yet.  Push the WoolyWire down about 1 inch on one of the wires, exposing the copper wire in the center.
 Bend the exposed copper wire at a right angle.
 
2. Fold a small portion of the other 2 wires down flat, so the wire end is not sticking up. (The picture below shows only one wire partially flattened.  You need to completely fold it over on both wires.)
 3.  Holding the three strands close together, wrap the exposed copper wire around all three strands, binding all 3 of them together.   Press the end of the copper wire down and tuck in, using the flat or half round pliers. I trimmed the extra fuzziness on the end, but that is a matter of personal preference.
4.  Place the three wires beneath the clip on the clipboard.  This will secure the wires while you are braiding.
 5.  Braid the wires, just as you would braid a child's hair.
6.  Stop braiding when you think you have enough braid to wrap around the channel pendant.  The length can be adjusted later, if needed.  Secure the loose ends with a binder clip.
 7.  Glue the the top ends of the WoolyWire just beneath the rim of the channel pendant. Set aside until the glue is dry. Unfortunately I don't have pictures for all of the steps, but the rest is really straight forward.

8.  Once the glue has dried, start winding the WoolyWire braid around the channel pendant.  You may like it wrapped loosely, or you may want to push the braid upward a bit so you can add a few extra wraps around the channel pendant. Adjust to your liking.  When you get to the bottom of the pendant, cut the WoolyWires about an inch or so longer than needed to wrap to the bottom of the pendant.  Push back the WoolyWire about one inch on one of the wires.  Fold over the other 2 wires, like you did on the top end of the braid.  Wrap the exposed copper wire around all three wires and glue the end of the braid at the bottom of the channel pendant.

9. Assembling the pendant:  Thread one bicone onto the headpin. Then add the channel pendant, fitting the open end neatly onto the top of the bicone.  Add another bicone on the top and make sure that both are seated firmly into the ends of the channel pendant.  The bicones serve to stabilize the pendant, by filling up the large holes on either side.  Using the wire from the headpin, create a double wrapped loop at the top of the pendant.  If you make a small loop, like I did, you can attach it to the leather cord with a jump ring.  If you make a larger loop, you can thread the pendant directly onto the leather cord.
10. After the pendant is threaded onto the leather cord, add a small drop of glue to one end of the leather and inside one of the end caps.  Place the leather end into the cap and hold in place till the glue sets. Repeat on the other side.

11.  Attach the lobster claw clasp to one end with a jump ring.  Make a short chain with the other 3 jumprings and attach them to the other end cap.  The clasp can be fastened to any of the 3 jumprings, making the length adjustable.

If you have questions about any of the steps, please feel free to ask.  I will be happy to answer your questions in the comments section.
Wear your WoolyWire necklace with pride!
Linda