Showing posts with label embossed metal. Show all posts

Saturday, February 21, 2015

Saturday Share - Re-Visit...Embossing Metal with a Sizzix Big Shot

Hi all, I have been swamped with day job woes, meeting publication deadlines, and well, just everyday family life.  Today, I decided to am re-run a post from almost exactly 2 years ago. Hope you get some inspiration and ideas!


It's no secret I love textured metal...hammered, punched, stamped, etched, embossed. My 1st foray into the arena of texturing metal was by hitting it really hard with my chasing hammer...I didn't really know what I was doing, but it made cool divots in the surface, and I was immediately addicted. Plus, it felt really good to pound the hammer against the poor metal, leaving a lasting mark!

I eventually went to metal stamps, which deceptively a lot harder than it looked...I could never get a complete design, and when I would try a second hit, I got a lot of shadow images!

Next was etching...I like the result, but it is messy.

Next, after falling in love with Keirsten Giles' gorgeous stamped designs, came hammering brass texture plates directly onto the metal.  Her generous posts on using vintage coins actually opened my eyes to more possibilities...also, she stressed the fact that you needed to anneal the metal and tape it down to your steel block so it doesn't move!  Why didn't I think of that!  I still love this technique and use it frequently!

Next, I became drawn to gorgeous designs by various artists created by using ordinary textures found in nature...leaves, lace, screen mesh, etc.  This, I found out, entails using a rolling mill.  Want!  But, yikes, the least expensive ones are expensive!  Like so many of us, I was/am broke!

Fast forward to seeing a blog posts by Erin Prais-Hintz about her Vintaj Big Kick.  I was intrigued and interested, but not so much in using the thin brass Vintaj blanks that were recommended.  I wanted to use metal sheet, and I wanted it to be more durable.  Then, this past fall I came across a blog post at Cinnamon Jewellery on her experiments with the Sizzix Big Shot.  I immediately decided I wanted to give this a go.  Right before Christmas, I found it on sale at Amazon and told Hubby that he could get it for me to put under the tree or I would get it for myself.  Nice, obedient (snort) guy that he is, he got it, but wouldn't let me play with it until after Christmas!

Here it is...

 Basically, it is a rolling mill originally created for embossing paper goods and other scrapbooking crafts.  It comes with this sort of folder that enables you to place media in with the embossing templates and create a layered stack that is thick enough to press the images into the media, be it paper or metal.  The embossing folders to use are also created by Sizzix, or you can use other similar ones by other companies.  I actually found the 2 I currently have at Michaels, but there are lots more on line.

I have tried up to 22 gauge metal with great success.  The trick is to anneal the metal very well.  I usually pickle afterward so as not to stain the embossing folders with firescale and grunge!  The cool thing about these folders is that they are a bit transparent so you can see the design on top of the metal and line up the metal exactly where you want the embossing to happen.  The folder has a positive and negative design, so the finished piece is 2-sided, unlike etching and stamping.

Here are a few pieces I have created since using mine...

These were patina'ed with Ranger Inks and sealed with Ice Resin
...featuring ceramic beads by LeAnn Weih.

These were torch-fired enameled for a cool effect...featuring lampwork by Jelveh Jafarian.

These were run through the Big Kick, then punched with holes!

Favorites..they were bought by my sister as a gift to her daughter-jn-law!  I need to make more!

That's all for today...I want to do some more experimenting using texture plates and maybe some found object textures, but that will have to wait...I have an 11 yo with the dreaded flu, and 3 new baby guinea pigs to figure out!  Please share any experiences you have had with using the Big Shot or Big Kick with metal...especially non-Vintaj brass!

*****

Thanks for letting me share this older post....a few months after I posted this, I did a followup, using other things for embossing...check it out here!  And don't forget that 1 week from today is the AJE Component of the Month hop, featuring metal clay components from yours truly!!!


Sunday, March 2, 2014

Fun With Chain (and No Soldering!)

I love interesting chain, and I especially love it if it's handmade. I really love copper and am frequently disappointed that practically all of the commercial copper chain I see is either copper-plated brass or steel--no solid copper chain! I'm sure there's probably some economic or practical reason for this but it still gives me the frownies. So sometimes I make my own. I love looking at an interesting commercial chain and figuring out a way to make something similar myself--preferably without soldering! Below are three styles of chain I have enjoyed making that require no soldering or even sawing.

The first chain is a simple figure 8, made from heavy-gauge double-ended ball headpins. I haven't actually ever used it for anything, I've been saving it for the "perfect" project. The two lengths at the top are copper and sterling silver, and the ones on the bottom are copper and brass.
The figure 8s are joined by other smaller figure 8s, which are just wire hammered flat before being formed into the 8-shape. For the larger 8s, I just experimented with different gauges of copper wire, making figure 8s of various sizes until I found a size and gauge I liked (these are done with 16 gauge wire, and the smaller connector figure 8s are 18 gauge wire.) I left what I thought would be enough length to form the ball at each end,
unfolded it and measured it, and then cut a bunch of pieces that length.

I balled up the ends in my torch and then created my figure 8s,
And then hammered them.
I could have joined the 8s together with plain jump rings but I decided to do something more interesting and did the smaller figure 8s. You could do beaded links in between, or wrapped links, or whatever you want.

You can also use figure 8s without the balls (*snort* I said BALLS), such as in this bracelet I did a few years ago. Those are just plain figure 8s, doubled up, with a couple of big jump rings around the middles. I did saw these jump rings, but there's no soldering here.

The chain below is based on commercial chain I have seen that I liked. I thought, "I bet I could do that myself!"

For this I just start with 6mm widths of textured copper sheet (I think this is 24 gauge--click HERE for a brief explanation of how this sheet is embossed) and hammered rings squashed into ovals (I just turn them on their sides and tap them with the hammer into an oval shape):

(It doesn't matter to me that the cut section of the ring is ugly, because it's going to be hidden inside the textured sections; but if you wanted to, you could certainly solder them closed and make the invisible parts tidy.) For the chain above, each textured strip is about 28mm total length. I curled the ends with the 3mm barrel on my step jaw pliers. The rings are formed from 14 gauge wire on the 6mm barrel of my step jaw pliers. Here's what the back looks like (I kind of like the back too):
And from the side you can see how it's formed:
It's not perfect, but I like my jewelry like I like my men. Primitive.

The last chain is a simple twisted bar chain. You cut a piece of wire, hammer half of it one way, the other half the other way, and put a hole in either end. Ta-da!
It looked plain so I wrapped the middles with double-ended ball headpins (or "bones," as I heard Shannon German call them once.) The ones below are just plain, obviously. You can link them with plain jump rings, or beaded links, or whatever you want. I especially like using the bar links for sterling chain, because you get a lot of mileage out of it for not a lot of labor or cost (compared to doing fiddly little round or oval links--especially if they're soldered. Ew. Not My Thing.) I think this is 14 gauge wire.

There is some other chain I want to try, some with some simple soldering and another with textured washers. I'll let you know how that goes!

Keirsten
My Etsy Shop
My Blog
My Flickr Photostream

Monday, November 18, 2013

Inspired by Tulips; the Exploration of Creating a 3D Shape in Metal

Keirsten Giles has once again written up a fantastic blog post about her studio adventures and explorations. Hopefully you are as inspired as I am by the peek into her journey of creating a tulip shape in metal. Make sure you click on the link about coins and hammer embossing. You will love it. 

-Jen 

---------------------------------------


I love metal beads and other three-dimensional metal shapes; unfortunately it is difficult to find such ready-made items in a finish that matches my own metalwork, and I don’t do any casting, or work with metal clay so I can’t easily make my own. I decided to try achieving a 3D shape with simple cuts and curves. My inspiration was tulip blossoms:

Photo by John O’Neill courtesy Wikipedia (http://en.wikipedia.org/wiki/User:Jjron)


I just love this shape.

I used a tulip-shaped vintage brass beadcap for a starting point, picturing it spread flat in my mind (I still thought I might use it so I didn’t want to actually smash it flat).


From Calliope’s Attic on Etsy

I sketched out a couple of large shapes that I thought might work, with four petals.


Tulip shapes Keirsten Giles


I eventually bit the bullet and just smashed the beadcap I had, thinking, “Well, I’m going to make a bunch of these from copper, so what do I really need it for?”


Smashed bead cap Tulip shapes Keirsten Giles


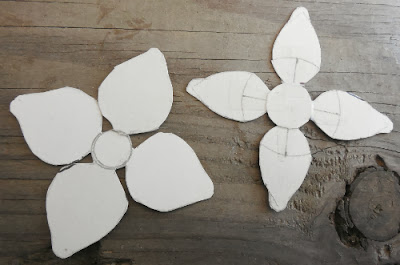
I scanned it, and then made several different sizes on the computer and printed them onto card stock to make templates from:

tulip scanned template Keirsten Giles
the actual template is included at the bottom of this post for you to save and use

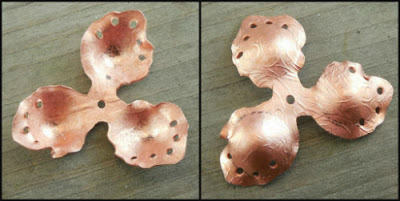
Then using my new templates I cut out several sizes from various gauges of copper sheet—22 gauge for the very large ones, and 24 and 26 gauge for the smaller ones. I etched the 22- and 24-gauge shapes, and embossed the 26-gauge sheets with coins and a hammer . I punched center holes with my Beadsmith hole punch pliers, and then annealed all the textured shapes to make them easier to work with. Just for fun I made holes in the edges of the petals on one pair.

Tulip shapes in copper Keirsten Giles


I began by using my doming set to produce slightly cupped shapes on the petals.


Doming copper tulip shapes Keirsten Giles


Doming copper tulip shapes Keirsten Giles


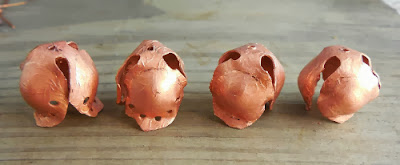
Then I domed the center of each shape, first resting the doming punch in the center of the shape and pressing the petals against the ball with my fingers, and then hammering the punch gently into the cap.


Doming copper tulip shapes Keirsten Giles

Doming copper tulip shapes Keirsten Giles


Et voila!

Completed copper 3d tulip shapes Keirsten Giles


Completed copper 3d tulip shapes Keirsten Giles


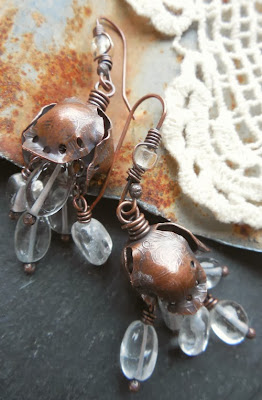
I’ve used one of the small embossed pair for earrings, with clear quartz:


Earrings by Keirsten Giles Lune Artisan Jewelry


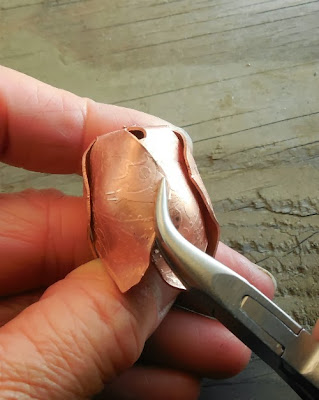
I made the largest ones from 22 gauge sheet. These required a little more man-handling—I had to curve the edges of the petals inward a bit with my pliers.

copper tulip shape 3d Keirsten Giles


The large ones may be part of necklaces eventually, and maybe I will use a pair of the larger ones for a lariat. I have to say I preferred the three-petal bud to the four-petal. I may rework the four-petaled ones a little bit to give them a rounder shape. All in all, it was fun!


copper tulip shape 3d Keirsten Giles


-Keirsten Giles
Lune Artisan Jewelry on Facebook

-------------------------------------------------

If you would like to experiment with your own tulip shapes, Keirsten is very generously sharing her template with you. First, click it to open the image, then right click to save it to your computer. Print it out, and use it. Make sure you share your results!


Saturday, April 20, 2013

Saturday Share...Big Shot, the Sequel!

Back in February, I shared some of my experiences with using the Sizzix Big Shot using their embossing folders.


Several of you commented, asking if the Big Shot could be used  with other materials...brass design plates, found objects, etc.  My curiosity sufficiently aroused, I have since been playing around here and there with using other things besides the suggested embossing folders to create texture on metal with it. So, I thought I would share my findings with you today!

As a standard procedure before running a piece through the Big Shot, I anneal my metal with my torch (I used my Lenk butane, but any torch will do), so they would be as soft as possible.

First up, I wanted to try some design plates I found a while back on the cheap at Michael's.  I bought them to try and hammer the texture into the metal, and put them away...I actually forgot I had them!

I experimented with 3 different textures, to varying degrees of success. At the top of the photos are the plate I used, and the bottom is the outcome.  The plates were 2-sided, opposites...indented on 1 side,  raised on the other.  I used the raise side on all 3 tries.


It worked, but it didn't really give me a clean impression...sort of hazy, whch of course could work, depending on your design.

Next, I decided to try some burlap fabric that I had.  I have hammered fabric and screen wire textures in before to mixed success, so I thought I would give it a go.


Again, not a terribly clean impression, but I sort of like it.

The next pieces used a couple of steel components I just got.  The filigree rectangle actually made one of my favorite textures.  Doesn't really look like the filigree design, but it is a cool texture...sort of like concrete block!  The leaf only gave an outline, but it works!


Tracy over at Cinnamon Jewellery (I absolutely love her work!!) commented that she was etching pieces to use as texture plates, so I decided to try that as well.  I used a piece I etched a couple of weeks ago.  I think it needs to be a deeper etch though.  As you can see, it is pretty, but not very prominent.


Well, there you have it.  In my humble opinion, while these worked to a certain extent, it was pretty hard on the Big Shot.  I had to add more layers to get enough pressure to impress the design and it took more muscle.  I may have warped the top plastic layer of my cutting/embossing pad.  The embossing folders that are designed to work with this machine, since they have 2 sides with an interlocking design, tend to give a more defined impression.  I will probably stick to using a hammer and my bench block with the metal texture plates.

But wait, last minute light bulb...what about using a wire design?  I found a copper wire free-form reject in my scrap bin, and decided to give it a go.


Hmm, this actually worked pretty well.  Bonus, like the embossing folders, you get an inverted design on the other side.  I like them both...this is something I will definitely incorporate!

Well, there you have it!  It is possible to use the Big Shot with design plates and other texturing materials, but make sure to anneal the metal really well,  tape the materials and the metal blank to the machine, so that it doesn't slip around, be mindful to make sure you aren't abusing your machine with too much force, and have fun!

Let me know if you have been experimenting with the Big Shot or something similar since my last post...I would love to hear about your results and opinions!

Melissa Meman
Melismatic Art Jewelry
Art. Life. Love.


Saturday, February 23, 2013

Saturday Share - Embossing Metal with the Sizzix BigShot

It's no secret I love textured metal...hammered, punched, stamped, etched, embossed. My 1st foray into the arena of texturing metal was by hitting it really hard with my chasing hammer...I didn't really know what I was doing, but it made cool divots in the surface, and I was immediately addicted.  Plus, it felt really good to pound the hammer against the poor metal, leaving a lasting mark!

I eventually went to metal stamps, which deceptively a lot harder than it looked...I could never get a complete design, and when I would try a second hit, I got a lot of shadow images!

Next was etching...I like the result, but it is messy. 

Next, after falling in love with Keirsten Giles' gorgeous stamped designs, came hammering brass texture plates directly onto the metal.  Her generous posts on using vintage coins actually opened my eyes to more possibilities...also, she stressed the fact that you needed to anneal the metal and tape it down to your steel block so it doesn't move!  Why didn't I think of that!  I still love this technique and use it frequently!

Next, I became drawn to gorgeous designs by various artists created by using ordinary textures found in nature...leaves, lace, screen mesh, etc.  This, I found out, entails using a rolling mill.  Want!  But, yikes, the least expensive ones are expensive!  Like so many of us, I was/am broke! 

Fast forward to seeing a blog posts by Erin Prais-Hintz about her Vintaj Big Kick.  I was intrigued and interested, but not so much in using the thin brass Vintaj blanks that were recommended.  I wanted to use metal sheet, and I wanted it to be more durable.  Then, this past fall I came across a blog post at Cinnamon Jewellery on her experiments with the Sizzix Big Shot.  I immediately decided I wanted to give this a go.  Right before Christmas, I found it on sale at Amazon and told Hubby that he could get it for me to put under the tree or I would get it for myself.  Nice, obedient (snort) guy that he is, he got it, but wouldn't let me play with it until after Christmas!

Here it is...


 Basically, it is a rolling mill originally created for embossing paper goods and other scrapbooking crafts.  It comes with this sort of folder that enables you to place media in with the embossing templates and create a layered stack that is thick enough to press the images into the media, be it paper or metal.  The embossing folders to use are also created by Sizzix, or you can use other similar ones by other companies.  I actually found the 2 I currently have at Michaels, but there are lots more on line.

I have tried up to 22 gauge metal with great success.  The trick is to anneal the metal very well.  I usually pickle afterward so as not to stain the embossing folders with firescale and grunge!  The cool thing about these folders is that they are a bit transparent so you can see the design on top of the metal and line up the metal exactly where you want the embossing to happen.  The folder has a positive and negative design, so the finished piece is 2-sided, unlike etching and stamping.

Here are a few pieces I have created since using mine...


That's all for today...I want to do some more experimenting using texture plates and maybe some found object textures, but that will have to wait...I have an 11 yo with the dreaded flu, and 3 new baby guinea pigs to figure out!  Please share any experiences you have had with using the Big Shot or Big Kick with metal...especially non-Vintaj brass!

Happy Saturday!

Melissa Meman
Melismatic Art Jewelry
Art. Life. Love.