Showing posts with label sizzix bigshot. Show all posts

Saturday, February 21, 2015

Saturday Share - Re-Visit...Embossing Metal with a Sizzix Big Shot

Hi all, I have been swamped with day job woes, meeting publication deadlines, and well, just everyday family life.  Today, I decided to am re-run a post from almost exactly 2 years ago. Hope you get some inspiration and ideas!


It's no secret I love textured metal...hammered, punched, stamped, etched, embossed. My 1st foray into the arena of texturing metal was by hitting it really hard with my chasing hammer...I didn't really know what I was doing, but it made cool divots in the surface, and I was immediately addicted. Plus, it felt really good to pound the hammer against the poor metal, leaving a lasting mark!

I eventually went to metal stamps, which deceptively a lot harder than it looked...I could never get a complete design, and when I would try a second hit, I got a lot of shadow images!

Next was etching...I like the result, but it is messy.

Next, after falling in love with Keirsten Giles' gorgeous stamped designs, came hammering brass texture plates directly onto the metal.  Her generous posts on using vintage coins actually opened my eyes to more possibilities...also, she stressed the fact that you needed to anneal the metal and tape it down to your steel block so it doesn't move!  Why didn't I think of that!  I still love this technique and use it frequently!

Next, I became drawn to gorgeous designs by various artists created by using ordinary textures found in nature...leaves, lace, screen mesh, etc.  This, I found out, entails using a rolling mill.  Want!  But, yikes, the least expensive ones are expensive!  Like so many of us, I was/am broke!

Fast forward to seeing a blog posts by Erin Prais-Hintz about her Vintaj Big Kick.  I was intrigued and interested, but not so much in using the thin brass Vintaj blanks that were recommended.  I wanted to use metal sheet, and I wanted it to be more durable.  Then, this past fall I came across a blog post at Cinnamon Jewellery on her experiments with the Sizzix Big Shot.  I immediately decided I wanted to give this a go.  Right before Christmas, I found it on sale at Amazon and told Hubby that he could get it for me to put under the tree or I would get it for myself.  Nice, obedient (snort) guy that he is, he got it, but wouldn't let me play with it until after Christmas!

Here it is...

 Basically, it is a rolling mill originally created for embossing paper goods and other scrapbooking crafts.  It comes with this sort of folder that enables you to place media in with the embossing templates and create a layered stack that is thick enough to press the images into the media, be it paper or metal.  The embossing folders to use are also created by Sizzix, or you can use other similar ones by other companies.  I actually found the 2 I currently have at Michaels, but there are lots more on line.

I have tried up to 22 gauge metal with great success.  The trick is to anneal the metal very well.  I usually pickle afterward so as not to stain the embossing folders with firescale and grunge!  The cool thing about these folders is that they are a bit transparent so you can see the design on top of the metal and line up the metal exactly where you want the embossing to happen.  The folder has a positive and negative design, so the finished piece is 2-sided, unlike etching and stamping.

Here are a few pieces I have created since using mine...

These were patina'ed with Ranger Inks and sealed with Ice Resin
...featuring ceramic beads by LeAnn Weih.

These were torch-fired enameled for a cool effect...featuring lampwork by Jelveh Jafarian.

These were run through the Big Kick, then punched with holes!

Favorites..they were bought by my sister as a gift to her daughter-jn-law!  I need to make more!

That's all for today...I want to do some more experimenting using texture plates and maybe some found object textures, but that will have to wait...I have an 11 yo with the dreaded flu, and 3 new baby guinea pigs to figure out!  Please share any experiences you have had with using the Big Shot or Big Kick with metal...especially non-Vintaj brass!

*****

Thanks for letting me share this older post....a few months after I posted this, I did a followup, using other things for embossing...check it out here!  And don't forget that 1 week from today is the AJE Component of the Month hop, featuring metal clay components from yours truly!!!


Saturday, April 20, 2013

Saturday Share...Big Shot, the Sequel!

Back in February, I shared some of my experiences with using the Sizzix Big Shot using their embossing folders.


Several of you commented, asking if the Big Shot could be used  with other materials...brass design plates, found objects, etc.  My curiosity sufficiently aroused, I have since been playing around here and there with using other things besides the suggested embossing folders to create texture on metal with it. So, I thought I would share my findings with you today!

As a standard procedure before running a piece through the Big Shot, I anneal my metal with my torch (I used my Lenk butane, but any torch will do), so they would be as soft as possible.

First up, I wanted to try some design plates I found a while back on the cheap at Michael's.  I bought them to try and hammer the texture into the metal, and put them away...I actually forgot I had them!

I experimented with 3 different textures, to varying degrees of success. At the top of the photos are the plate I used, and the bottom is the outcome.  The plates were 2-sided, opposites...indented on 1 side,  raised on the other.  I used the raise side on all 3 tries.


It worked, but it didn't really give me a clean impression...sort of hazy, whch of course could work, depending on your design.

Next, I decided to try some burlap fabric that I had.  I have hammered fabric and screen wire textures in before to mixed success, so I thought I would give it a go.


Again, not a terribly clean impression, but I sort of like it.

The next pieces used a couple of steel components I just got.  The filigree rectangle actually made one of my favorite textures.  Doesn't really look like the filigree design, but it is a cool texture...sort of like concrete block!  The leaf only gave an outline, but it works!


Tracy over at Cinnamon Jewellery (I absolutely love her work!!) commented that she was etching pieces to use as texture plates, so I decided to try that as well.  I used a piece I etched a couple of weeks ago.  I think it needs to be a deeper etch though.  As you can see, it is pretty, but not very prominent.


Well, there you have it.  In my humble opinion, while these worked to a certain extent, it was pretty hard on the Big Shot.  I had to add more layers to get enough pressure to impress the design and it took more muscle.  I may have warped the top plastic layer of my cutting/embossing pad.  The embossing folders that are designed to work with this machine, since they have 2 sides with an interlocking design, tend to give a more defined impression.  I will probably stick to using a hammer and my bench block with the metal texture plates.

But wait, last minute light bulb...what about using a wire design?  I found a copper wire free-form reject in my scrap bin, and decided to give it a go.


Hmm, this actually worked pretty well.  Bonus, like the embossing folders, you get an inverted design on the other side.  I like them both...this is something I will definitely incorporate!

Well, there you have it!  It is possible to use the Big Shot with design plates and other texturing materials, but make sure to anneal the metal really well,  tape the materials and the metal blank to the machine, so that it doesn't slip around, be mindful to make sure you aren't abusing your machine with too much force, and have fun!

Let me know if you have been experimenting with the Big Shot or something similar since my last post...I would love to hear about your results and opinions!

Melissa Meman
Melismatic Art Jewelry
Art. Life. Love.


Saturday, February 23, 2013

Saturday Share - Embossing Metal with the Sizzix BigShot

It's no secret I love textured metal...hammered, punched, stamped, etched, embossed. My 1st foray into the arena of texturing metal was by hitting it really hard with my chasing hammer...I didn't really know what I was doing, but it made cool divots in the surface, and I was immediately addicted.  Plus, it felt really good to pound the hammer against the poor metal, leaving a lasting mark!

I eventually went to metal stamps, which deceptively a lot harder than it looked...I could never get a complete design, and when I would try a second hit, I got a lot of shadow images!

Next was etching...I like the result, but it is messy. 

Next, after falling in love with Keirsten Giles' gorgeous stamped designs, came hammering brass texture plates directly onto the metal.  Her generous posts on using vintage coins actually opened my eyes to more possibilities...also, she stressed the fact that you needed to anneal the metal and tape it down to your steel block so it doesn't move!  Why didn't I think of that!  I still love this technique and use it frequently!

Next, I became drawn to gorgeous designs by various artists created by using ordinary textures found in nature...leaves, lace, screen mesh, etc.  This, I found out, entails using a rolling mill.  Want!  But, yikes, the least expensive ones are expensive!  Like so many of us, I was/am broke! 

Fast forward to seeing a blog posts by Erin Prais-Hintz about her Vintaj Big Kick.  I was intrigued and interested, but not so much in using the thin brass Vintaj blanks that were recommended.  I wanted to use metal sheet, and I wanted it to be more durable.  Then, this past fall I came across a blog post at Cinnamon Jewellery on her experiments with the Sizzix Big Shot.  I immediately decided I wanted to give this a go.  Right before Christmas, I found it on sale at Amazon and told Hubby that he could get it for me to put under the tree or I would get it for myself.  Nice, obedient (snort) guy that he is, he got it, but wouldn't let me play with it until after Christmas!

Here it is...


 Basically, it is a rolling mill originally created for embossing paper goods and other scrapbooking crafts.  It comes with this sort of folder that enables you to place media in with the embossing templates and create a layered stack that is thick enough to press the images into the media, be it paper or metal.  The embossing folders to use are also created by Sizzix, or you can use other similar ones by other companies.  I actually found the 2 I currently have at Michaels, but there are lots more on line.

I have tried up to 22 gauge metal with great success.  The trick is to anneal the metal very well.  I usually pickle afterward so as not to stain the embossing folders with firescale and grunge!  The cool thing about these folders is that they are a bit transparent so you can see the design on top of the metal and line up the metal exactly where you want the embossing to happen.  The folder has a positive and negative design, so the finished piece is 2-sided, unlike etching and stamping.

Here are a few pieces I have created since using mine...


That's all for today...I want to do some more experimenting using texture plates and maybe some found object textures, but that will have to wait...I have an 11 yo with the dreaded flu, and 3 new baby guinea pigs to figure out!  Please share any experiences you have had with using the Big Shot or Big Kick with metal...especially non-Vintaj brass!

Happy Saturday!

Melissa Meman
Melismatic Art Jewelry
Art. Life. Love.


Thursday, February 14, 2013

Our Other Loves...

Yay - It's Valentines day and the world is full of hearts and flowers and other such romantic stuff and, if you're anything like me, probably has been for quite a while where jewellery and art beads are concerned (warning - non romantic type here...!). So by way of a change I asked some of my AJE team mates to tell me about the other loves in their working lives - those things however large or small that made their creative lives easier, better or just more fun...And they were very forthcoming...

Pliers featured strongly with Diana sharing her love for her Lindstroms..."Besides the fact that they are perfection...they are ergonomic and can take a beating. They may be terribly expensive but they last". Oh and don't ask her to share them because she won't!

Melissa on the other hand is currently very attached to her more 'budget' priced Xuron flush cutters whilst my Wubbers are definitely up there on my list of loves.

Melissa is also rather taken with the 'Sizzix BigShot' she got for Christmas  "it embosses metal similar to a rolling mill (to a certain extent) but way, way less expensive!" This is one of the gadgets I keep eying up (since I can neither afford nor house a rolling mill) and I am rather jealous of Melissa's new love!


Torch fired enamelling is a technique finding favour with more than a few admirers on the team and certainly a major crush for both Melissa and more latterly Francesca - "I am currently in love with torch fired enameling - it's a relatively new technique for me, but I've become a little obsessed with it". From a tool perspective Francesca's jeweler's saw and her flex shaft rank highly as both are so versatile.


The objects of affection for Jo are her set of Vallorbe needle files of which she says "they cut beautifully but need very little clean up afterwards, and the range of shapes in the set mean that I've always got the right shape for the job. Expensive yes, but definitely worth it as they will set me a lifetime and save me a lot of time compared to using cheaper files". 

Running a close second is her favourite hammer... "I inherited it, and it's a bit knocked about and the head has imperfections that create the most beautiful texture, the texture that's on some of my clasps. I would be devastated if I lost it as its irreplaceable!" Hope it's insured Jo!


Sue Kennedy told me that lampworkers are fickle about thier favorites, because each new tool or new glass is a favorite but her current loves are her cab mandrels..."It is a lot of fun to make cabs, as I'm finding out...I need to buy more!"

Entertainment is also important for the team while they are hard at work at certain tasks and when Jenny is wire wrapping or stringing she loves to listed to Podcasts like The History Chicks - "a sassy funny informative podcast about women, both famous and infamous throughout history". Hmmm, I wonder if any of us will ever feature... 

One of Jenny's favourite bands to listen to while working are Frenchy and the Punk "upbeat, gypsy, punk... hard to describe, but infectious and energizing" says Jenny - sounds perfect to me.


Our esteemed leader Jennifer likes to listen to audio books while she's making beads and currently holds a torch (sorry couldn't resist it) for the books in the Dresden Files series..."It's way outside my norm, but it's entertaining and the narrator is perfect for the hero. Love it when that happens". I have to say I don't know these books at all but that chap on the cover does look rather alluring so I might just have to check them out!


Jennifer has also developed a passion for one of my loves - bronze wire. Obviously working with bronze clay this is a staple for me and I get through a ton of the stuff, particularly as It can be fired to very high temperatures and still retain it's strength and appearance. It's harder and more tensile than copper or silver and can be tough on the hands but I just love it and, as Jennifer commented, you get the most amazing colours when you take a torch to it.


Designer Linda's current passion is her camera - a Cannon Power Shot SD 4000 IS. "It's made a big difference to the quality of my photos in my jewelry listings. It has a low light setting that allows me to take pictures in most light situations. It also lets you get fairly close macro shots for a point and shoot. Love it!' 


And then of course there are some of us who fall for the supporting actor rather than the romantic lead. Kristen for example is much enamoured by a simple pair of nail clippers "because they get very close to the bead work to snip threads" and she always has to have a cross stitch needle close for pulling threads when there is a mistake.

As for me, I too have a couple of less than glamorous tools in my kit that I couldn't be without. I was gifted these dental picks/scrapers by my friend Cilla Watkins, a Dental Hygienist and the designer behind 'Tell Your Girlfriends' jewellery and quite frankly, I don't know what I did before I had them, As well as being perfect clay tools for cleaning, shaping and carving they have a myriad of uses from picking up tiny beads to getting those ridiculously small bits of steel shot out of nooks and crannies. Thank you Cilla.


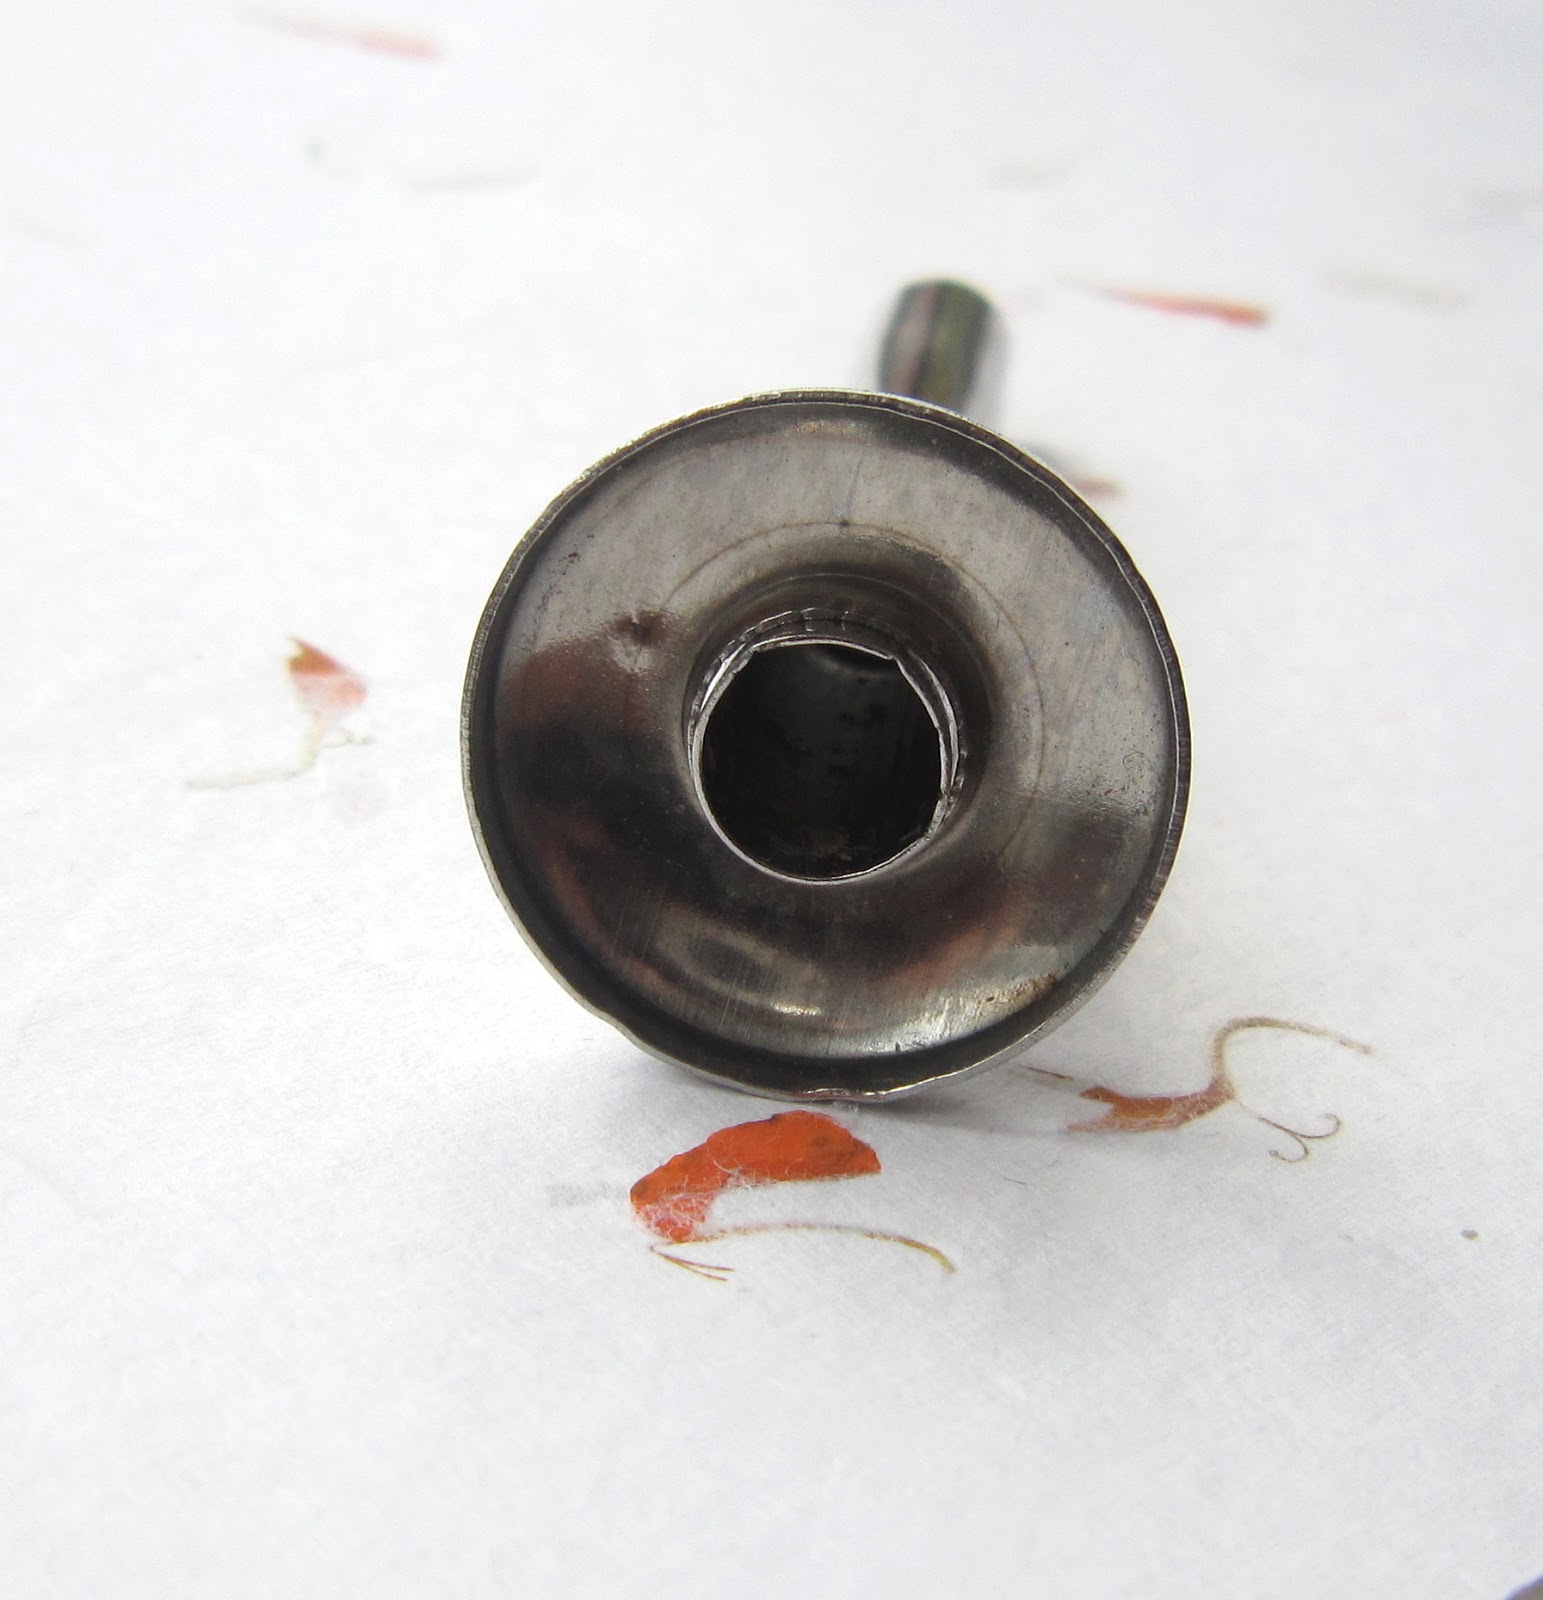
And last up is a little gadget which has made my life so much easier in a way it was never designed to do...


This is the funnel from a fancy bottle of olive oil that has long since been disposed of and it now serves as a cutter for toggle clasps. It has a 2cm ring which slides up and down a central tube which just happens to be the perfect size for the cut out. I am terrible at centering things by eye and it's too time consuming to measure each one so this is just a godsend and, having just made in excess 100 clasps for a bead show I can tell you that I seriously LOVE this little treasure!


So there you go then - a few of our loves but what about you...what's the one thing you couldn't or wouldn't be without in your creative life...we'd love to hear.

Oh and while I'm here, don't forget that the next reveal for the earring challenge is this coming Sunday, so if you're one of our pinners make sure you have your designs uploaded to the Pinterest board if you want a chance to be featured on the blog.

Lesley
The Gossiping Goddess