Showing posts with label ceramics. Show all posts

Sunday, October 2, 2016

An Abundance of Tree Inspiration

When Caroline chose trees as the theme for September's challenge I was thrilled! I have been in awe of trees for a very long time. I have taken countless photos and have used trees as inspiration in my jewelry and fiber art for several years.
It wasn't until I sat down to make some jewelry for the challenge that I realized just how many items I had already created using trees/leaves as inspiration.
After completing the tree challenge I wanted to do another blog post so I could share the numerous pieces that I have created over the past 8-10 years with trees as my inspiration.
As you will see trees can be depicted in any medium. They lend themselves to hand stitching, machine stitching, creating leaves from copper, creating trees from wire, stamping in clay, stamping on fabric...The opportunity to use trees as inspiration in your art is endless!
                                            A few pieces of jewelry using leaves-
Brass Etched Leaf, Agate & Acorn Necklace
                      
Hand Forged Copper Leaf & African Turquoise Necklace
Rustic Raku Leaf With Tibetan Agate & Glass Beads
And a beaded cabochon that looks as though you are peaking through hanging limbs at a misty pond.
Bead Embroidered Jasper Necklace Hanging From An Antler

You can etch copper with trees and encase in resin.
Etched Copper In Metal Bezel With Resin

                                     Trees can be embroidered by hand and beaded.
Detail Of Crazy Quilt
Fiber Collage With Ribbon/Embroidered/Beaded Tree
Felted Fiber Collage With Beaded Tree
Photo Printed On Fabric With Multiple Layers of Embroidery & Beads
Trees can be machine embroidered and embellished with jewelry type elements. These are close-ups of art quilts with trees as the central element.
"Keeper of the Woods' Art Quilt
"Can't See the Forest for the Trees' Art Quilt

                              You can use rubber leaf stamps to print on fabric or paper.
                              I used the same hand-carved stamp for both of these pieces.
"Spring Revival" Art Quilt

"Central Park Player" Mixed Media Collage
Or you can actually use leaves to paint and print onto fabrics. After I printed with the leaf I encased the painted leaf between fabric and tuille then edge-stitched it.  I attached the leaf on the printed fabric to create more dimension.
Fiber/Mixed Media Mini Quilt
And again, I used a real leaf in a mixed media collage below.
"Be Who You Are" Mixed Media Collage
Leaves can be used as a resist for sun printing with setacolor paints as in the photos below. The first photo also has leaves stenciled on the fabric. And the second photo has a screenprinted dandelion.
Dyed, Sun Printed, Stenciled, Screen Printed

Dyed, Sun Printed, Screen Printed, Machine Embroidered & Beaded
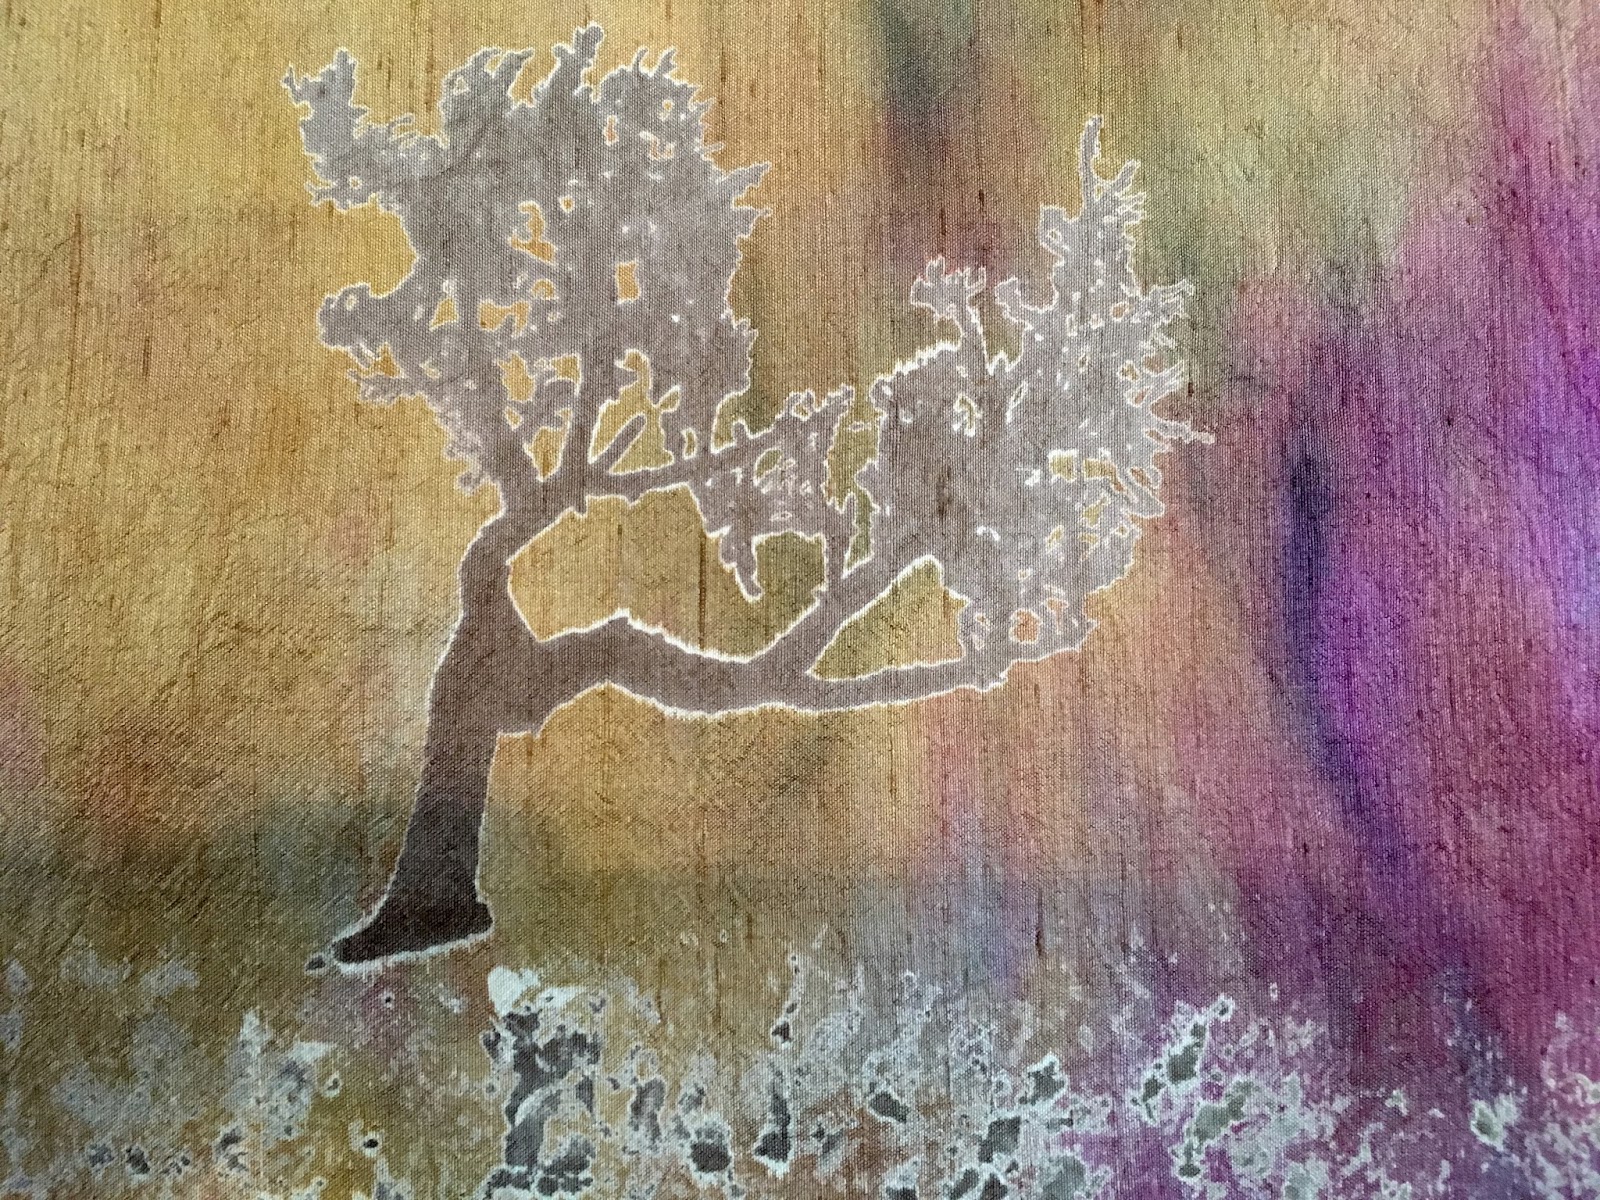
These trees were screenprinted onto hand dyed silk with discharge dyes and are just waiting for me to do something with them!
Dyed Dupioni Silk Screen Printed With Discharge Dyes

Dyed Dupioni Silk Screen Printed with Discharge Dyes

Leaves can be used to impress into clay. The one below is raku.
Elephant Ear Leaf Plate

The ones below were rubbed with oxides then high fired glazes applied on stoneware.
Hosta Leaf Plate
Hydrangea Leaf Plate

Maple Leaf Plate With Leaf Handles (I forgot what leaves I used?)
Believe it or not, there are still other ways I have used trees.  I mentioned all the photos I've taken- well, they could possibly be a whole series of blog posts by themselves so I will stop here.

Hopefully, you will be inspired by trees in ways you had never considered before. Maybe we will revisit the tree theme here again in the future. If you didn't get a chance to see all the participant's tree inspired pieces please do so. They were fabulous!

Looking forward to October's component of the month-sugar skulls.


Wednesday, June 1, 2016

Whimsical Work

I'm about to start packing up my studio and office to get ready for my move to New York (Colin got a new job) but before I do that, I wanted to make one more batch of work for my shop.  Apparently I needed to make fun & silly pieces right now.

Forming the shell
I decided to start with some stoneware snails.  The first step in making these is to form their shell.  I roll a ball of clay and then flatten the back by gently tapping it with a wood block.

Carving the shell
I set the shell aside for a few minutes so it can dry just a tad.  I then go back and carve my spiral design into each side.

Forming a wire antenna
While the shell continues to dry, I cut and form some little antennae from high-fire wire. 

Almost a snail
The body is then formed from another piece of clay, rolled into a log and then shaped further.  The antennae are then inserted on top of the head.

Oh My!
My favorite part is giving each snail their eyes and silly expression!

Scoring the shell
Once the body is finished, it is time to attach the shell.  I score the bottom of the shell and the top of the snail, add a bit of water and gently press them together.

Greenware Snail
And here he is prior to any clean-up with a sponge.  After he gets sponged, he'll be bisque-fired, glazed and then final-fired.  I can't wait to see how he turns out.  


Little Buggy Face
I also made a little buggy face guy.  Wish I had time to make more of these before the move!

And then there were these ridiculous things...

Funny Face Wearing Underpants
I decided it was about time I gave my funny face beads some bodies.  This guy is wearing some underpants and slippers!  I'll fill in their joints with beads so that they aren't stumpy when they come to life.

Funny Face With T-Shirt
And this guy is wearing a t-shirt!  I think they'll make fun ornaments but if I can make them a bit smaller, they might even work as pendants for people that want to let their silly show!

I'll finish these pieces up during the week, list what I can in my Etsy and then pack up the studio and get ready to move!

Happy Beading!

Friday, May 20, 2016

The Three Muses - a glaze journey...

This is my newest tile design and it tells quite a tale. Pour yourself a cup and I'll tell you... 
And so it begins. 
Here is my new Three Muses tile - the original sketch and the first copy pressed from my mold. It was a long time getting to this state... designing, sculpting, casting in plaster, curing. I was thrilled to have it in my hands. Definitely my most complex tile to date - especially since I do not often do (human) figures. 

I have Lesley and Caroline to thank for the inspiration. In a truly "Scenius" way, a conversation we three had started all this. We were discussing felting, and wool, and curly locks, and gabbing a bit as you do. Someone, Lesley I think, names the thread Three Wise Women. A little cheeky, and a little accurate as we were each other's go-to for feedback and advice. 

I swear this image popped into my head fully formed. 
Please note: thumb for scale! All you are about to see takes place in a tile maybe 6 x 7". 
And then it went further. Three wise women. Three Graces of Classical myth, three Muses. Suddenly Burne-Jones and Rossetti and the Pre-Raphealite painters were there too clamoring for attention. Long Waterhouse style dresses to hide the body (not cheating; just simplifying) and evoke an era of art history? Done. Lets go all the way and inscribe the tile with the motto associated with the Pre-Raphaelite brotherhood! ( In for a penny... ) The motto is "Ars Longa, Vita brevis" which translates to "Art is long, life is short". 

Animal familiars? Three witches? My 2 dogs naturally and Lesley's cat Cleo. A hare for Caroline? Sure! The two of them had recently met up for a hare themed exhibit in the UK and I was desperately jealous. You KNOW how I feel about hares. Oh and should I mention that the hairstyles are loosely inspired by we three? I know - it seems over the top. But it felt right to me. They DO need hairstyles, after all. 

So I recently glazed the first two of these tiles. Why only 2? Well... They are very complex. I wanted to share the process here in a photo essay of sorts. This IS how I glaze all of my ceramic tiles - this one is just many more small parts.. 

1. Stain the entire tile with black (or dark) underglaze. Looks a wreck until you sponge it back. I like the added depth it gives the relief and it prevents any glaring white areas if a spot is accidentally left unglazed. 
Trust is needed here. 
2. Glaze the background ares. I like to work "back to front". This is either underglaze or glaze depending on my planned treatment of the frame. Three coats in and around. 
I think they look good already! SO excited. 
3. Three coats of peachy underglaze on faces and hands. 
Dark dark blue used to stain crevices on this version. 
4. Base color of hair - 3 coats. Sometimes 2 if my underglazes are thick. 
Even working 2 at once there are many variations. Truly one of a kind results. 
5. Accents in hair. Highlights and low lights. 
Aiming for auburn in the middle. We shall see. 
6. First dress: green glaze - 3 coats. 
7. Secong dress - dark blue glaze - 3 coats. 
8. Third dress - turquoise glaze - 3 coats. I selected this analogous palette for the first tile because I knew these glazes and colors worked together, chemically and visually. 
They look so "bleh" at this stage. These are glazes I have used and trusted for 20 years though!
9. Paint the hare and cat in underglazes, with details. ( Sorry Cleo - your marking will have to wait.)
Feeling a little disappointed with detail in these two animals. Then I remind myself they are like the size of a quarter! 
10. Paint the dogs in underglazes. Include shadowing and highlights. Yes, they look like my dogs. What else did you expect? 
OK that was fun! 
Doggy details. Oscar in black and white. Zoey in fawn and brown. 
11. Glaze the background - 3 coats! And edges of tile. In this case I used a transparent grey; since the center area had an underglaze color on it the tile will read ad having a 2 toned background. ( Different tile as can see. I did say I did 2 at a time) AND glaze the center figures sash! 
Yes - different dogs. Simplifying a little and mirroring the cat and rabbit's colors. 
12. Very carefully paint 3 coats of clear glaze to all areas that are underglaze only. This will seal them, give them a gloss finish matching the other glazes and make them durable. 
This is tedious and my least favorite part. 
13. Fire the tile in the kiln. These are low-fired glazes and fire to ^04 at app. 1850 degrees F. 
Ta-Da! And yes - this one already sold. My husband told a return customer this story and it was a done deal! 
I couldn't be happier! I wish I could accurately tell you how LONG it took to do the 2 tiles pictured here in this photo essay. I will keep track next time. I like this palette - I think a tile this "busy" needs harmonious colors to read well without dramatic contrast - so it doesn't compete with itself. I do look forward to trying other palettes on the next few.

Thanks for staying until the end... I am proud of and deeply invested in my work, the details, the layers of meaning that may never be evident to the casual viewer. This new design means quite a bit to me and I am happy to share the backstory with you!