
************************************************************
Firstly, I'd like to say hello, and big
thank you to Jennifer for having me here!
I'm Caroline from Blueberribeads, a ceramic
bead maker, but I love to try out anything creative, and I love mixed media.
I first discovered electroforming after
stumbling across some beautiful lampwork beads while surfing around on google.
I instantly fell in love with the effect, the colour, the texture, everything
about it, and decided this was what my ceramic beads needed!
After much research and hunting around for
parts, I worked out how to do it, so here's my version of electroforming in a
nutshell...

Electroformed Ceramic Acorns by Blueberribeads
Electroforming uses the same process as
electroplating, where items are covered with a thin coating of metal. The
difference with electroforming, is that the coating is much thicker and can
also be used over organic, non metal items such as seed pods and beads.


Electroformed seed head by Edooley
Now for the technical bit...
To 'grow' copper on to an item electricity
passes from the DC power supply to the Anodes. These are pieces of sacrificial
copper connected with wires around the tub suspended in a copper sulphate
solution. The metal dissolves from the anodes passes through the solution and
reforms on the cathode (the item to be electroformed). The cathodes, in this
case beads and leaves, are suspended with copper wire into the solution and the
bar is connected back to the power supply. The idea is to pass the electrical
charge around in a loop.
Beads and leaves aren't conductive, so to
complete the loop, they need to be painted with a conductive paint to make sure
the copper forms where you want it.

To make leaves and other items in to pendants and charms, you need to attach a bail, I do this with 2 part epoxy resin. The next step is to seal the item if it's porous. I use clear acrylic car spray. Then when everything's set and dry they are painted with the conductive paint.
To make leaves and other items in to pendants and charms, you need to attach a bail, I do this with 2 part epoxy resin. The next step is to seal the item if it's porous. I use clear acrylic car spray. Then when everything's set and dry they are painted with the conductive paint.
Once the paint is dry they are hung in the
solution and power is switched on. To form something like one of my acorns
takes about 10 hours. It's an extremely boring process and there's not much to
see, but the end result is worth the wait!
When the leaves come out, they are bright
copper, so to enhance the pattern of the leaves and the natural texture of the
copper, I treat them with Liver of Sulphur and give them a tumble to bring back
the shine.
To show you some of the effects you can get
with electroforming, here's a few pics of my work and some of my other
favourites.


Ceramic face pendant by Blueberribeads
Ceramic & leaf art nouveau pendant by
Blueberribeads
Skeleton key by KimV Glass
Ring by PIROK

Glass Big hole beads by BeadsofPassion
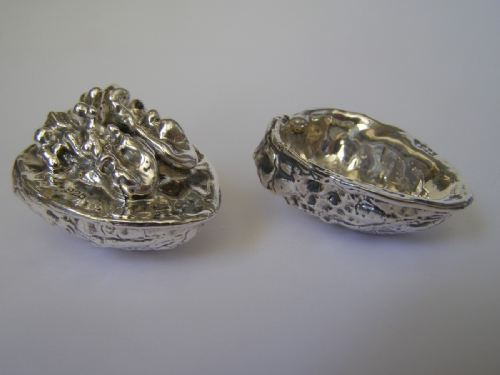
Glass Acorn by Julie Nordine
I hope you've enjoyed reading and that I've
maybe inspired you to have a go!
-Caroline
Wonderful post, I love electroforming and have done just a bit. One of these days I'd love to do more, it's on my long list of things I'd love to do as most of us have. I had to purchase those gorgeous beads from BeadsOfPassion, a major splurge and I'm so excited about it!!
ReplyDeleteThanks Kristi, I'm a little bit jealous of your new purchase! They're beautiful!
ReplyDeleteKristi & I are going on a metalsmithing retreat next week and I believe that electroforming is on the agenda. So this post was especially timely and fascinating. Thank you for sharing.
ReplyDeleteOkay I have to tell you this is the most amazing process! I am jealous of all that can play with fire an now electricity!!! I would love to incorporate these gorgeous beads with my seed beads. Thank you so much for being a guest blogger and adding to my wish list items!!!!
ReplyDeleteBrilliant post Caroline - not sure I get the physics bit but the effect is fantastic and I love my acorns. Thanks for sharing with us.
ReplyDeleteThis looks like a fascinating process! In fact I have it on my long list of things I want to try.
ReplyDeleteThanks so much for sharing!
I love the look and although so far I've only done some plastic chickens you've given me a poke to get my equipment back out and play. It is kind of magical!
ReplyDeleteFabulous post! What is "conductive paint"?
ReplyDeleteGreat post and I love the interesting effect electroforming creates.
ReplyDeleteThanks all, I'm thrilled to have such a lovely response, my OH thinks I'm nuts... it's nice to meet some like minded people! :)
ReplyDeleteKaren, the paint is tiny particles of copper suspended in a medium that you can paint with. It means that you can 'paint' the metal wherever you'd like it to form.
Caroline, fantastic post! I saw electroforming once before on educational public TV, but you've explained it so clearly here. Thank you. i have a new appreciation for the labor of love & art form!
ReplyDeleteYour work is divine and lovely. I'm so excited I'll be participating in the upcoming blog hop with you & Lesley. Not just excited -- honored! And so looking forward to working with your gorgeous beads.
Rita
Very interesting post, always wanted a go at electroforming onto my beads, must get the bits and bobs to have a go. Thank you
ReplyDeleteThank you Rita, that's really lovely of you to say so! Can't wait to see what you do! :)
ReplyDeleteLooking forward to seeing how you get on Elaine!
ReplyDeleteNow even more than ever I want to come to your place for art camp! Hi Caroline - nice to see you here! Gorgeous examples that I now want... and you really demystified the process for me! Thanks!
ReplyDeleteThanx for the helpful post! I also do some electroforming at home. The only thing I cant figure out is why does it sometimes plate smoothly, sometimes bobbly and sometimes semi-spiky?? Because sometimes the texture is way to rough for a jewellery piece. Can you help??
ReplyDeleteHere you can see my stuff --> http://kinkeljewellery.wordpress.com/2012/03/05/electroforming/