Showing posts with label bracelet tutorial. Show all posts

Friday, December 4, 2015

Knotted Bracelet Tutorial


A few years ago I took a mini class from Erin Seigel on making knotted waxed linen earrings and I've been a knotty girl ever since.  I love the huge range of colors and the tactile feel of the linen as I make the knots.  Today I'm I sharing a tutorial for a knotted holiday bracelet.

I shared a button loop bracelet tutorial in the past, but it was made with flexible jewelry stringing wire. The purpose of this tutorial is not necessarily to help you end up with a bracelet just like this, but rather to share with you some hints or tips that will help you work with waxed linen, whether you make a bracelet like this in other colors or whether you use these techniques in earrings or necklaces.  So, let's get started.

Waxed linen comes in different thickness or plies.  The linen I'm using in this bracelet is 4 ply, which is what I usually use.  You can choose to use a neutral or coordinating color or try out  bright contrasting colors.  In this case I'm using 4 ply black.

 Materials
  • About 35 inches 4 ply waxed linen in the color of your choice
  • 3-4 focal beads
  • 1 button (in this tutorial I'm using a button with a shank).
 (The ceramic flower bead is by Lesley Watt of Thea Elements.  The faceted ceramic red bead is by Michelle McCarthy of Fire Fly Design Studio.  All other ceramic beads are mine.
  • Size 6-8 seed beads or 4 mm fire polish or round beads
  • A handful of various other beads, medium and small size, with holes large enough to accommodate one pass of the linen  (I only ended up choosing a few of what you see below.)
 Directions:
1.  Thread on a dozen or so seed beads or 4 mm beads.  Fold the cording in half and center the beads on the fold. Pinch the working ends of the cord together and see if the loop you've formed will fit around the button,  You want it to fit snugly, but not tight.  Adjust the number of beads in your loop, if needed, to get the right fit.
2.  Tie an overhand knot at the base of the loop.
*Hint - Waxed linen is a pretty forgiving material if you go slow with it.  Make your overhand knot, but tighten it slowly.  You want the knot as close to the base of the loop as possible.  If it is too far away, you can loosen it up and re-position it so it will be closer to the base of the loop.  It's easy to loosen and re-position a knot as long as you haven't completely tightened it.  But once it is pulled tight, it is unlikely that you will be able to loosen it.  So go slowly and pay attention to where the knot will be landing.  
3.  Now string on the focal beads.  You can knot between each one or just place a knot at the end of this grouping, as I have done.
4.  Now separate the 2 cords and string 1 of your smaller beads onto each cord and tie an overhand knot after each small bead.
5.  Continue to add beads to each thread.  You can knot after every bead or after small groupings of beads.  I'm doing a bit of both.  If your bead has a large hole, like the red cube bead above, the knot may just slip inside the hole.  To prevent that, you can use a smaller spacer bead next to the hole, (see below).
Another way to compensate for an over-large hole is to make a grouping of beads, with smaller beads on each end, as I did with the large-holed green tube bead, above.
6.  Continue adding beads and knotting until your bracelet is the length you want.  When using larger beads, as I have, you need to make a longer bracelet, as the beads stand off of your wrist, increasing the circumference. Drape the bracelet around your wrist to see how it is fitting.  Remember, you can always add more beads, but once knotted, you cannot subtract beads and you would have to start all over from the beginning.
7.  When you've reached your desired length, bring both linen cords together and tie an overhand knot.
8.  Take one cord and pass it through the button shank from left to right.  Pass the other cord through from right to left.
 9.  Pull these two cords in opposite directions until the button is close to the knot you made at the end of the bracelet.  Wrap the two cords in opposite directions around the space right above the knot.  Tie them in a knot and then wrap them around to the other side and make a knot there, too.  Dab the knot with a touch of glue and trim the cord ends.

I hope you've enjoyed this tutorial.  If you make something following these directions, I'd love to see it.  You can tag me on Facebook or post it on the Art Jewelry Elements Facebook page.  Enjoy!

~Linda
Linda Landig Jewelry 


Friday, December 19, 2014

Button Closure Bracelet Tutorial - Re-post

Today I'm re-posting a tutorial from a little over a year ago.  I love making these button closure bracelets and people are always so delighted to discover how easy it is to fasten them!

~~~~~~~~~~~~~~~~~~~~~~~~~~~~~~~~~~~~

I love using button closures on bracelets and necklaces. Customers are always surprised and enchanted by this type of clasp and when they discover how easy it is to fasten a bracelet with a button, they are delighted!


So today I thought it might be fun to share a tutorial on how to make a 2 strand bracelet with a button and loop clasp. You can use any button you want.  I especially enjoy using artisan buttons or vintage glass buttons.  For this tutorial I used a handmade ceramic button by local artist, Terry Nokell, (no website).


Cuppa Joe Button Closure Bracelet

Materials

  • 20 inches (51 cm) beading wire, (I used Soft Flex, medium)
  • About 3 inches (7.6 cm) of scrap beading wire or thin cording
  • 2 sterling silver crimps.  At least 1 of the crimps must be wide enough to accommodate 4 passes of the beading wire
  • 1 crimp cover or a small bead that has a hole large enough to fit over a finished crimp
  • Assorted beads of your choice in different sizes and shapes, including some seed beads or other beads that are 4 mm or smaller
  • 1 button, 1 inch (2.5 cm) or smaller.

Directions


1.  As you can see in picture #1 below, a shank finding has been glued to the back of the ceramic button. Button and loop closures can be made with either shank buttons or 2-hole buttons.

2.  Measure out 20 inches (51 cm) of your favorite bead stringing wire. Set aside. Cut or find some scrap beading wire or thin cording.

3. Using the short piece of scrap stinging wire or cording,  thread the button to the center of the scrap wire.  You are going to use this short wire to grasp onto the button in step 7, when you are sizing the loop.


4.  Set the button aside for a moment and string seed beads or other smallish beads to the center of the 20 inch (51 cm) piece of stringing wire.

5.  Pinch the wire into a loop, as in picture 5, to estimate if the loop is large enough to fit over the button.  Don't worry, you can adjust the loop size in step 7, if needed.  When you think the loop looks like the right size, string a sterling silver crimp bead over both wires, (base metal crimps don't hold well and break easily). Slide the crimp up next to the beads.  Do NOT crimp it yet!

6.  OK, here's my trick for getting the right sized loop every time:  With your dominate hand, grasp both ends of the wire that you threaded through the button shank,  leaving a little slack.  The scrap wire enables you to hang onto the button, yet it allows the button to move naturally, as though it were attached to a bracelet.
With your non-dominate hand, hold the beaded loop, next to the crimp.  See if you can pass the button through the loop.  The best way to do this it to turn the button perpendicular to the loop, as shown in picture 6.  The button should slip through without any struggle or resistance.  Adjust the number of beads in the loop, if necessary and re-check it for size.  The loop should be a little larger than the perpendicular button, but not much larger.  The great thing about doing it this way is that nothing is crimped yet.  You can adjust things as needed before you go on.

7.  When the loop is sized correctly, crimp the crimp bead.


8.  Either cover the crimp with a crimp cover or cover it with a small bead, as I did here. I had a seed bead with a large enough hole.  Pony beads work well, too.

9.  Now for the fun part! Start adding on the beads you have chosen for your bracelet.  Start out with some smaller beads closest to the crimp.  This allows the 2 strands to lay nicely there, without being too bulky.  You can make both strands the same or different.  You can use patterns or not.  You can play with colors or go monotone.  Just have fun!

10. Keep adding beads until the bracelet is about half an inch (1.2 cm) shorter than the final length that you want. I wanted my finished bracelet to be 7.5 inches (19 cm) long, so I stopped adding beads after the bracelet reached 7 inches (17.7 cm).  Check to see if both strands are the same length.  Add or subtract beads as needed.    I had to make some minor adjustments to even out both strands, as you can see in photo 10.

11.  Thread the crimp onto both beading wires. This should be the crimp that can accommodate 4 passes of the wire. Then string on 3-4 small beads, the button shank and 3-4 more beads.


12.  Pass the wires back through the crimp and gently snug the crimp and beads, but not too tightly.  See how mangled my beading wires are?  My crimp bead was barely large enough to squeeze all 4 wire strands through it.  I had to wrestle them through the crimp bead with my pliers!  Crimp the crimp bead and trim the excess wire.

13.  Wear your bracelet proudly.  It looks equally pretty with the button on the bottom or top of your wrist.  Wear it anyway you like!


If you'd like some resources for wonderful artisan made buttons, visit my previous post, Button, Button, Who's Got The Button.

If you use this tutorial to make a button closure bracelet or necklace, I would very much like to see it!  Please either leave links in the comment section here or post pictures of your button and loop closure creations on the Art Jewelry Elements Facebook page.

If you have any questions as you use this tutorial, just ask.  I'd be glad to help.

Saturday, June 7, 2014

Make Your Own ~ Sweet Flower Dreams Bracelet

Yes, I'm still making jewelry… somehow I fit it in between all the bead making (my secret: I'm working very hard on giving up sleep. ;-)! Hey, everyone needs a hobby, right? So if making beads is now my part-time job, making jewelry is the perfect hobby… or at least that's the excuse I give myself when I need to shop for more beads and components.

And more jewelry for me always means more tutorials for you!

And if you love making jewelry, then being a part of AJE comes in very handy, since not only is there always a fresh supply of tutorials, tips, studio peeks, and inspiration, there's also the Component of the Month challenges, where if you're lucky you get a chance to add some new beads to your next design. Our May CoM was hosted by Sue Kennedy and that's how this new bracelet started… inspired by her sweet chicklet beads, I went with a soft shabby and worn vintage look, I turned away from my favorite autumn tones and put down my wire… and I really enjoyed it! I hope this little tutorial inspires you too!


Supplies you'll need:
- 2 (or more) bicone czech glass beads
- 3 (or more) glass chicklet beads
- a sleepy flower garden bunny
- 0/11 seed beads (I used frosted rosaline)
- a mother of pearl button
- one 2 inch fabric covered bead cord
- lace (make sure it's narrow enough to fit through the holes on the chicklet beads)
- hemp cord (or waxed linen… just make sure it fits your seed beads)

Tools you'll need:
- scissors
- a length of 22 gauge scrap wire
- glue

Before starting to assemble this bracelet, it's a good idea to lay out your beads and cords and measure to help you visualize the finished length. My finished bracelet fits up to a 6 1/4 inch wrist—I wanted it to fit somewhat tightly and I've got rather small itty bitty wrists, so depending on the size of your wrist, you may use need to use longer lengths of lace and cord and add a few more beads. Have fun with it and make it your own!

 1. I made the button clasp first. Start by cutting a 7 inch length of lace and fold it in half.


 2. Loop the scrap wire through the folded end of the lace for easy stringing.


 3. Gently pull the lace through.


 4. Remove the wire. Using a short piece of waxed linen, pass it through the loop of lace and tie the button in place. Move the chicklet up close to the button, leaving a bit of room between to form a shank.


 5. Glue the knot and you're done with this first bracelet section!


 6. Next I made the loop for the button clasp—cut about 12 inches of cord.


 7. String enough seed beads to form a loop that easily fits over the button.


 8. Tie a knot at the end of the loop, add the bicones and bunny bead, knotting between each one. You're now finished with the second part!


 9. Cut another length of lace, this time about 12 inches long. Fold in half and put the scrap wire through the cut ends (not the folded end).


 10. Pull the lace through the first chicklet, leaving a little space at the folded end.


 11. Take the ends of the cord at the base of the bunny and tie a knot inside the loop of lace.


 12. Trim and glue the knot.


 13. Move the chicklet bead up right beneath the bunny.


 14. Tie a knot in the lace and pull the other chicklet bead up just beneath. Remove the wire.


 15. Now for the last and easy step—first double check that your bracelet will fit and make any necessary adjustments…


 16. And then knot the ends of the lace together with the ends of the fabric covered bead cord.


 17. I added one more knot beneath the last chicklet and then knotted the lace and fabric together… trim and you're done!


I hope you had fun following along!
Have a most wonderful and creative weekend!


http://www.treewingsstudio.com/

Saturday, March 1, 2014

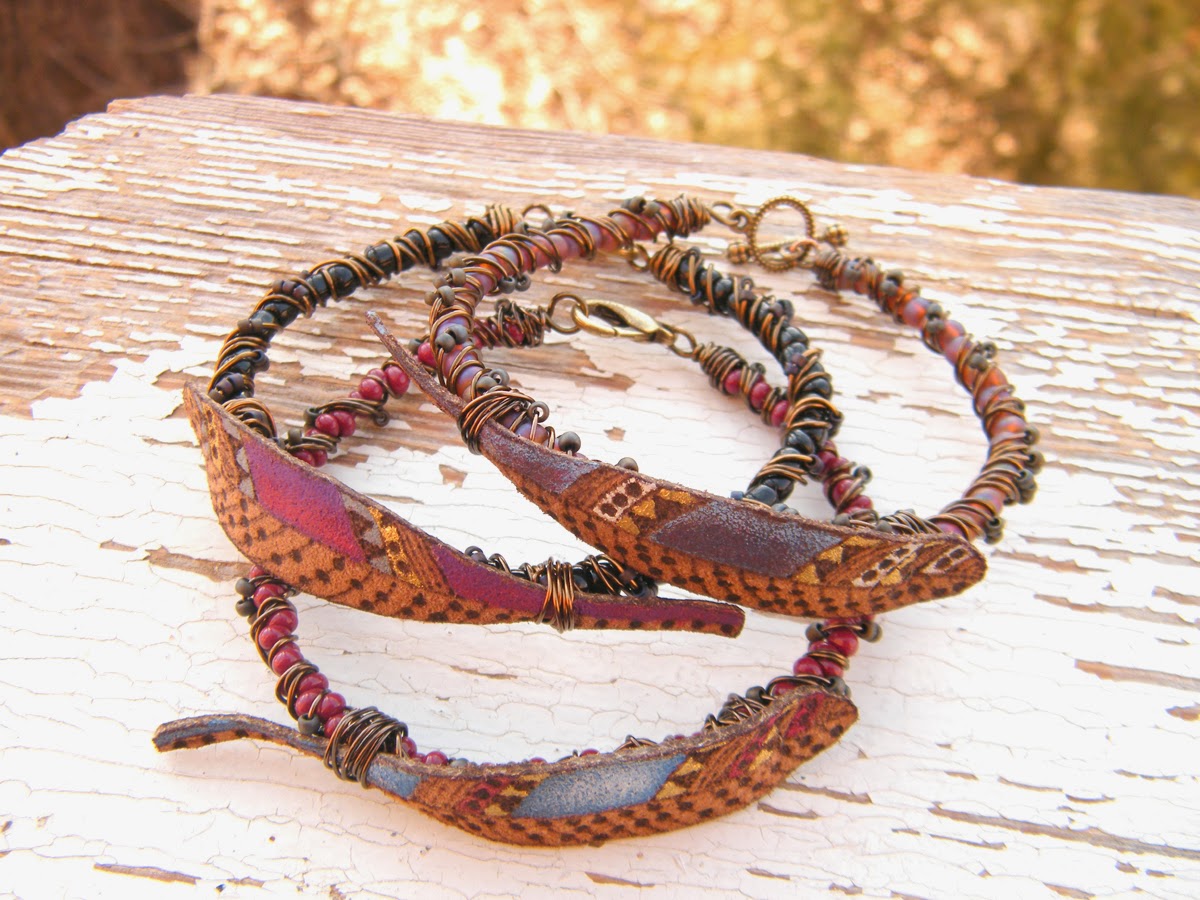
Make Your Own ~ Wire-wrapped Feather Bracelet

Okay… they're here!! I've finished painting my new leather feathers!

Making new jewelry components always means new jewelry design ideas... so...

Today I'm sharing a new bracelet tutorial with you!


Supplies you'll need:
- 20 gauge wire
- 22 gauge wire
- 24 gauge wire
- lobster claw clasp
- round 6/0 beads or magatama 3-4mm beads (I'm using oxblood magatama.)
- round 11/0 beads (I'm using iris gray.)
- painted leather feather focal

Tools you'll need:
- wire cutters
- flat-nose pliers
- bent-nose pliers
- large needle

1. Start by cutting a 20 gauge length of wire, about 3 inches longer than needed to fit your wrist. Loop one end and add the clasp. Wrap and trim.

2. String your round 6/0 beads or magatama 3-4mm beads onto the wire. Keep stringing the beads until you have about 1 inch longer than your wrist size. Check sizing on your wrist and form a loop and wrap closed.

3. Next, cut a length of 22 gauge wire about 3 times as long as the bracelet base you just completed. Starting from the clasp end, wrap the wire over the beads all the way to the loop end. Do this twice.

4. Here's how it will look after wrapped twice.

5. Now, cut a length of 24 gauge wire about 4 times longer than the base and starting again at the clasp end, wrap over the base, this time stringing a few 11/0 beads with each wrap. Keep the beads even or make them look more scattered like I did — whatever you like best!

6. You're almost finished!

7. You can use whatever focal you like, but if you're using a painted leather feather, you'll need to pierce some holes — 2 at each end.

8. Cut about 5 inches of 24 gauge wire and string through the top holes on the feather.

9. Determine the center of your bracelet and wrap the feather securely in place.

10. Up until this point you'll probably find it's easier to work with the bracelet out straight, but now you need to curve it into shape before wrapping the other end of the feather in place — otherwise the feather won't lay right.

11. Wrap around the bracelet base and over the top of the feather. And your done!

Enjoy your new bracelet!


Try other colors and different bead sizes too. These are so fun to make and really pretty fast!


And for extra fun and to celebrate the debut of my new painted leather feathers, I'm having a giveaway and sale!


Go to my blog for a chance to win your own pair of leather feathers in your favorite color.... and... everything in my shop ships for free when you use code FLYFREE (international orders too!) through March 5th.

Happy Saturday and happy bracelet making!


http://www.treewingsstudio.com/