It’s all go here preparing for my next show this weekend, so I thought for todays post, I’d show you making some of my newest design of beads… Sand dollars.
 |
| Porcelain Sand Dollars |
Sea creatures are a great subject for bead makers, and an ocean palette is perfect for jewellery designing.
To make make this design, I first start with a lump of porcelain. The clay is wedged and rolled flat. I use bands on my rolling pin to get an even thickness when rolling. This clay has been rolled to about 5/6mm.
 |
| Ready to start |
Next, I cut circles with a cookie cutter.
 |
| Cut blanks |
Once I have enough, the clay is speared from one side to the other with a skewer. This takes a bit of practice. The clay is so thin that it’s easy to come out in the wrong place!
 |
| The start of the bead |
The top edge of the cut circle is pressed to make a rounded edge.
 |
| Starting to form |
A small slice of clay is removed from the front and back of the bead by cutting down to the skewer with a wire loop tool.
 |
| Cutting the first hole |
Marks are made on the bead to show where to cut through for the holes in the design.
 |
| Marking out |
I poke through the clay with a needle tool.
 |
| Piercing |
Then lightly draw the shape of the central ‘flower’ of the urchin.
 |
| Marking out |
Using a flat sharp sculpting tool, shallow cuts are made all the way round the shape to create the top design.
 |
| Carving the details |
And the flower is drawn on the back.
 |
| Sculpting the shape |
Once the beads are leather hard, they are sponged to smooth any rough edges, and when completely dry, they go in to the kiln.
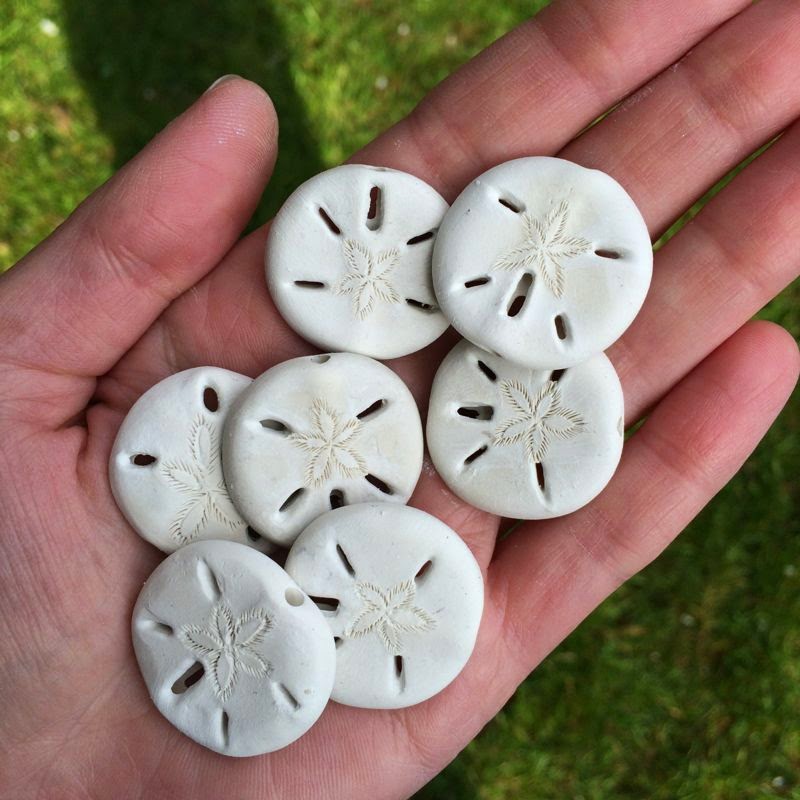
And here they are finished!
 |
| Smoothed and finished |
I fired them unglazed for a natural finish. These will be coming along to the Stourbridge bead fair with me this weekend... Hope to see you there!


These are terrific!
ReplyDeleteThe detail that you put into these is amazing! Thank you for sharing your process. Sand dollars/sea biscuits are one of my favorite sea creatures and these are just beautiful! Have fun this weekend!
ReplyDeleteThis is cool might give it a wirl! :) thanks Caroline x
ReplyDeleteI love this tutorial and all the other information you have shared. Your designs are always inspiring creativity!
ReplyDeleteThese are so pretty! Great tutorial and fantastic idea!
ReplyDeleteOmg they are perfection. I haven't seen a artisan create sand dollar that could be this perfect. Thank you for sharing your process!
ReplyDeleteThanx for sharing. Your sand dollars are lovely.
ReplyDeleteThese are very cool! I love sand dollars.
ReplyDelete