Wednesday, December 16, 2015

Limitless Possibilities

art history notes slides coffee and biscuits
Last minute cramming for my art history final; fueled by coffee and Crabtree and Evelyn Christmas Pudding Biscuits

I took my last final of the semester yesterday. I am not going to sugarcoat it...this semester was HARD. Not because of the work. It was the normal amount of challenging yet interesting. I learned so much more about art history, and by extension, world history. Somehow I avoided world history in high school.

I also learned how to draw. Again, I somehow managed to avoid taking art class in high school. Not because I tried to avoid art class, but because my "arts" elective was the high school newspaper. I had every intention of being a newspaper reporter when I grew up. I didn't become a journalist or grow up (probably).

drawing white color pencil on black jennifer cameron
Drawing I did for my final portfolio from a photo I took of my cat in my drawing class. White colored pencil on black matboard
No, this semester was hard because I just didn't want to do the work. I very much enjoy interacting with people and learning new things, but I'm done with homework. DONE. I spent the entire semester dreaming up all the things I could be doing instead of what I was doing. At this point, I know I need to take at least a semester off rather than continuing to pay for something that I don't have the heart to do right now.

As the semester was winding down, I started thinking very seriously about my goals, wants and needs...much more than the normal "end of the calendar year" goal setting we all seem to do in the days immediately surrounding January 1 (which is only TWO WEEKS AWAY, people!). Then some interesting links caught my attention which have sort of affected my goals.

#1 - I accidentally came across a planner on Kickstarter called the Spark Planner, which looks amazing, but they were already sold out on December deliveries, they are more expensive than doing a regular bullet journal, and they had an option of getting a free PDF (see update about the PDF at the bottom of this post!) if sharing the Kickstarter link on social media. So I went that route so I can explore what the Spark Planner is about to possibly order it later down the road. The PDF is pretty amazing and the Spark Planner would make a fantastic planner. But that's not even the best part.

spark planner, sparknote, goals, planning
Photo from the Spark Planner order page 
I am now on the email list, which is not usually a great thing, especially this time of year when companies are sending 2 and 3 emails EVERY SINGLE DAY. However, being on Kate Matsudaira's email list has resulted in one email each week; which have been very valuable. The last two emails have included worksheets for planning for the upcoming year. They are not necessarily only business driven, but are broad enough to include anything. Lucky for everyone, the first worksheet is posted on the spark notebook blog. I assume this means the second one will be posted as well, which I hope is the case. This particular worksheet has been extremely thought provoking for me and now that school is done, I look forward to actually making notes on it. It primarily delves into personal relationships and what people will say about you at your funeral and what you want your legacy to be. Like I said, very thought provoking.

In spite of the beauty of the Spark Planner, I am still very dedicated to my bullet journal method of planning my life. But I'm always on the lookout for something better. I will continue the bullet journal, but alter it, and incorporate some of these spark planner goals/journal entries, etc in my bullet journal. My current bullet journal is about half full, but the spine is falling apart (it was a clearanced piccadilly journal from Barnes and Noble) so I ordered a Leuchtturm 1917 medium squared, which reviewers swear is a high quality notebook/journal. Also, quite frankly, I like the idea of starting a new bullet journal for the new year. It's an empty book of possibilities!
leuchtturm 1917 squared bullet journal
My brand new Leuchtturm 1917 medium squared notebook/journal for bullet journaling.

#2 - As I mentioned, I took a drawing class this semester. On the first day of class the teacher made us draw three pictures as a skill baseline. We had to draw our hand (mine looked more alien than human), a full portrait of someone we know from memory (HA! My husband might leave me if he ever saw how I drew him), and we had to do a self portrait while looking in the mirror. He had us write our impressions on the back of these pictures. On my self portrait I said I didn't have a nose because I had erased it so many times because it looked too much like male genitals. Anyway, my new drawing skills were VERY hard won. One of my biggest personal goals is to continue to develop them and delve into more media, trying things out, seeing what speaks to me. I don't remember how or where, but this yearlong online mixed media and art journaling course called Wanderlust came to my attention. After thinking about it for a while, seeing the class schedule, and the very good price, I decided to sign up. 


Wanderlust 2016 online mixed media class

In addition to the above, I'm excited to get back to the studio on a regular basis. When I don't have classes, I'm playing catch-up in all the other areas of my life. My studio desperately needs a purge and reorganization. This is my number one priority once Christmas is over.

My extremely messy studio

Because I love learning and hate homework, one of my big goals is to attend classes of interest when I can get to them. A high priority is to increase my metalworking and beadweaving skills. It's been a long time since I've taken any fun technique based classes. I've kind of become obsessed with beadweaving, even attempting my first glass cabochons. Yes, I will be making lots more. In addition I definitely want to feed my glass skills. I've barely done any lampworking in the last 1.5 years.

bead embroidery, glass cab, glass addictions, jen cameron, seed beads
A recent bead embroidered piece using one of my glass cabs. 


I want to feed my brain in other ways. More reading, less time plugged in. I finish several audibooks a year with all the time I spend driving, but I need to spend quality time with regular books and magazines and less time with pop culture type junk articles. I also want to bind more books after my one experience with Jenny teaching us how at the lake house bead retreat a few months ago.

I also have big plans to do some home improvement projects and some volunteering, continue with running and maybe setting some new goals with that. I am super excited to get started! With the weight of homework off my shoulders, I feel like the possibilities are endless and I'm ready to start today. However, first I am going to spend some quality time enjoying the Christmas season, watch some Christmas movies, eat cookies, wrap presents and decorate the house.

What types of goals do you have? How do you keep track of these goals and when will you begin to implement them?

Update: I just saw this on the Spark Notebook Facebook page


Monday, December 14, 2015

Beaded Wreath - Christmas Ornament Tutorial


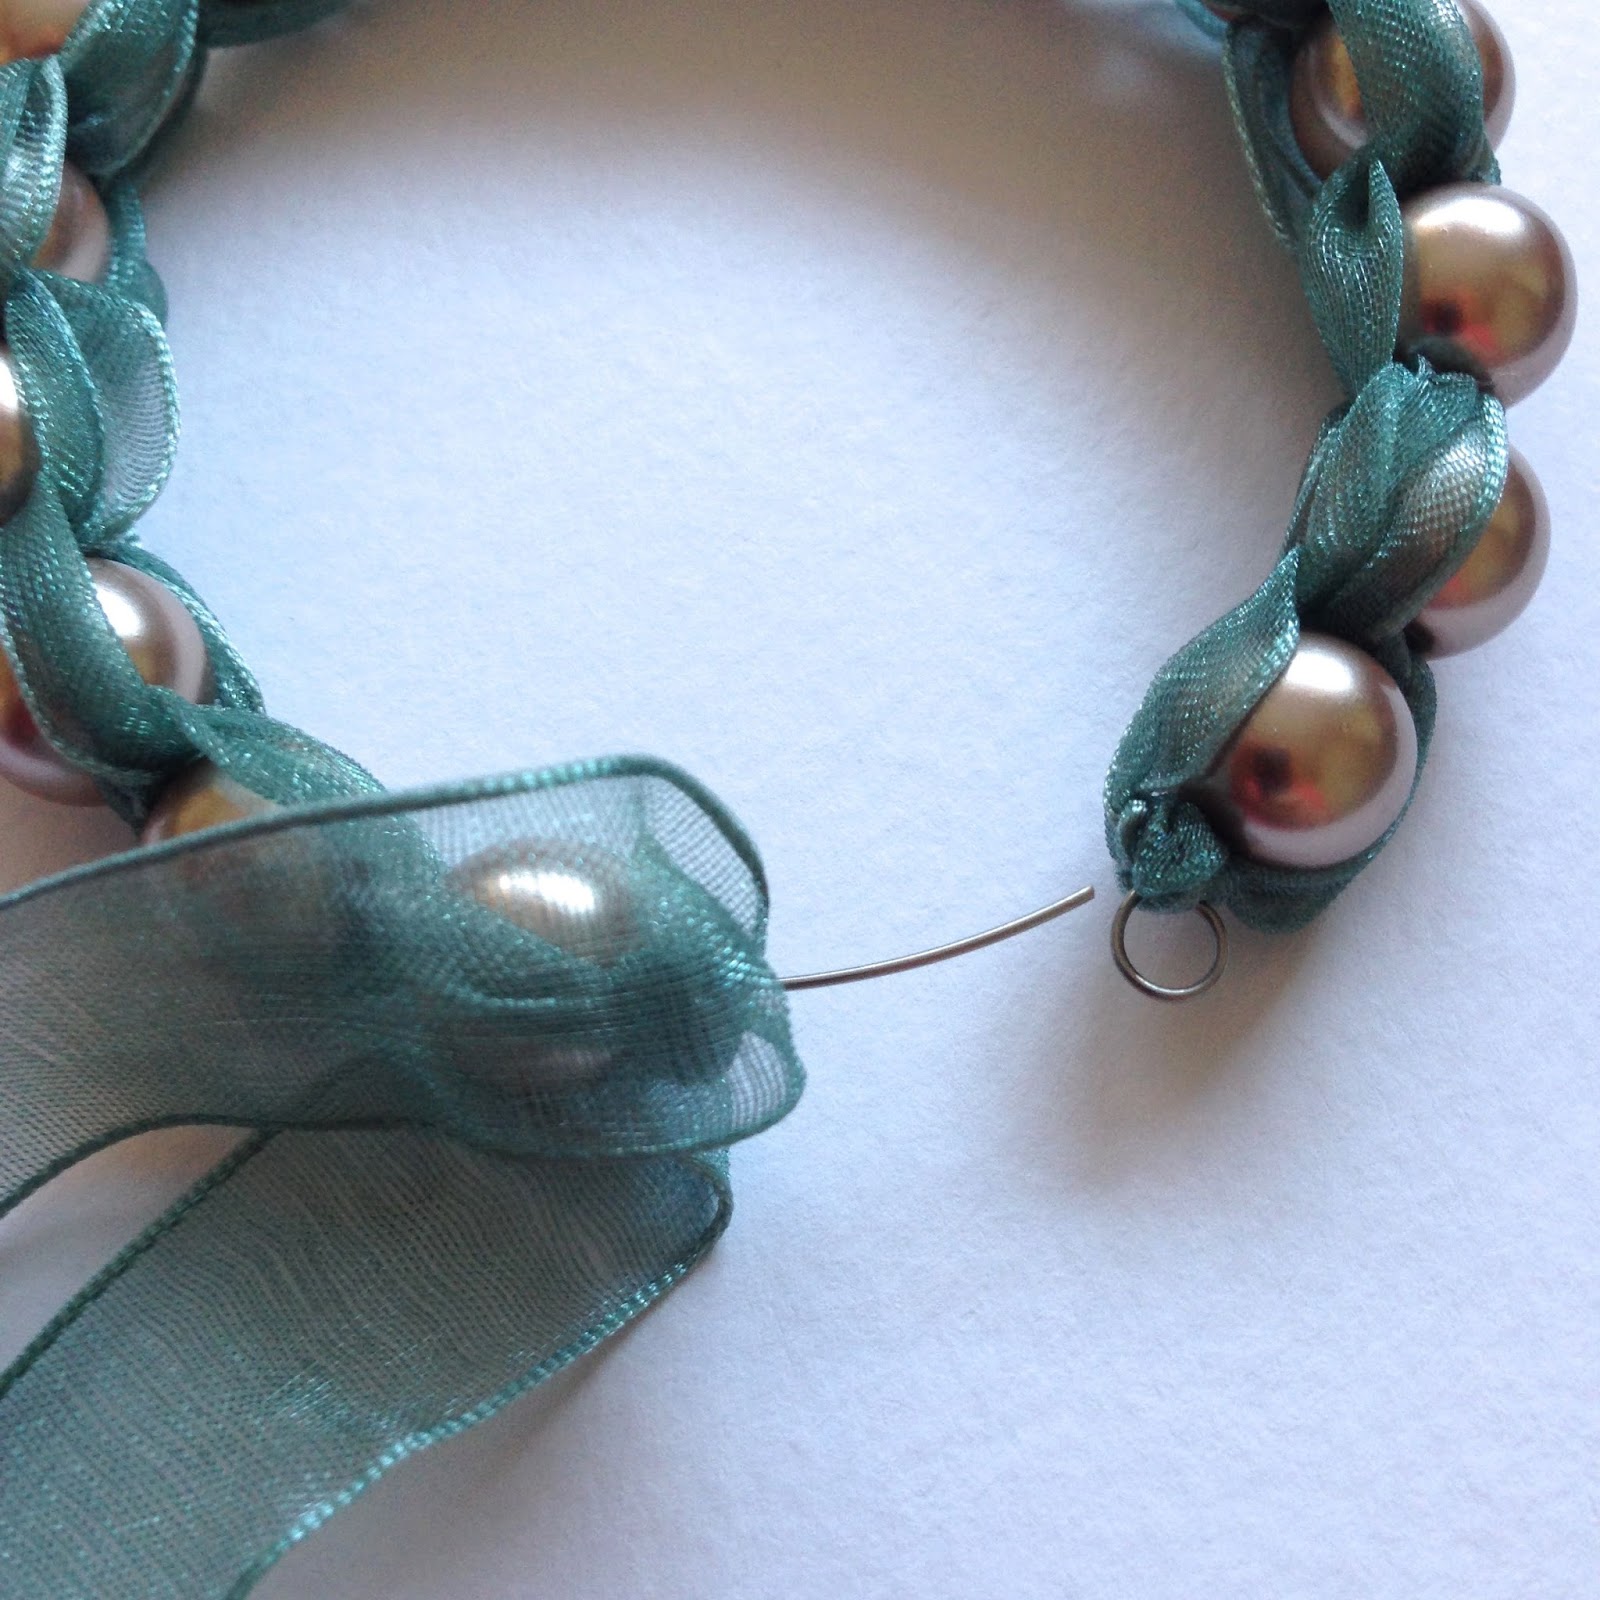
Today I'm sharing with you a tutorial for a beaded wreath Christmas ornament that I devised by adapting my design for a silk macrame bangle - please excuse the fact that it's displayed on a laurel bush but my Christmas tree is not up yet. For this ornament I've used 15mm organza ribbon and 10mm glass pearls but you can literally use anything you like to create an ornament that suits your own decor...ribbons, cord and even fancy knitting yarn can all be combined with fun and funky results...just let your imagination run wild.

Materials
To make the ornament as I have you will need:

1  1/4 coils of memory wire
48" length of 15mm organza ribbon
12" length of 15mm organza ribbon
16 10mm glass pearls
1 10mm jump ring
1 charm or beaded dangle - I used ceramic birds from Blueberribeads
Round nosed pliers
Memory wire cutters
Scissors


This design is worked with a simple macrame square knot but the nature of the ribbon I used makes it a little tricky to see the technique so if you need clarification you can find a diagram here.

Step 1
With the round nosed pliers turn a loop at one end of the memory wire.


Step 2
Take the 48" length of ribbon, find the centre and tie it around the memory wire adjacent to the loop.


Step 3
Thread a bead onto the wire.


Step 4
Create the first part of a simple macrame square knot by taking the right hand ribbon and passing it over the memory wire which acts as your core. Then pass the left hand ribbon over the right hand ribbon and under the core wire and pull though to secure the bead. Don't pull the ribbon too tight - you want to aim for it to drape nicely around the bead.


Step 5
Add another bead. Create the second part of the macrame square knot by taking the left hand ribbon and passing it over the memory wire then pass the right hand ribbon over the left hand ribbon and under the core wire and pull though to secure the bead ( the reverse of the process in step 4).


Note
Because memory wire is springy this process can feel a little awkward at first but once you have a few beads in situ it becomes easier. I found I got more control by tucking the free end of the wire under my little finger.


Step 6
Repeat steps 3 - 5 until all the beads are threaded and the circle is completed. Tie an overhand knot to secure the ribbon.

.


Step 7
Make sure the beads are snug up to the first loop then trim the spare end of the memory wire and turn a second loop.


Step 8
Thread one of the ribbons tails through each of the loops pull together gently to close the wreathe then knot to secure.


Step 9
Wrap the tails around the loops a couple of times to hide them and then tie in a bow.


Step 10
Attach your charm to the large jump ring then take the shorter length of ribbon and pass it through the jump ring.


Step 11
Place the ribbon and charm under the bow and bring it up around the front and back of the bow making sure to centre it carefully. Knot the ribbon so that it creates a neat finish (not too tightly) to the bow and knot again to secure.


Step 12
Tie the shorter ribbon at the ends to create a hanging loop.


Step 13
Trim the tail ends of the bow and there you have your finished ornament.


I hope you enjoyed the tutorial and are inspired to have a go at creating some ornaments of your own.

Happy holidays.


Friday, December 11, 2015

Oh Christmas Tree...

Christmas is just around the corner, so today I thought I'd share an idea I came up with last year for some cute Christmas tree charms.

Porcelain Trees

These are made in porcelain, but they also work in polymer for a quick festive make.

Depending on what you prefer, you will need some ceramic or polymer clay. Paints, inks, glazes, whatever you like to use to create with. For the tutorial I chose to use green polymer clay. You will also need a ball ended stylus and a little bit of wire.

Gather Supplies

Start off by conditioning your clay and rolling to form a tree shape.

Ready to start creating

Using the stylus, poke a short groove in the clay beginning at the top and pulling the tool out at the bottom to flare it out. (This doesn't work quite as well with polymer clay as it does with ceramic, you will end up with a slightly smoother design). To get a nice finish, lift the tool out before it tears through the clay. Do this all the way round the bottom of the tree shape.

The first row of branches

Once you have your first line repeat just above to make a second line. Try and finish the groove of the second line just above the top go the first so there are no gaps.

Building the design.

Continue adding lines around the shape until you get to the top.

Branches finished


Take some wire and create a loop. Fix this in the top of the tree, then cure the clay following the instructions on your clay packet.

Adding a copper wire loop

Once cooled it's time to decorate. I decided I liked the green colour of the clay so opted for a snowy effect using white alcohol ink, but you can paint, use inks, metallic wax or whatever takes your fancy!

To make it look as though the snow has fallen on the branches, I took a dab of ink on my finger and gently patted it around the tree so that just the tips of the branches were coloured.

Adding the snow

While the ink was still wet, I sprinkled on some microfine glitter for an extra bit of sparkle (Well it is Christmas!)

And a bit of sparkle

And here are the finished trees. They would be great as some last minute earrings, a pendant or make a bigger version and turn them into a Christmas decoration, a tree for your tree!

The finished decorated trees.


Wednesday, December 9, 2015

Color me enchanted! A book review...

I sat down to write this post on 2 books in my art/inspiration/history library that I adore. And found a new book by  the author, Victoria Finlay. I only wonder if I can wait until the holidays to purchase it. You know its on my list right away! OK - back to the regularly scheduled post... 

When I need a go to gift for a friend I turn to the work of author Victoria Finlay. Almost everyone I know would find either of her first 2 books interesting. Gems, history, drama, folktales, color, pigments, each, science, paint, art.... see what I mean? I wanted to introduce these to you, for your list or as gifts... since it IS that time of year. 

First: Color: a natural history of the palette. 

This book is a treat. Divided into the colors of the rainbow it delves into origins, materials, organic sources, scientific methods, history, travel, culture... The author shares her travel tales, her detailed and thorough research, both historical and cultural. Its a behind the scenes look into things that are so familiar and remain a complete mystery!

Color by V. Finlay. Available here

From the back cover: 

  • Cleopatra used saffron - a source of the color yellow - for seduction... 
  • Extracted from an Afghan mine, the blue "ultramarine" used by Michelangelo was so expensive he couldn't afford to buy it himself.
  • Since ancient times, carmine red - still found in lipsticks and Cherry Coke - has come from the blood of insects. 
Snippets from "Color..."
"If you open up a box of paints, there are numerous such stories hidden inside it. There are stories of sacredness and profanity, of nostalgia and invention, of secrecy and myth, of luxury and texture, of profit and loss, of fading and poison, or cruelty and greed, and of the determination of some people to let nothing stop them in the pursuit of beauty." ( page24)


Second: Jewels- A secret History

Jewels by V. Finlay available here
Diamonds, rubies, emeralds, amber, jet... 
Im sure you have heard of the infamous and tragic Hope diamond, of Mikimoto and the first cultured pearls. But what of Whitby, the town jet built? The emerald city of Sikait? The amber washing championships on Jantar, Poland? I didn't think so! These and more tales await you in the pages of "Jewels"! I am the first to admit that I am a "gemstone junkie" and that I most frequently use stones in my beadwork. But this is a multicultural exploration into places, gems, folklore...  that appeals to me on so many levels!
Snippets from "Jewels"

And most recently: The BRILLIANT history of Color in Art

Finalys' newest! Im so excited! On Amazon... 
Looking inside this one on Amazon, I may have actually sealed out loud in excitement. COLOR and ART HISTORY. I am in heaven. Cave paintings! Tyrian purple and Egyptian blue, gilded Medieval painting, sepia photography... 
from the back cover: 
  • Cleopatra made purple the royal color of the Western world. Her favorite was made with rotten shellfish soaked in urine. 
  • Cobalt blue was the key evidence in a infamous trial  involving Nazi collaboration and a forged Vermeer. 
  • Van Gogh used chrome yellow beautifully in his paintings - but he probably shouldn't have eaten it. 
( I searched for this last night at Barnes & Noble. To look, maybe to bring it home... Sadly their one copy wasn't not the shelf. So for now - it remains on my Wish list.) 

I know that was a very biased, enthusiastic review. But if all I achieve is to have you look up these books and consider them... they speak for themselves. Great gifts - for yourself, or your art/jewelry/history/folklore friends!