Saturday, June 30, 2012

Big Hole Blog Hop REVEAL

It's finally here, that seems like such a long wait!!

Check out what these 14 Artisans created with my Big Hole Copper Components.
 They each received one slightly different from everybody else and they didn't get to choose,
I sent them out at random. I didn't even know what I was sending.
Please hop around to each blog and let them know how much you love what they've created,
and we'd love it if you would share this hop with your friends.

If some of the participants don't have their reveals up quite yet,
 please check back a little later!
It will be worth it!!

The Crafthopper
LamplightCrafts
Spice Box Designs
All the Pretty Things
Jean A Wells
Kristen Stevens

Thanks to all who participated and thanks to all who will hop and share the love,
we all appreciate you stopping by!

Friday, June 29, 2012

Tool Review ~ Beadsmith 2-Sided Texture Hammer

BeadSmith 2-Sided Texture Hammers 
are available in 3 options 
-Wide Circles & Dots 
-Thin Circles and Speckles
-Stripes and Weaves 
I'll be showing the the first two today ~ 

I've just gotten these in and instantly loved the sturdiness and heavy duty texture heads. 
 They feel good in your hand and have a heavy head that really connects with the metal.


  I like that you get 2 textures on each hammer creating a pile of options for texture combinations.
 I love these hammers and have already used them a ton!  
My favorite is the Wide Circles and Dots...I love the big divets of the dots impression.  
You can see in the ring below that it creates a nice deep dot that catches the LOS perfectly.  


The textures also created a good indentation creating a great base for patina.  

~ Inspiration pictures ~ 

I've used 24g copper, brass, 22g bronze and 20g aluminum in my samples today &all worked perfectly. 
I hammered without annealing, but imagine you could get an even better impression from doing so.  

Basic instructions: 
Place item to be textured on a bench block or anvil & strike the surface sharply with the hammer wherever you want the texture to appear.  
Experiment hitting the metal on a slight angle or flush. 
Mix and match  for even more textures.

I've just added the BeadSmith 2-Sided Texture hammers to my line ~
 I've been awaiting their arrival for some time now and am thrilled with the quality.

Click here to purchase & receive a  free 2"x5" piece of copper sheet to play with! 
Offer good til July 15th.  
~ Melinda Orr  ~ 
Melinda Orr Designs 

Wednesday, June 27, 2012

Tuesday, June 26, 2012

Monday, June 25, 2012

Inspired By Design Challenge: Christmas in July

Did you see the entries for the last Design Challenge: Inspired by Shells? Scroll to the bottom of the post, click on the thumbnails. Definitely take a look, there are some great entries!

For this month's design challenge, I am again using Captiva Island for inspiration, but in a totally different direction. Shells are natural elements and there is nothing natural about this month's design inspiration.

The inspiration comes from a magical place called The Bubble Room (fyi~their website has music if you want to turn your speakers down or off first).

The Bubble Room
The Bubble Room! My daughter is on the left, cousin on the right

And because a good chunk of their decor is Christmas themed, and this is a challenge, and thinking about Christmas in July is definitely a challenge, it's a match made in heaven. Plus I just think it sounds like fun and hope you do too.

The Bubble Room
Merry Christmas! 

The following two photos are from their "Christmas Room" and should be used for your inspiration. You can view this room by standing at the top of the stairs inside the restaurant and looking through a window down into the room. If you want to see more photos I took at The Bubble Room, you can see them on my blog.

The Bubble Room
Santa sitting in the Christmas room at the Bubble House
The Bubble Room
Elves in the Christmas room at the Bubble House

-The blog hop for this photo will be held July 16th, which gives you 3 weeks to create something inspired by this photo.

-Challenge yourself to use at least one handmade component. It can be made by you or by someone else. 

-On the day of the reveal, post the inspiration photo(s) and photos of what you created based on the inspiration photo on your blog. Write how you were inspired by the photo. Tell us about the handmade component you used and why. 

-Add you blog post URL to the linky tools at the bottom of the AJE reveal post (instructions on how to do it are super easy and self explanatory once you click on the link for linky tools).

-Add the linky tools html to your blog post to continue the hop. 

-Have people visit your blog

-This is meant to be a way to help everyone's creativity to expand and for self improvement and to get new visitors to your blog

-This is not a high stress situation. You do not have to commit in advance. You join when you are inspired and/or have time and want to challenge yourself. 


Now get creating! 

Saturday, June 23, 2012

Welcome our Newest Team Members

We are super excited to introduce you to the newest writers for AJE!

Genea Crivello-Knable plays with fire to create really fun, funky and colorful lampwork beads. You may have seen she already wrote up a blog post on AJE about silvered ivory stringer a few days ago.


Diana Ptaszynski plays with mud...I mean, she works with clay and is the talent behind Suburban Girl Studio and just wrote up a fab piece on the raku process a couple days ago. 


Kristen Stevens is a seed bead kind of girl that I have been friends with via our blogs for a couple years now. She's a lovely person and also she creates gorgeous beaded jewelry and components


We are so thrilled these three amazing women are joining up for our adventure!

We are also looking for guest writers. If you are interested, contact me (Jen) for more details jennifer.glassaddictions@gmail.com

Friday, June 22, 2012

Open Studio Friday: Jen Cameron

Welcome! We are going to be spending most of our time outside today so I can show you my photography set-up during nice the weather months.

The back of our house faces a southwest direction, which is perfect for later afternoon/early evening photo shoots.

When I first walk out the back door, I step onto this small deck. It's not really a deck in the traditional sense...mostly just a method for getting from the kitchen to the back yard.

Floor of back deck glass addictions jennifer cameron

Example of photo taken on the deck: 

Modern Terra glass addictions jennifer cameron

We built this house almost 6 years ago and the wood of the deck is a beautiful weathered gray...perfect for taking bead photos. However, hubs threatens he's going to stain it every single year. So far I've prevented it. We'll see how much longer that lasts...

Deck railing glass addictions jennifer cameron

The railing of the deck is also a great spot to take bead pics. Not only do you get the look of the weathered wood, but also back lighting from the sun. 

Example: 
Mushroom Hunting in Wonderland Lampwork Focal Bead by Glass Addictions

The deck is a really handy because I will also sometimes use this post to take photos (thank goodness I always have a "helper" close by...)


Jun 21 2012 048 resized

An example of the post in use:

Davy Jones' Locker 

Once I make my way off the deck, I still have several options. We have had lots of stone retaining walls built over the years that serve various purposes...mostly so I have someplace to take bead and jewelry pics!

We had this fire pit area added onto our patio last summer. (Ignore the stripe of dead grass. We are getting ready to make that area into a landscaped bed.) This area is perfect when I've waited a bit too late to take photos or if it's overcast (like it was when I took this picture because we actually got RAIN yesterday!) Otherwise, this area gets too much sun and is too bright. 

Firepit retaining wall jennifer cameron

Here I've piled up beads ready to have their portrait taken.

Lampwork key beads jennifer cameron glass addictions

Again, I have a helper. My favorite rock on the fire pit wall is the one to the far right where one key is by itself. The reason I like that rock is that it has less red and brown than most of the other rocks. 

Outdoor photography studio jennifer cameron glass addictions

On the other side of the patio, we have a retaining wall with a bed filled with burning bushes. This spot is usually perfect late afternoon when it's too bright for the fire pit rocks but still later in the day so the sun is being blocked out a bit by the bushes.


Back patio jennifer cameron

My favorite rock is the big one where that red planter thingy is. I've been using that one the most lately. Example of it in use: 
nightmare insomnia series bead glass addictions jennifer cameron

I've even used this giant hosta plant to hold bracelets while taking pics (can't find an example at this moment). 

hosta glass addictions jennifer cameron

But what about when the weather is bad? Taking photos in the cold or snow does not appeal to me at all. Sometimes I break down and use the photo cube. Especially because in the winter days are so much shorter, I don't have time to take photos when it's actually daylight. 

However, when the light is good and the problem is it's too cold or too snowy for my outdoor photo studio, I have big southwest facing windows and the perfect bead backdrop ceramic tile in the kitchen. 


Back door


Jun 21 2012 028 resized

Nightmare Insomnia Series focal

My other option is our kitchen table. It makes a great backdrop, but the wood has a lot of red in it, which doesn't always work.

kitchen table

Hangtag and earrings glass addictions jennifer cameron 

Even though I spent money on a photo cube set-up and the mega daylight fluorescent bulbs, I prefer using natural light whenever possible. It's not that the photos are bad in a photo cube, quite the opposite. There are a couple reasons I prefer natural light.

#1- I personally cannot photograph the "hot" colors like red, orange and pink accurately with the photo lights. Natural light is much better for my current skill set.

#2- The lights are so bright and so nicely diffused, that it sometimes makes the bead look even better in the photo than it does in real life. I do NOT ever want to mislead my customers.

Thanks for visiting! Just so you don't feel cheated by not seeing where the magic happens, I will share a picture of my torch area right after I cleaned it up last January (it's not this clean any more).

Jan 14 2012 clean studio glass addictions jennifer cameron

I also want to invite you to my virtual beady pajama party on my blog tonight. There will be lots of door prizes, new beads, and other fun stuff. However, you do have to be present sometime during the party to win. Visit my blog for more details. 

Blog Party glass addictions jennifer cameron

Thursday, June 21, 2012

Gas Kiln: Trials and Tribulations

Hello Bead Friends!

I'm thrilled to be a new member of the AJE team!  When I was asked to join I thought to myself, "Hmmm what could I write about?".  As it turns out, I was doing my first raku firing of the year over the weekend and figured you might like a peak at the process.

Not only was this my first raku firing of the year, it's my first time using the new gas kiln!  Colin (my husband) and I had some problems when we first tried it out on Saturday.  We couldn't get the kiln up to 1880 degrees.  It kept falling short at 1600 and we weren't sure what the problem was.  That night, I went online and did some research and realized we were plugging up holes we thought were peep holes but were actually for ventilation...OOPS!

We gave it another try on Sunday and had wonderful results.  Here is what the set-up looks like...
And here's the inside of the kiln...
All the white bricks help keep it super toasty-roasty inside.  You'll notice two pointy things in the back, those are cones and are designed to curl over when the desired temperature is reached.  With raku, it's really a combination of watching the cones AND watching the glaze on the beads.

Here's the kiln all fired up and working properly!

The kiln is essentially made of wire, fiber blanket and a garbage can lid.  This isn't exactly high tech but it gets the job done.

Once the kiln reaches the desired temperature we turn the gas off, remove the lid and place the bead rack inside a reduction chamber (aka. small garbage can) filled with shredded newspaper. The paper bursts into flames and the lid is shut.  The fire needs oxygen to keep going and so it begins to pull it directly from the glaze causing "magic" to happen.
I typically leave the rack in the chamber for 15-20 minutes before removing it and cooling it with water.  Colin and I are still working on getting great flashing (those pretty blues, purples and reds) but here's a peak at the results from this firing..

We're going to experiment further this Saturday and I'll be certain to post the results!  Oh, and you want to know what will happen with these beads?  Well they'll be available for sale at my booth at Bead Fest this August in Philly.  I hope you'll come visit.

Happy Beading!

Wednesday, June 20, 2012

Silvered Ivory Stringer on black and opal glass

Hello friends!

I am excited to be writing my first post for Art Jewelry Elements. Today I wanted to share my discoveries about glass with you. While being inspired by my friend, Staci Smith and Karen Totten, I dove into some ideas on making my glass look more like stones and water. 

One of my favorite organic "glass tools" I like to use is, silvered Ivory. Silvered Ivory is Dark Ivory glass rolled in pure silver leaf and pulled into tiny "stringers" of glass for embellishing beads. Silvered Ivory stringer, or SIS, gives beads a gorgeous organic look to them.
Here is a simple set of spacers demonstrating the look of SIS. See the beaitful organic bands that line the bead? Dark Ivory glass on it's own "webbs" or "curdles" giving it a beautiful organic look. When you add silver not only does it react with the Ivory glass, but it reacts with the beads base as well! 

I am always excited to sit down at my lampwork table and create because I tend to learn new things every time I sit down. So what is it that I learned? 
First off, all glass is different. Each color has it's own chemical make up that may cause it to react differently with different glasses. In the photo you can see that I used SIS on a base of Tuxedo black. You will notice the pretty webbing, but if you look at the edges of the band of SIS you will see that it doesn't spread! Hmmm, how very curious!

I did the same band of SIS on a base of effetre Black and look at the different results! See how the band of SIS is very "webbed" and "frazzly". Cool huh?!

So how does this work with Opal glass? Well I was in a watery mood so I chose a wonderful selection of opal glasses from Creaiton is Messy. 
I chose some wonderful soft blues, sea foam greens, teal green, teal blue, and capri blue. You may recognize these beads from my latest Etsy shop update from this week ;)

I took the newest Limited Run glass, Moana for a test drive with my SIS to see how it looked. You will notice from the picture that when I used the SIS it did that pretty webbing, but it didn't spread like it does on the effetre black. Hmmm.... On the right you will see that I did get the glass to spread, just how I like! So how did I do it? Well I kinda manipulated the glass to do what I wanted. I used a band of regular Dark Ivory glass first. I melted in the Dark Ivory and let it spread onto the surface.  I then added a line of SIS, and let that melt into the surface on top of the Dark Ivory. VOILA! Just the look I wanted! 

BUT.... I did learn some things on the way.... 
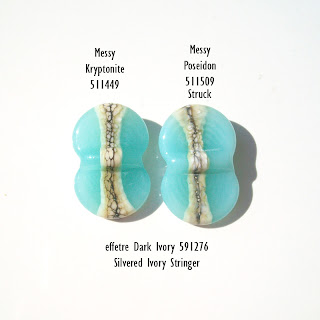
Here you can see Kryptonite and the new Messy color, Poseidon.  If you look at Poseidon, you will notice that the glass struck to a hazy opaque. Dang! So how did that happen? From working with the glass I have learned that this tends to happen from "striking" the glass(heating and cooling the glass multiple times). Over heating will also give you the same results of struck glass! In working with these glasses several times  I have also noticed that my propane tank needs to have 5psi of pressure and my oxygen valve (I use an oxygen concentrator) needs to be opened all the way. It seems that a slight dip in propane pressure allows the glass to strike easily as well.

So how the heck do you keep the glass opaly? Well here is what I did. I made my bead like normal, but when I applied the Dark Ivory, I kept my bead hot(not letting it cool past an orange glow). I then applied and melted in the Dark Ivory, let it spread slightly, and then applied the SIS on top. This is one of those glass tricks that you have to have just the right amount of heat. 

Well I hope you have enjoyed learning about silvered ivory and how to design with it on glass.

Thanks for stopping by!

xo Genea

Tuesday, June 19, 2012

AJE Eye Candy - Finished Jewelry

Finished Jewelry featuring many Art Jewelry Elements.


Criffles and clay by pipnmolly
 
Wrapped Chandelier Earrings by miamacreazioni


Asymmetrical Earrings by Staci Louise Originals

Sea Horse Bracelet by JeanAWells

Teal Flower Beaded Bracelet by songbead


Copper Teardrop and Lampwork by ChrysalisToo

Porcelain Pansy Bracelet by ForMySweetDaughter

Kristi