Tuesday, March 31, 2015

March Hares - the AJE Themed Challenge Reveal


March is often associated with idioms about lions and lambs... but here at AJE it was the month of the Hare. We had discussed this "theme" idea for a good while before deciding to move ahead. And we, as a team, felt there were myriad reasons to give it a try... We wanted the bead makers, the component people to have an opportunity to be involved in a monthly challenge. I mean art beads - am I right? And we wanted to encourage dialogue on inspiration, and shared inspiration. We wanted to demonstrate individual styles of expression, and the diversity of artist offerings within limited parameters. But enough philosophy - on with the reveal!

This month we have many participants - team members, 2 winners and a great list of artists and designers that hopped to the challenge. Take a look. Enjoy.

Happy Spring!

AJE Team
Jenny
Caroline
Lesley
Linda
Niky
Melissa
Rebekah
Lindsay

Guests
Aural - Woodland Bay Native
Heather - Hidden Ridge Studio
Cindy Martin-Shaw
Keren Panthaki
Jackie Ryan
Karin Grosset Grange - Ginko et Coquelicot
Pamela Traub - Klassy Joolz
Paisley Lizard Designs
Karen at Ditsy Blue
Michelle McEnroe ( 4 pieces pinned on the AJE Pinterest page)

Monday, March 30, 2015

Sea Urchin Cabochons: How They're Made!

I've created so many stoneware sea urchin cabochons lately because they were in high demand when I returned from the bead cruise.  They had been featured in Beverly Herman's "Star of the Sea" workshop and the ladies had asked for more.  So I thought I'd share an inside peek at how these pieces are made...

Fresh Block of Stoneware
All urchin cabochons start their life from a block of brown stoneware.
Wedged Stoneware
I cut a piece of clay from the block and wedge it for proper consistency and to remove air pockets.
Slab
The clay is then rolled into a slab.  I use a simple wooden rolling pin for this.
Greenware 
I cut the cabochons from the slab and then smooth the edges.  They are then set aside for awhile.
Mold Made from Antique Button
Another piece of clay is cut and wedged then I remove a small piece and roll it into a ball.  The small decorative urchin element is created from a mold I made of an antique button.
Molded Stoneware
The little ball of clay is pressed into the mold, removed and then set aside.
Scored Stoneware
I then score the decorative urchin and the cabochon, apply a bit of slip and join the two pieces together.
Greenware Cabochons
The cabochons are then left to dry for a couple of days.
Bisque Cabochons with Oxide Applied
Once the cabochons are completely dry, they are put into my small kiln and bisque fired.  I unload them the next day and apply an oxide to the decorative urchin element.  The oxide is applied by brushing it on and then wiping the excess with a wet sponge.
Glazed Cabochons
After the oxide is applied, each piece is glazed.  I typically apply 2-3 layers of glaze.
Finished Sea Urchin Cabochons
Once I have enough work to fill the kiln, I load all the pieces and fire to Cone 6.  The pieces are unloaded the next day and then inspected for any flaws.  I then spend a day photographing, editing and writing drafts for my shop.

And there you have it!  That's what it takes to make a sea urchin cabochon!

Happy Beading!

Sunday, March 29, 2015

A Drove of Hares

I've been really excited about our first Component of the Month Theme Challenge!  Rabbits have always had a presence in my life - from breeding Angora's for fiber when I was a child, to fostering indoor rescue rabbits as an adult, to collecting every soft floppy stuffed bunny I can find.
Me, age 10, with two of our baby Angora rabbits.
To inspire myself for the hare challenge, I raided my stash for all the hare and bunny beads that I've gathered over the years.  I'm sharing them with you today, but don't forget about the reveal blog hop on Tuesday, March 31st...trust me, you will want to see what everyone has been up to!
Stone rabbit fetishes - carnelian, sodalite, picture jasper and moss agate.
I love carved stone animals - and this little carnelian rabbit is one of my earliest acquisitions.  Anytime I find a selection of them in a shop, bunnies are the first thing I look for!
Old bronze Chinese rabbit seal/stamp, and a modern pewter button.
A few years ago I bought a lot of old bronze Chinese seals on Etsy - and this little rabbit just happened to be one of them!  The pewter button was a gift from a friend...and reminds me that I really need to get some Green Girl Studios rabbits!
Porcelain spiral hare cab by Laura Mears, prancing hare raku lentil by Blue Berri Beads, Chinese porcelain love bunny.
Laura Mears has become so popular it's really challenging to purchase her components...but it was so worth it when I managed to snag this gorgeous hare!  Our own Caroline recently sent me one of her raku hare lentils too - I'm loving every artist's interpretation of these animals!  
Carved bone rabbit head, leaping hare shell cabochon, carved bone bunny bead, Chinese lampwork albino rabbit head.
I love the detail that bone allows in carving - this carved bone rabbit head ended up being the inspiration for my entire piece this month.  The shell cab reminds me of the white bunnies in Goodnight, Moon...perhaps an idea for a piece in itself!  And someday the albino rabbit head will be a Alice in Wonderland inspired necklace...oh, speaking of everyone's favorite fictional rabbits...
Laser cut wood by PorkChopShow.
This selection of Alice in Wonderland illustrations (and a vintage bunny too) are laser cut wood from PorkChopShow on Etsy.  He has a great selection of weird and whimsical images...but I couldn't resist the Alice pack!  Someday I will make awesome necklaces out of all these cabs!  Can't you just see the heraldic White Rabbit with a fringe of red hearts?
Sneak peek of my project this month...
I hope you will all be around on Tuesday to check out everyone's wonderful creations!  I know I can't wait to see what everyone has been up to!

Until then, 
Lindsay

Saturday, March 28, 2015

April Component of the Month Giveaway!

Hello everyone! It's time for another Component of the Month giveaway and I'm so excited to be hosting for April's challenge! Up for grabs are my brand new little wood heart beads!

I hand shaped each heart in polymer clay and carefully stamped both front and back with a weathered wood impression that I made a while back.

On the side, to make them extra special, I carved the word "love".

I painted them in my favorite rustic copper brown color and a brand new color: sea-washed grey, to mimic the look of driftwood. Perfect to add a touch of woodland charm, sea-worn shabbiness, and rustic beauty to your new jewelry creations! Each one is about 18mm by 23mm long.

Want to play along? Here are the rules…

  • I will giveaway 1 heart bead in the color of your choice to each of 3 winners selected randomly from those who leave comments below this post. Your comment must included your EMAIL address so we can contact you should you win.
  • Please — only leave a comment if you can commit to creating a finished piece and blogging about it on the reveal date.
  • The names of the 3 winners will be announced on Wednesday, April 1, 2015.
  • This giveaway is open to US and international countries, but please be aware that international addresses will have longer postage times… sometimes up to 3 weeks.
  • The blog reveal will take place on Thursday, April 30, 2015.

Good luck and happy creating!

Rebekah Payne

Friday, March 27, 2015

Lampwork Tutorial: Faux Aqua Terra Jasper!

Waaaay back in the beginning of 2009, I saw a photo of a jasper called aqua terra!  I loved it.  I had to make it into lampwork beads!  This is a photo of the first set of Silvered Aqua Terra beads I sold on etsy in January 2009!

My first Aqua Terra beads on Etsy, Jan. 2009

I thought today I'd give you a tutorial of how to make your own, if you're a lampworker!

Materials Needed:

Rod of Light Ivory (Effetre)
Rod of Light Teal (Effetre)
Sheet of Silver Foil
Marver of your choice
Bead Press of your choice

First, cut your silver foil.  I cut the sheet in eighths.  This gives a nice portion of silver foil for an 18mm size bead.
Cut your silver sheet into eighths.

Next, get your bead press ready.  In this example, I am using a Zoozii's straight-sided lentil press, the middle 18mm size.
Get your bead press tool ready!

First, wind your footprint onto your coated mandrel.  Wind it on and hold it above your press, to make sure you are slightly smaller than the diameter of the well you are using.
Gather your glass on your prepared mandrel.
Check the fit of the glass in the well.

I usually roll the gather of glass in the well to make sure there's enough/not too much glass and to get the general shape of an olive. If you need to, add or take away glass.
Add more glass if needed.

Once you have enough glass, leaving enough room to add a little bit more, make your initial press.  Don't do it so hard that you break your bead release.
Check your glass in the well again.

You do not have to press your glass into the lentil shape if you think you have enough glass - if you aren't sure you can press the shape.
Press into your shape to make sure you have enough/not too much glass.

At this point, you can take your glass blob back to an olive shape, As you can see, I have my silver foil all ready and waiting for me!  Next, you want to slightly heat your glass and roll it in the silver foil, making sure to go all the way around the glass.
 Wrap your glass with a piece of silver foil.

Next, burnish in the foil.  Burnishing is rubbing the foil into the glass so it sticks very well.  You can do this with a tile, a marver, or your torch mounted marver.
Burnish the silver foil into the glass.

Then, you want to put your blob back in the flame, and you slightly melt off the silver foil.  This is what it looks like after you burnish and put the glass back in the flame.
Melt the silver foil into the glass at the top end of the flame.

Now, you want to add some squiggles of light teal.  As much or as little as you want, keeping in mind you are going to have to press the glass again and don't want to have too much.  You can always add more teal, it's harder at this point to take it away!
Add teal glass to silvered glass.

Melt in the teal and press the bead again in the bead press.  You can see from the photo below that you will have some chill marks (chill marks are the marks you get on your bead when you press it, and as the bead cools very quickly in the press, you get marks from the press).
Press your bead, check for chill marks.

Flame polish your bead to get rid of the chill marks.  If you flame polish too heavily and lose definition on your bead, you may want to heat, press again, and then flame polish again.
Flame polish bead, put in the kiln!

This is the finished bead!  Of course you can do these beads in many shapes, as I show below.

 Bicone-shaped aqua terra beads
 Lentil-shaped aqua terra beads
 Ribbed round-shaped aqua terra beads


If you aren't a lampworker but love these beads, I have them available in my etsy store, and I'll be happy to make you some if they sell out!

Thanks for checking out my tutorial today!

Susan Kennedy
SueBeads Etsy Store
SueBeads Web Store
SueBeads Blogspot


Thursday, March 26, 2015

Simple Leather Bracelet Tutorial


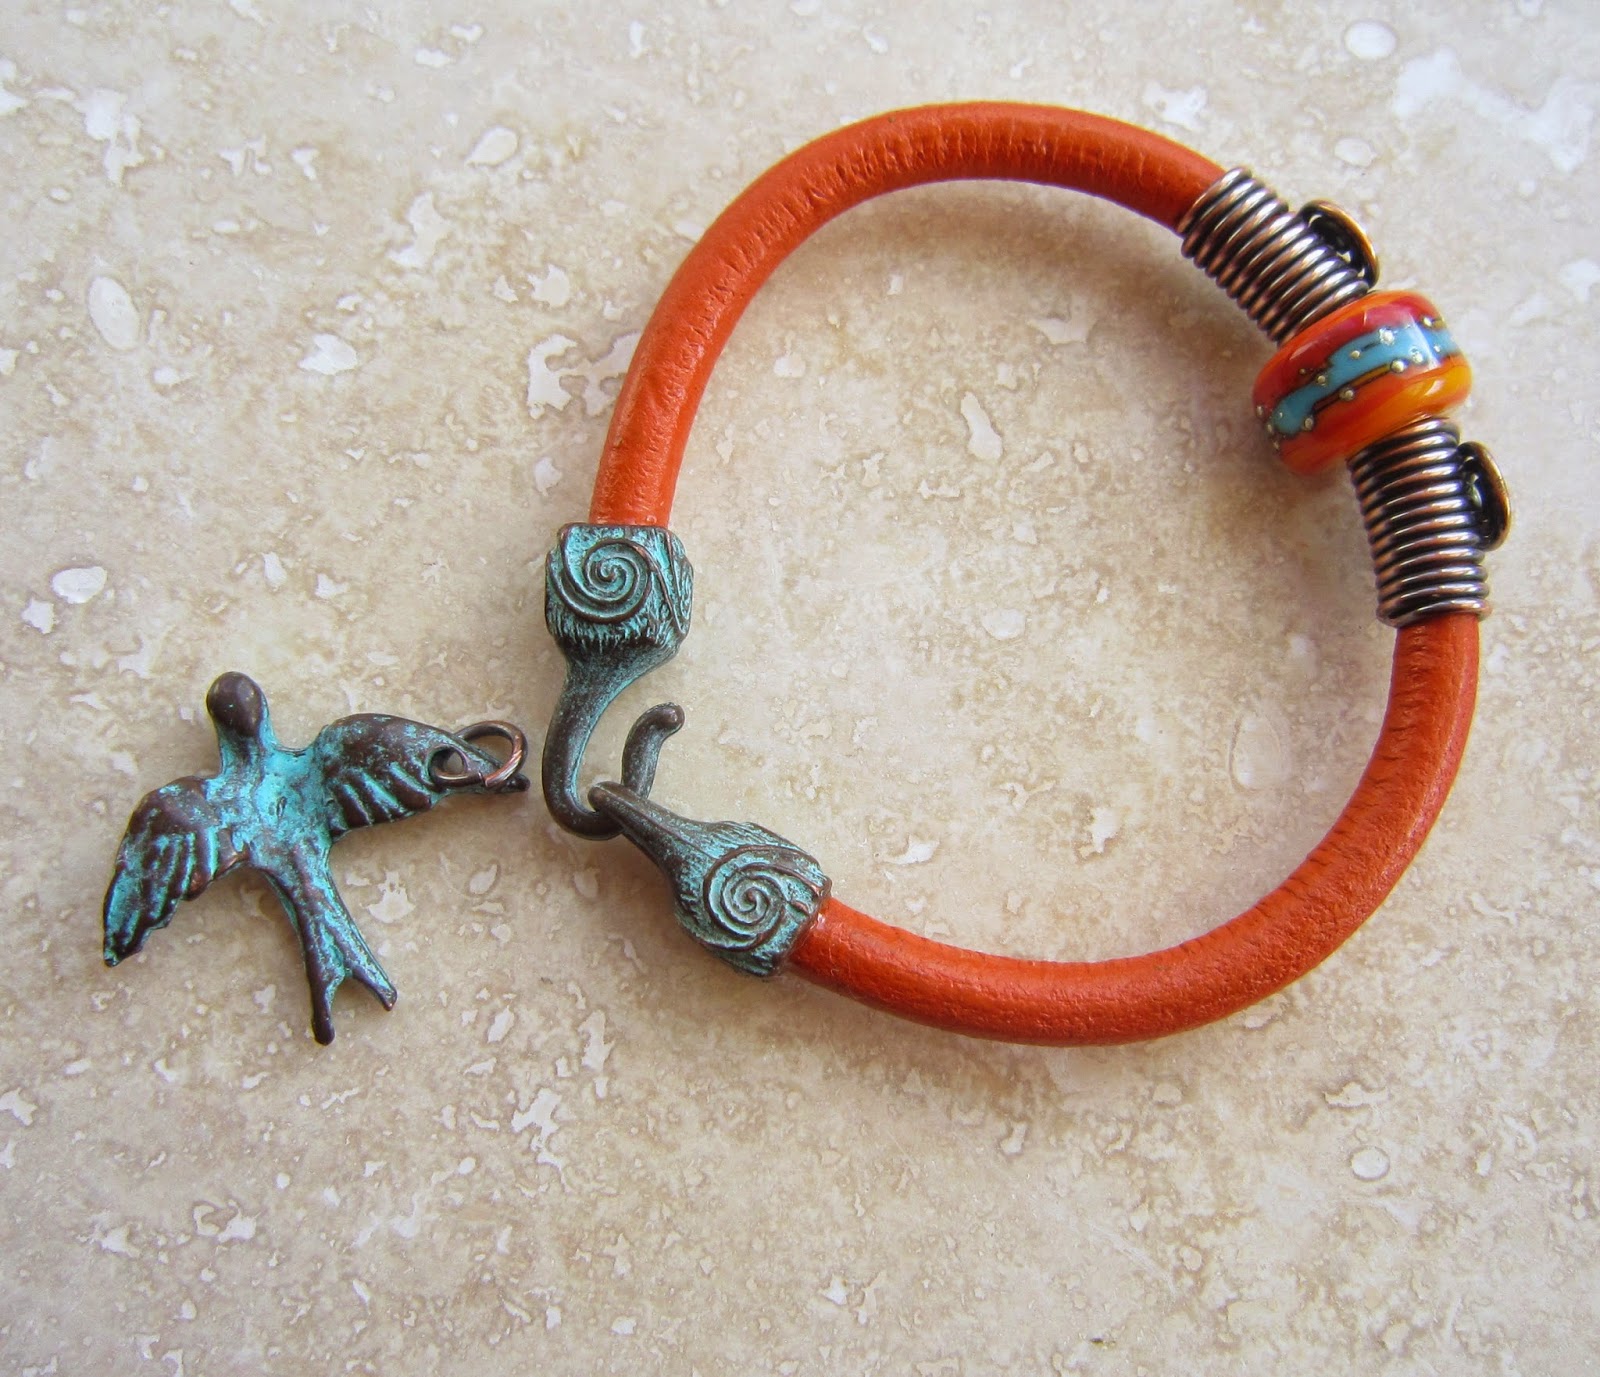
A little while ago my fellow AJE team mate Caroline sent me some gorgeous Greek cast metal closures and charms with a lovely verdigris patina. They just screamed out leather bracelet and I thought I share this simple summery design with you today...

Materials
Mykonos cast hook and eye clasp set
Mykonos Charm (optional)
7" 6mm leather cord (or length to fit wrist)
2 x 14" pieces copper wire 18SWG/16AWG
1 large hole bead
Flat/round nose pliers
Wire cutters
LOS
Clear Epoxy adhesive
6mm mandrel/knitting pin/leather scrap


Step 1
Take one piece of wire and wrap around your mandrel 10 times making sure it's not too tight so that you can remove the wrapped piece from the mandrel and get it onto the leather.

Step 2
Using round nose pliers take the end of the wire and begin turning a coil in the wire. Transfer to flat nose pliers and continue coiling until you have 3 rings.

Step 3
Continue wrapping the wire around the mandrel until the coil is level with it. Press the coil flat against the wrapped wire as shown. Trim the tail end of the wire on the underside with the coil on top.


Step 4
Repeat steps 1 to 3 to create a second piece that mirrors the first.

Step 5
File or sand out any tool marks and use LOS to oxidise both pieces together with a jump ring if you're using a charm. polish back with wire wool, tumble or polish.


Step 6
Thread the bead onto the leather and thread a copper element on either side. Make sure the focal element is centred then gently press the ends of the wires on the underside into the leather to stop any movement, taking care not to mar the leather on top.


Step 7
Use epoxy adhesive to glue the closure fittings onto the leather taking care to line the hook and eye up. Leave to dry.


Step 8 - Optional
Use the jump ring to attach a charm to the eye section of the clasp.


And that's all there is to it...

I actually decided that this particular charm was a little too large and I left it off so this is my finished bracelet...


I've been wearing this since I finished it and it's very comfortable. I really like it as it is but if you want to add a charm there are smaller versions available like these cute little shells.


Supplier list
Mykonos components - The Artisan Bead Compan
6mm leather cord - Cords and Wires
Lampwork Bead - Studio Juls     
Copper wire - Wires.co.uk  

Happy creating!