Showing posts with label clay. Show all posts

Wednesday, June 1, 2016

Whimsical Work

I'm about to start packing up my studio and office to get ready for my move to New York (Colin got a new job) but before I do that, I wanted to make one more batch of work for my shop.  Apparently I needed to make fun & silly pieces right now.

Forming the shell
I decided to start with some stoneware snails.  The first step in making these is to form their shell.  I roll a ball of clay and then flatten the back by gently tapping it with a wood block.

Carving the shell
I set the shell aside for a few minutes so it can dry just a tad.  I then go back and carve my spiral design into each side.

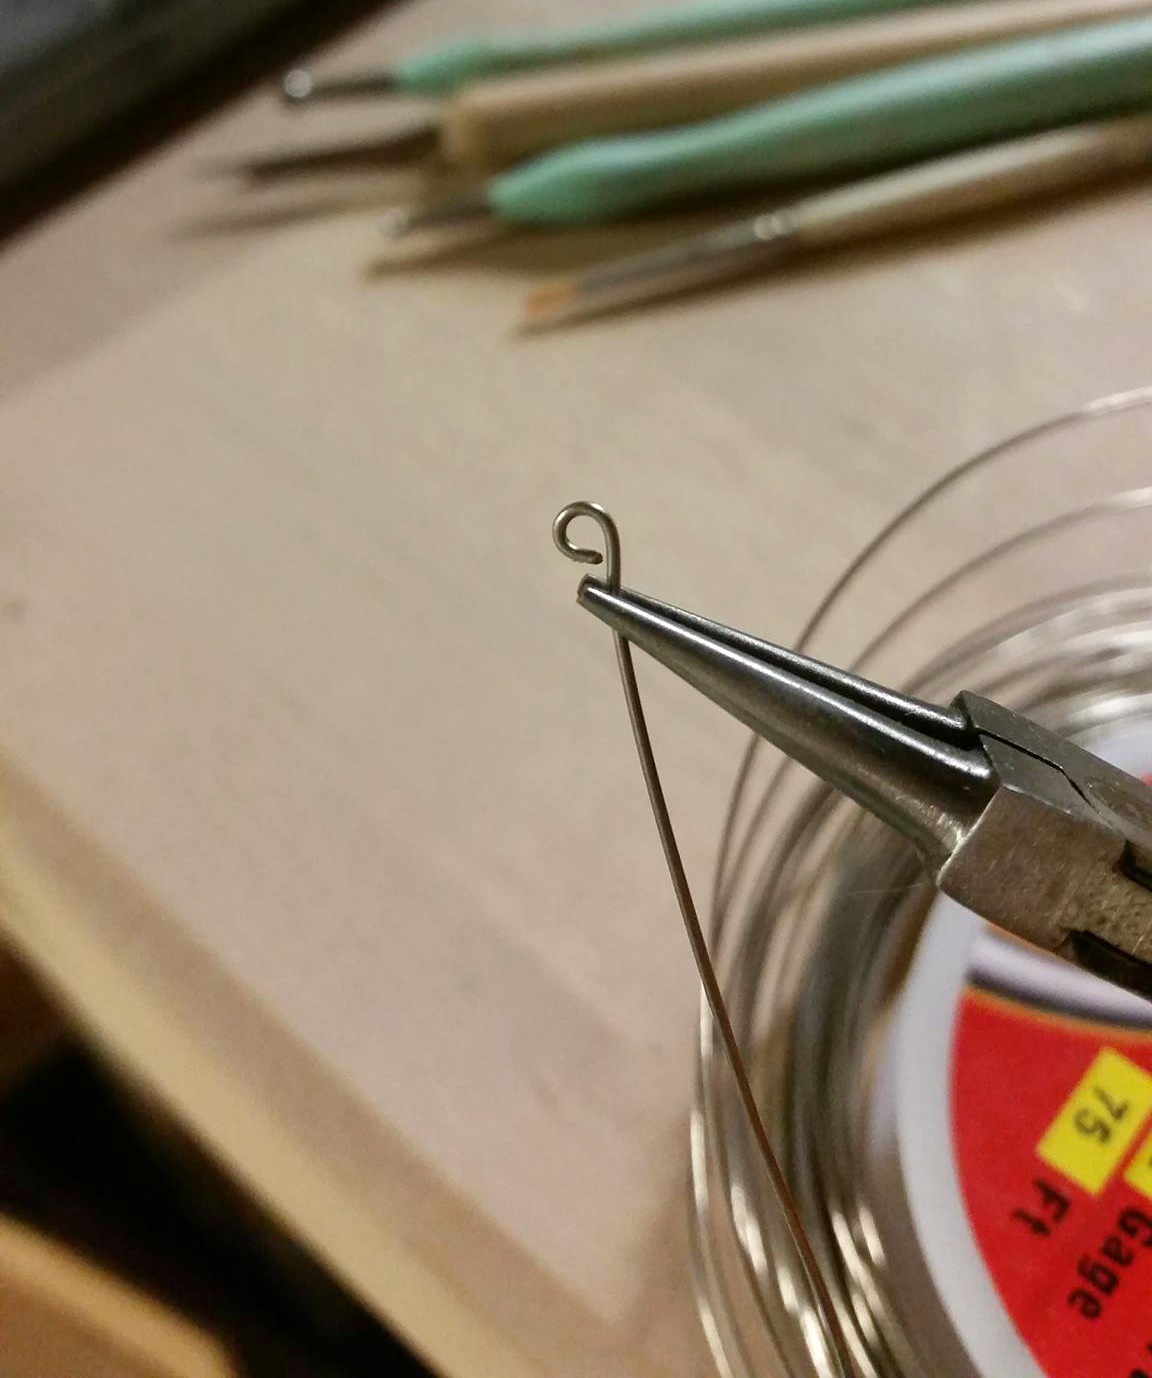
Forming a wire antenna
While the shell continues to dry, I cut and form some little antennae from high-fire wire. 

Almost a snail
The body is then formed from another piece of clay, rolled into a log and then shaped further.  The antennae are then inserted on top of the head.

Oh My!
My favorite part is giving each snail their eyes and silly expression!

Scoring the shell
Once the body is finished, it is time to attach the shell.  I score the bottom of the shell and the top of the snail, add a bit of water and gently press them together.

Greenware Snail
And here he is prior to any clean-up with a sponge.  After he gets sponged, he'll be bisque-fired, glazed and then final-fired.  I can't wait to see how he turns out.  


Little Buggy Face
I also made a little buggy face guy.  Wish I had time to make more of these before the move!

And then there were these ridiculous things...

Funny Face Wearing Underpants
I decided it was about time I gave my funny face beads some bodies.  This guy is wearing some underpants and slippers!  I'll fill in their joints with beads so that they aren't stumpy when they come to life.

Funny Face With T-Shirt
And this guy is wearing a t-shirt!  I think they'll make fun ornaments but if I can make them a bit smaller, they might even work as pendants for people that want to let their silly show!

I'll finish these pieces up during the week, list what I can in my Etsy and then pack up the studio and get ready to move!

Happy Beading!

Monday, May 23, 2016

A Pottery Adventure

I was a bit stuck over what to write about this week. I've not touched anything bead or jewellery related for a while, so I thought I'd share some of what I've been up to while not making beads. About 3 years ago, I acquired a pottery wheel. Every so often I would sit down and have a go and when beautiful pots didn't appear before my eyes I would put a board on it and it would go back to being a table.

My wheel
Here it is looking unusually clean! Can't say the same for the surrounding area... I'm a messy worker!

It's been a dream of mine since I was young to have a wheel, but each time I sat down, I got the feeling that the time wasn't right and I'd give up and pack it up again. A couple of weeks ago, I moved it to the other side of the shed where it was a bit more accessible and tried again... something clicked and I managed to make a few things I was nearly happy with.

Wedged clay ready for throwing

Throwing the clay down

Centering

Opening up to create the base

Lifting the walls

Tidying up

Cut off the wheel

I'm not quite up to making a matching set yet, but I like different!

Drying overnight so they're ready to trim

It's great to finally feel like I'm getting somewhere!

So with my new found confidence, I decided to try out some mugs. I've been mad for carving recently, (it all started with Lindsay's Eye challenge when I made Egyptian eye cabochons) and wanted to try the technique out on a larger scale. So after trimming my pots, I carved the design on to them and pulled some handles.

Action Shot - Trimming the foot

Scoring the design

Carved and smoothed

Extruded sausages ready to pull handles

Curving the handles

This is the first one drying out ready for a bisque firing.

Waiting to fire. 

Still a bit wobbly, but getting closer to looking just like a real one!

I'll be working on the rest of them this week... hopefully I won't mess them up in the glaze firing!


Wednesday, August 5, 2015

The Making of a Rustic Stoneware Coin Pendant

This month, I am providing my rustic stoneware coin pendants for the August Component of the Month.  I thought it might be fun to show off how these pieces are made.

First 3 Steps
All rustic stoneware coin pendants start their life as a ball of speckled brown stoneware.  I then flatten each ball and impress the texture into it.  I have two texture sizes I use for these pieces.

Removing the center
Once each piece has been textured, I remove the center using a variety of cutters.  

Greenware coin pendants
The pendants are then left to dry for several days.

Cleaning up the pendant
Once the pendants are completely dry, I clean up any rough patches with water and a sponge.

The little kiln and some bisque
After all the pieces are cleaned up, I load them into my little kiln and bisque-fire them.

Glazed bisque
The next step is to glaze the back and the textured portion of the pendants.

A tray of glazed pendants
I then use a wet sponge to remove some of the glaze, leaving glaze only in the textured sections.  This leaves much of the brown stoneware exposed.

Adding crackle glaze
After the initial glaze, I apply a white crackle glaze to each piece.  This helps give the piece that primitive, aged look.

Tray of glazed pieces
Once I have enough pieces to fill my large kiln, I load it up and turn it on.  The kiln will run for several hours and I'll unload it the following morning.

Finished pendants
If all goes according to plan (it doesn't always), then these are the fabulous end result!  Thankfully, we had zero issues with the kiln and all of them came out great.  And that's how rustic stoneware coin pendants are born!

Happy Beading!

P.S. If you are sad that you weren't randomly selected for the COM, I do have some of these pieces available for purchase in my Etsy shop, so you can still play along!  


Sunday, August 2, 2015

August Component of the Month Giveaway!

It's time for the August Component of the Month Giveaway!
Rustic stoneware coin pendants
Up for grabs this month is one of my rustic stoneware coin pendants!  Each piece is made to look like an ancient finding just dug up from the depths of the earth!

Want to play along? Here are the rules…

  • I will giveaway 1 stoneware coin pendant (chosen at random) to each of the 2 winners selected randomly from those who leave a comment below this post. Your comment MUST include your EMAIL AND BLOG address so we can contact you should you win.
  • Please — only leave a comment if you can commit to creating a finished piece and blogging about it on the reveal date.
  • The names of the 2 winners will be announced on Tuesday, August 4, 2015.
  • This giveaway is open to US and international countries, but please be aware that these will be posted from the US and international addresses will have longer postage times… sometimes up to 3 weeks.
  • The blog reveal will take place on Sunday, August 30, 2015.

Good luck!

~Diana P.

Monday, July 20, 2015

On My Clay Table

I'm FINALLY back in the studio making beads again.  I've been lacking bead mojo for awhile due to a variety of reasons.  It was nice to be back in the studio but I'm taking things slow.  The focus right now is to catch up on swaps I owe people, fulfillment of pieces for event donations and restocking the shop with some popular pieces.  Hopefully once these things are done, I can spend some time just playing and get some of my mojo back.  Let's have a little peek...

Porcelain
Here's the block of porcelain before I got to work.  I love the weird, earthy and musty smell it has.  
Porcelain slab
The first order of business was to roll out a slab of the porcelain.  I pulled a bunch of leaves outside for the autumn collection.  Because I use real leaves, I have a limited time in which to make this collection.  Once the cool weather rolls in and the leaves fall off the trees, I can't make more of these pieces.  They truly are seasonal work.
Porcelain leaves
I made a series of buttons for a friend who does leatherwork and the rest are pendants and charms destined for the shop and the Ceramic Art Bead Market. 
Leaf cabochons
There was also the business of making lots and lots of little leaf cabochons for Beki Haley's Beaders Dream Retreat.  I'm sponsoring the event, so each attendee will get a porcelain or stoneware leaf cabochon in their bag.  I am working on the stoneware pieces today while the little kiln runs a bisque-firing.
Porcelain beads
I'm also running dangerously low on beads so I rolled some up.  Most of these will be glazed to coordinate with the leaf pieces.  
Speckled stoneware
After I completed the porcelain work, I cracked open my speckled brown stoneware.  Mmmmm there was that nice earthy and musty smell again.
Rustic stoneware coins and beads
I made a bunch of rustic stoneware coins for the shop AND for next months Component of the Month (you won't want to miss that one).  I used the center cut-outs to roll some beads.  I also made a bunch of disc beads for a wedding order I'm trying to complete.  

As of right now, I'm still working in stoneware and I've got a bisque-load running in the garage.  Sea urchin cabochons and more little leaf cabochons are on the table today.  I'm really looking forward to completing this batch because I plan to move away from so much production work and start playing more.  I'd like to spend some time coming up with new designs and also working in art that isn't necessarily bead-related.  Change is good.  

So, what's on your work table?

Happy Beading!

Friday, June 5, 2015

Wood, Salt, Ash: I dream of future beads.


Hooked on wood fire, enchanted with salt
(Warning: a lot of clay, alchemy and fire. Very few beads...)

I just unloaded my first ever group wood fired/ salt glazed kiln yesterday. Its ALL I have been working towards for three weeks; which is a scant amount of time to prepare enough work. I loved the entire process and am already dreaming up pendant designs that could work best with these two unique kinds of firing. Let me take you back to Saturday last:
Glazed work on palettes as we prepare to load the noborigama
Seven students and one instructor. Unload your already glazed pieces, 20-30 per person. Make a million wadding balls and glue them to your pots feet/base. Load kiln, 2 large chambers.
Wadding. There are a few of my pieces bottom right. 
Wood fire chamber on the left.  Salt glaze chamber on the right. 
Brick up kiln. The kiln was started at 7:30 pm on Saturday. The overnight crew of two students stoked the kiln steadily UNTIL 4 am. We worked in shifts, continually maintaining and increasing the fire over a 22 hour period, reaching ^ 10/11. So tired but so exhilarated...

Why do ALL THIS, you ask?

There are as many variations as the day is long, but there is a sense of mystery. The chemistry is well documented as to HOW this all happens, but I felt a bit like an alchemist preparing to transmute lead to gold. The sense of mystery, the possibilities, the wonder...

Wood firing: "Burning wood not only produces heat of up to 1400°C (2,500 °F), it also produces fly ash and volatile salts. Wood ash settles on the pieces during the firing, and the complex interaction between flame, ash, and the minerals of the clay body forms a natural ash glaze. This glaze may show great variation in color, texture, and thickness, ranging from smooth and glossy to rough and sharp. The placement of pieces within the kiln distinctly affects the pottery's appearance, as pieces closer to the firebox may receive heavy coats of ash, or even be immersed in embers, while others deeper in the kiln may only be softly touched by ash effects. Other factors that depend on the location include temperature and oxidation/reduction. Besides location in the kiln, (as with other fuel-fired updraft kilns) the way pieces are placed near each other affects the flame path, and, thus, the appearance of pieces within localized zones of the kiln can vary as well. It is said that loading an anagama kiln is the most difficult part of the firing. The potter must imagine the flame path as it rushes through the kiln, and use this sense to paint the pieces with fire."

Wood fired pots: 1. Cynthia Bringle 2. Ted Ernst 3. Terry Inokuma 4. Jennifer Harnetty 

Salt glaze: "Salt glaze pottery is stoneware with a glaze of glossy, translucent and slightly orange-peel-like texture which was formed by throwing common salt into the kiln during the higher temperature part of the firing process. Sodium from the salt reacts with silica in the clay body to form a glassy coating of sodium silicate. The glaze may be colourless or may be coloured various shades of brown (from iron oxide), blue (from cobalt oxide), or purple (from manganese oxide).

Salt glazed pots:  1. Robert Compton 2. Phil Rodgers 3. Oak Hill Pottery  4. Mark Bassett

And yesterday - the unloading! 

First thing we saw as we unblocked the door... The torso was bare clay. Thats the magic of wood firing. 

Pieces from a diverse array of students, and instructors work. 

sampling of my smaller work. More details forthcoming at jdaviesreazor.com/blog

Sadly I only slipped one pendant and one cab into the kiln. (Small pieces like that can be annoying to load in a super large communal kiln, and as it was my first time firing with this group I was cautious.) David, our instructor, gave me three palm stones as well. These pieces were unglazed, bare stoneware clay placed in the salt chamber. I love the earthy speckled texture. On the back you can see the bare spot were the pieces was "wadded" (set up on a piece of wet clay to prevent it from fusing to the shelf.) I think the aura of color around the bare spot is beautiful. 


I am on fire, pun intended with ideas! There will most likely be another wood fire workshop in the fall, run by the Perkins Center for the Arts in Moorestown, NJ. I'll be ready. I envision pendants and cabs, some glazed, others glazed in the carved areas only. Some bare clay - "painted with fire" and I see a series with a secret message/word/symbol on the back there the wadding keeps it clear... a secret message worn on your skin. 

Thanks for reading - I know that was a lengthy post with out much correlation to artist made beads and components. But I was excited to share and I DO have dreams of future beads in my head.