Showing posts with label keirsten giles. Show all posts

Monday, November 18, 2013

Inspired by Tulips; the Exploration of Creating a 3D Shape in Metal

Keirsten Giles has once again written up a fantastic blog post about her studio adventures and explorations. Hopefully you are as inspired as I am by the peek into her journey of creating a tulip shape in metal. Make sure you click on the link about coins and hammer embossing. You will love it. 

-Jen 

---------------------------------------


I love metal beads and other three-dimensional metal shapes; unfortunately it is difficult to find such ready-made items in a finish that matches my own metalwork, and I don’t do any casting, or work with metal clay so I can’t easily make my own. I decided to try achieving a 3D shape with simple cuts and curves. My inspiration was tulip blossoms:

Photo by John O’Neill courtesy Wikipedia (http://en.wikipedia.org/wiki/User:Jjron)


I just love this shape.

I used a tulip-shaped vintage brass beadcap for a starting point, picturing it spread flat in my mind (I still thought I might use it so I didn’t want to actually smash it flat).


From Calliope’s Attic on Etsy

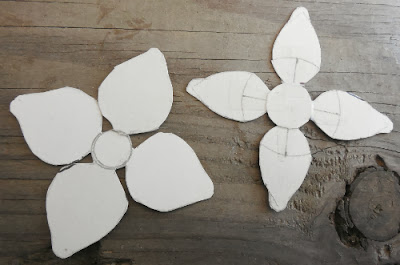
I sketched out a couple of large shapes that I thought might work, with four petals.


Tulip shapes Keirsten Giles


I eventually bit the bullet and just smashed the beadcap I had, thinking, “Well, I’m going to make a bunch of these from copper, so what do I really need it for?”


Smashed bead cap Tulip shapes Keirsten Giles


I scanned it, and then made several different sizes on the computer and printed them onto card stock to make templates from:

tulip scanned template Keirsten Giles
the actual template is included at the bottom of this post for you to save and use

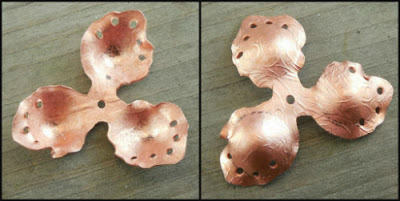
Then using my new templates I cut out several sizes from various gauges of copper sheet—22 gauge for the very large ones, and 24 and 26 gauge for the smaller ones. I etched the 22- and 24-gauge shapes, and embossed the 26-gauge sheets with coins and a hammer . I punched center holes with my Beadsmith hole punch pliers, and then annealed all the textured shapes to make them easier to work with. Just for fun I made holes in the edges of the petals on one pair.

Tulip shapes in copper Keirsten Giles


I began by using my doming set to produce slightly cupped shapes on the petals.


Doming copper tulip shapes Keirsten Giles


Doming copper tulip shapes Keirsten Giles


Then I domed the center of each shape, first resting the doming punch in the center of the shape and pressing the petals against the ball with my fingers, and then hammering the punch gently into the cap.


Doming copper tulip shapes Keirsten Giles

Doming copper tulip shapes Keirsten Giles


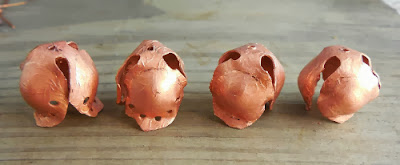
Et voila!

Completed copper 3d tulip shapes Keirsten Giles


Completed copper 3d tulip shapes Keirsten Giles


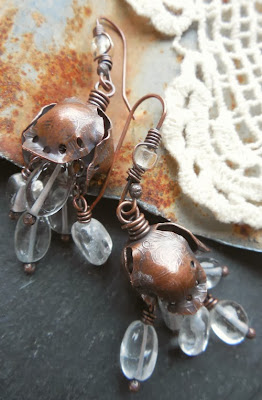
I’ve used one of the small embossed pair for earrings, with clear quartz:


Earrings by Keirsten Giles Lune Artisan Jewelry


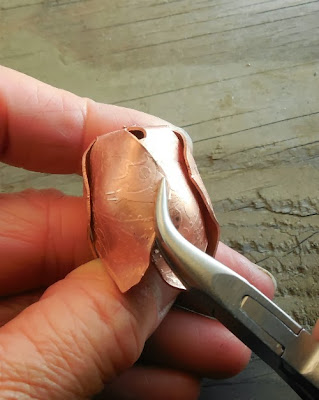
I made the largest ones from 22 gauge sheet. These required a little more man-handling—I had to curve the edges of the petals inward a bit with my pliers.

copper tulip shape 3d Keirsten Giles


The large ones may be part of necklaces eventually, and maybe I will use a pair of the larger ones for a lariat. I have to say I preferred the three-petal bud to the four-petal. I may rework the four-petaled ones a little bit to give them a rounder shape. All in all, it was fun!


copper tulip shape 3d Keirsten Giles


-Keirsten Giles
Lune Artisan Jewelry on Facebook

-------------------------------------------------

If you would like to experiment with your own tulip shapes, Keirsten is very generously sharing her template with you. First, click it to open the image, then right click to save it to your computer. Print it out, and use it. Make sure you share your results!



Tuesday, October 29, 2013

Inspired by Ceramics; the Exploration of "Organically Grown" Metal

I have admired Keirsten Giles' work for a long time, her sense of wonder, and the desire to explore and play. So I was super excited when she agreed to occasionally guest blog for you, our wonderful AJE readers. Enjoy! -Jen
-------------------------------------------


Every few months I get kind of bored with the jewelry I’m doing and so I change it up a little. I often will be inspired by another artist’s work that has a slightly different vibe than mine, and I’ll start heading a little in that direction to see what happens. 

Lately I’ve been wowed by really archeological and natural-looking pieces with a wild, primitive feeling, and dark, moody metals. I started collecting beads and focals with more of this primitive, rustic feel, preparing myself to take a little side-turn when inspiration struck. Robyn and Rey of Ragged Robyn and Grey Bird Studio, respectively, have really knocked my socks off with both their imagination and their uncanny ability to create objects that feel authentically ancient or natural. I picked up a couple little things from their shops:

Porcelain pods from Grey Bird Studio (mine!)

Tapered pod relics by Ragged Robyn (mine!)

Absolutely fabulous—it isn’t easy to mimic nature, or true agedness, like this. My hat is off to these hypertalented women! I could sit for hours just looking through their Etsy shops.

I don’t work in ceramics but rather metal, so I have been mentally exploring ways to make a piece of metal seem organically grown, or naturally aged/distressed. Lately I have been looking at pictures of ancient pottery shards on the Internet, and thought, “Why not try to fake up my own broken pottery shards, but with metal? It’ll be fun!!” And off I went.

I thought I’d make different sizes I could use for pendants, bracelet clasps, necklace connectors, etc. I had too much trouble trying to draw faux-broken edges, so I just sketched the basic shape and then let my saw wander where it might.

My freshly cut metal “shards”

It was way harder than I expected to create random edges! But I will say I overcame my loathing of the saw—it was actually kind of relaxing. Especially once I was using the right gauge saw for my metal. And nothing beats a fresh blade and some beeswax!

My plan was to etch them, so after filing and sanding the edges, I applied my designs using digital files printed onto PressnPeel sheets, using a household iron.

Shards ready to etch


Freshly etched shards

After etching them, I tube riveted most of the holes (I have an aversion to plain holes in metal components, and I also feel a little more secure using them with linen cording if there’s a tube rivet—fewer sharp edges to cut through the cording during the normal wear and tear.)


Tube-riveted shards

Then I blackened them to have a nice dark base to apply my patina over:

Shards nice and black from the LOS bath


I thought for this first batch, I would try to suggest the idea of old glazed pottery, so I used dye oxide patinas on them rather than leaving them as bare metal. I wasn’t totally thrilled with the results—I have a hard time getting a pattern to stand out using these patinas—so I applied a whisper of gilder’s paste over the top of the finished patinas to highlight the patterns a bit:

Finished shards ready for sealant

I couldn’t help leaving a couple of them bare metal (I love the color of copper! In retrospect, I think I would have preferred to leave them all bare copper, just adding other small patinaed elements to them.)

Bare copper necklace connectors


I just got a pile of really rustic recycled glass beads from Happy Mango Beads, which I think will work nicely with my “shards,” and I still have my hoard of Petra Carpreau treasures, plus my new earth relics from Rey and Robyn—I’m all set, so stay tuned. I should have some new jewelry to show in about six months, haha!

Keirsten’s Etsy shop: www.etsy.com/shop/lunedesigns
Keirsten’s Flickr photostream: http://www.flickr.com/photos/lunestudio/