Showing posts with label woolywire. Show all posts

Saturday, September 13, 2014

Making WoolyWire

I often get asked what goes into the creation of WoolyWire. What may on the surface seem like a simple product actually entails many steps, from processing the raw fiber to the final application on wire. I'm going to let my daughter Nellie Thomas - the creator of WoolyWire - describe the process for you in her own words. I think you will find it as fascinating as I do. ~ Karen


Obtaining and Preparing Fiber


The first steps involve cleaning and preparing fiber. Most of the fiber comes from wool, from sheep like the one in the photo below.  I obtain fleeces from fiber shows, and I also reserve fleeces every year from sheep that I know produce good wool. The ones I like to reserve are at Nistock Farms in Northern NY. My two reserved sheep are Pearl, a full-breed Cottswold, and Ash, cross-breed Cottswold / Border Leicester (I don't have pictures of Pearl and Ash, but below is a picture of Duke from the same farm). When sheering time comes, I am guaranteed fleeces from my reserved sheep. I also use other fibers, like angelina, bamboo, and silk.


Fleeces ready to be processed.


Once I have cleaned the fiber, I sort it and prepare it for dyeing. In addition to wool, I dye other fibers as well, such as bamboo and silk.


Next, I sort all my dyed work start assembling color and texture palettes. This is preparation for making an Art Batt...


Making a Art Batt


Here's a picture of my drum carder; the fiber is placed either in the tray in which the smaller drum will pull the fiber onto the larger drum or the fiber can be placed directly onto the larger drum. Typically finer fibers such as angelina, bamboo, or silk will be placed directly on the larger drum:


This is the fiber gathered in preparation for making the batt; it is helpful to plan a color scheme ahead and have all of your fiber ready next to the carder:


Here is what the fiber looks like once I have it all on the drum carder; it is a lot like painting!


Here is what the batt looks like having just been taken off the carder:


Here is the batt being prepared to be rolled for neatness:


Finally, here is the batt in its final stage, ready for spinning:


Spinning WoolyWire


I don't have a picture of the above batt made up into WoolyWire... but here is a different one I made and the Woolywire I spun from it:


My trusty spinning wheel... and my mom's pup Casey. =)


Next I felt the WoolyWire so that the fiber stays put on the wire. Then finally, comes cutting and packaging.  Lots of steps from sheep to final product, but so much fun to see the end result.  I especially love working with color. I hope you enjoyed this little behind-the-scenes glimpse of WoolyWire!


Sunday, April 20, 2014

A Little Easter Tour

When I think of Easter, I think of warm Spring weather, new growth, fresh pastel colors, and signs of Earth's re-birth. I thought I'd do a little visual tour of artisan jewelry and bead goodness that remind me of today's Easter.


These lovelies are by Leslie Watt of Thea Elements. I just want to dive in! And hey... do you notice something interesting about one of these photos? If you do, post the answer in a comment below!


Nellie Thomas has several yummy spring colors in her shop WoolyWire Etc., and is currently running a Spring sale for 25% off. 


Here are some lovely beads by Genea Crivello-Knable of Genea Beads. By the way, she is having an Easter / Spring sale starting on Monday.


Next is lovely Spring jewelry by Linda Landig of Linda Landig Jewelry. I especially love the bunny bracelet. She looks very content in her little garden of beads. :)


Rebekah Payne of Tree Wing Studio is having a Spring Clearance sale several of her beautiful polymer beads.


She has also introduced this new color, which I love! Really puts one in the mood for Spring.


Diana Ptaszynski of Suburban Girl Beads has these sweet pastel colored ceramic beads in her shop.


Jenny Davies-Reazor has some cute spring critter beads, like these two examples ...


I hope you enjoyed this brief tour. Have a lovely week. :) 

Thursday, March 27, 2014

WoolyWire Pendant Tutorial

I've been having fun playing with WoolyWire, a wonderful fiber and copper wire product that is handmade by Nellie Thomas of WoolyWire Etc.  Nellie hand dyes fibers and spins them onto solid copper wire.  WoolyWire can be bent and twisted, just as you would do with any 24 gauge wire, and it brings with it so many possibilities for adding color and texture to your jewelry designs.

A couple of weeks ago I got the idea to try braiding three colors of WoolyWire and then wrapping the wire around a large channel bead to create a pendant.  I'm in love with the result!
This pedant is easy to make and the results are stunning.  Here's how.

Materials:
3 packages of WoolyWire in a pleasing color combination (you won't need it all, don't worry)
1 large or medium channel pendant (available at WoolyWire Etc.)
2, 7-8 mm bicones in coordinating colors
1 decorative headpin with a 3 inch long wire, (mine is from Sue Beads)
23 inches of 1.5 mm leather cording in a coordinating color (mine is from Classic Elements)
2, 1.5 mm end caps (all my findings are from Shipwreck Beads)
1 lobster claw clasp
4, 7.25 mm Vintaj jump rings
GS Hypo Cement

Tools:
Flat nose or half round pliers
Round nose pliers
Wire cutters
A clipboard
Binder clip or "bulldog" clip
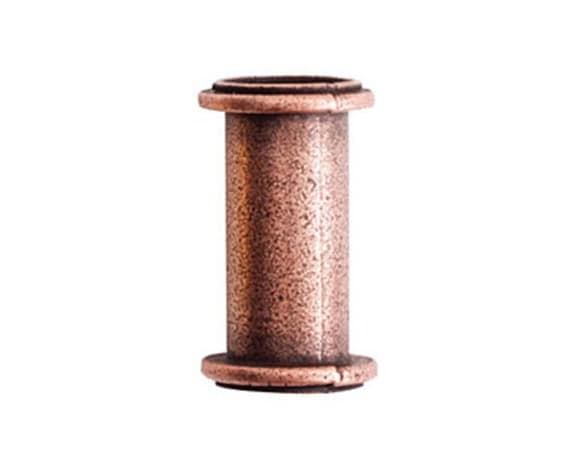
Large Channel Pendant

Directions:
1.  We are going to work with the full 3 foot lengths of the WoolyWire, so do not cut them yet.  Push the WoolyWire down about 1 inch on one of the wires, exposing the copper wire in the center.
 Bend the exposed copper wire at a right angle.
 
2. Fold a small portion of the other 2 wires down flat, so the wire end is not sticking up. (The picture below shows only one wire partially flattened.  You need to completely fold it over on both wires.)
 3.  Holding the three strands close together, wrap the exposed copper wire around all three strands, binding all 3 of them together.   Press the end of the copper wire down and tuck in, using the flat or half round pliers. I trimmed the extra fuzziness on the end, but that is a matter of personal preference.
4.  Place the three wires beneath the clip on the clipboard.  This will secure the wires while you are braiding.
 5.  Braid the wires, just as you would braid a child's hair.
6.  Stop braiding when you think you have enough braid to wrap around the channel pendant.  The length can be adjusted later, if needed.  Secure the loose ends with a binder clip.
 7.  Glue the the top ends of the WoolyWire just beneath the rim of the channel pendant. Set aside until the glue is dry. Unfortunately I don't have pictures for all of the steps, but the rest is really straight forward.

8.  Once the glue has dried, start winding the WoolyWire braid around the channel pendant.  You may like it wrapped loosely, or you may want to push the braid upward a bit so you can add a few extra wraps around the channel pendant. Adjust to your liking.  When you get to the bottom of the pendant, cut the WoolyWires about an inch or so longer than needed to wrap to the bottom of the pendant.  Push back the WoolyWire about one inch on one of the wires.  Fold over the other 2 wires, like you did on the top end of the braid.  Wrap the exposed copper wire around all three wires and glue the end of the braid at the bottom of the channel pendant.

9. Assembling the pendant:  Thread one bicone onto the headpin. Then add the channel pendant, fitting the open end neatly onto the top of the bicone.  Add another bicone on the top and make sure that both are seated firmly into the ends of the channel pendant.  The bicones serve to stabilize the pendant, by filling up the large holes on either side.  Using the wire from the headpin, create a double wrapped loop at the top of the pendant.  If you make a small loop, like I did, you can attach it to the leather cord with a jump ring.  If you make a larger loop, you can thread the pendant directly onto the leather cord.
10. After the pendant is threaded onto the leather cord, add a small drop of glue to one end of the leather and inside one of the end caps.  Place the leather end into the cap and hold in place till the glue sets. Repeat on the other side.

11.  Attach the lobster claw clasp to one end with a jump ring.  Make a short chain with the other 3 jumprings and attach them to the other end cap.  The clasp can be fastened to any of the 3 jumprings, making the length adjustable.

If you have questions about any of the steps, please feel free to ask.  I will be happy to answer your questions in the comments section.
Wear your WoolyWire necklace with pride!
Linda
Linda Landig Jewelry – ArtFire 
Linda Landig Jewelry – Etsy

Saturday, January 4, 2014

Learning To Play in 2013 And Beyond

When you are reading this post on Saturday, my husband and I will be busy taking down the Christmas tree and returning our living room to its normal, everyday appearance.  And while packing away the ornaments and the Christmas stockings, it seems appropriate to reflect upon the past year and to think about where my life journey might lead in 2014.
Preparing to write this post was a good exercise for me.  It made me realize how much exploration I did this past year.  I kind of surprised myself!  I started 2013 with Kerry Bogart's month-long  "Aspire To Wire" e-course.  I learned a lot from Kerry and it boosted my wire working confidence.  Since then, I have been making more of my own clasps, earwires, bails etc. and I plan to do even more in that direction in 2014.  Lately, I have been pushing my wire work skills even further, while working with Cindy Wimmer's new book, "The Missing Link".
Chris, (a local friend), and I started playing with enamels this year.  She has an awesome studio set up and she helped me get started and gave me pointers on how improve my technique.  I discovered that it is fun and inspiring to have some shared studio time with a friend!
I also got together with fellow AJE member, Kristi Bowman, several times this past year.  Kristi lives about 1.5 hours north of me.  We shared a booth at a couple of shows.  We work well together when vending and we have fun joking and talking shop.  We are planning some shared studio time in the upcoming year, also!
Kristi & I in the center, with lampwork artists Lara Lutrick (left) and Lori Bergaman (right).


Kristi and I also attended a metal retreat together, hosted by AJE member Francesca Watson and Melissa Muir.  I had a pinched nerve in my back and missed about half of the week-long retreat, but I am grateful for the time I could be there.  I became more confidant with the torch, and experimented with pewter casting, the use of a hydraulic press and a rolling mill.  I also made a bunch of wonderful new friends.  Kristi and I are already looking forward to the 2014 metal retreat!
Recently I've become intrigued with polymer clay.  I'm not much interested in "traditional" cane work, but rather in textures and surface decoration.  Kristi gave me an old pasta machine of hers and some 2 part mold.  I purchased a toaster oven and am anxious to give it a go in 2014.  I even collected and pressed ginkgo leaves (see below) when I was in Germany this past October.  Won't they make cool impressions for a polymer clay pendant?
The last 2 months of 2013 saw me experimenting with WoolyWire.  I love the texture and rich colors this hand-dyed wool brings to jewelry.  I know I'll be incorporating it in my work in 2014, as well.
The most recent development has me completely baffled.  I've begun doodling.  My mother sketched and painted and my brother has done illustrations in magazines and newspapers.  He has had his cartoons published in the New Yorker, and has illustrated 3 children's books.  I could never draw worth beans and just assumed that my brother got the total allotment of painterly DNA available for my parent's offspring.
Suddenly I've wanted to draw.  I was scared at 1st, because there's a strong line of perfectionism in my family and that trait can be both a blessing and a curse.  It is a curse, if you feel you have to somehow measure up to some imagined standard set by your mother and brother's gifts.  So I doodled secretly....don't laugh!  Then a couple of weeks ago, I just decided to h*** with feeling like I had to  excel at everything I do.  Its more than okay to just play and have fun for the sheer joy of it.  I'm not even drawing bead designs.  Just playing with shapes, colors and shading.  I have no training in art and no clue about techniques.  I don't know if this will be incorporated somehow into coloring polymer clay or if it is just an amusing diversion. And wonder of wonders, I no longer feel the need for this to be leading to a "productive" end-point.  Its is not a competition.  Its healthy to play and explore. My mind and heart are open and I'll see where 2014 takes me.

Linda
Linda Landig Jewelry – ArtFire 
Linda Landig Jewelry – Etsy