Showing posts with label holidays. Show all posts

Thursday, November 20, 2014

Holidays Are Coming....

Christmas day is five weeks today. Eek - five is that all... surely not?! Despite the fact that it happens at the same time every year and we know it's coming it always seems to catch some of us by surprise. Well if you're one of those and you still need some inspiration for some Christmas makes there are plenty of bead and ornament goodies around and here's a little round up of some of my favourites...

Whimsical bulb and bird bead set from Gaea...


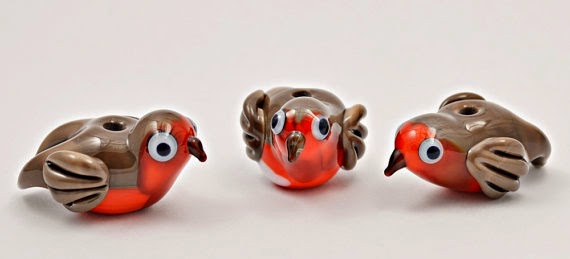
Adorable lampwork Robin focals from Izzy Beads...


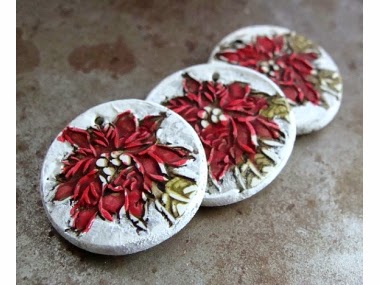
Pretty  Poinsettias from Humble Beads...

http://www.humblebeads.com/product/poinsettia-pendant

I just love these original and inspirational ornaments from Second Surf which would also make great keepsake tags for your special gifts...

 https://www.facebook.com/secondsurf/photos/a.386269463514.165209.168725313514/10152597437863515/?type=1&theater

Fabulously detailed frosty holly beads from Donna Millard

https://www.etsy.com/listing/113136894/handmade-lampwork-holly-glass-beads?ref=favs_view_11

For a more rustic feel how about this pretty cut out snowflake from Suburban Girl Beads...

 https://www.etsy.com/listing/206675994/dark-blue-stoneware-snowflake-pendant?ref=shop_home_feat_1

I just love the icy winter feel of these Polymer Clay Queen Anne's Lace pendants from Tree wings Studio - you can almost hear the ground crackle underfoot...

https://www.etsy.com/listing/207166341/new-color-gossamer-white-queen-annes?ref=hp_mod_rf

Some more lovely holly leaves from Serena Smith Lampwork...

https://www.etsy.com/listing/209038283/christmas-holly-lampwork-glass-leaf?ref=shop_home_active_6

What's not to love about this adorable little beaded owl ornament from Meredith Dada...

 https://www.etsy.com/listing/96507081/snowy-owl-christmas-ornament-beaded-clip?ref=shop_home_feat_1

A gorgeously rich and opulent lamp work focal from Sue Beads...


And because you can never have too much snow at Christmas another ceramic option from Linda Landig Jewellery...


So have fun with your Christmas bead shopping and I hope you're more organised than I am!

Lesley
The Gossiping Goddess

Friday, November 23, 2012

Memories from Christmas Past

I have been at a "Frosty Friday" art (not!) show today, so I hope you will forgive me for recycling a post from my blog from 2010!

Experiencing the yearly Christmas tree adventure always brings certain memories to mind...for those of you who don' know, I was born and raised in the Deep South...Alabama!  The very first scent of green, citrus-y, woodsy tree smell remind me of going out in the woods with my Daddy, and a few of my siblings, probably in the back of his old black pickup truck to find a suitable tree and possibly some mistletoe to hang.  Daddy and my brother were hunters and usually had the perfect tree already scoped out! It was usually cedar and Daddy would put it in a 5-gallon bucket full of wet sand and it would go in front of the big picture window in the front room of our little house.

We didn't have alot of money, especially for a lot of store-bought Christmas ornaments...there were some gorgeous huge glass balls that I remember hanging on the tree every year but I also vividly remember the hand-made decorations we made every year.  Like the little sweet-gum balls that we spray painted and decorated with glitter.


I also remember cutting a big star out of cardboard, covering it with aluminum foil and then cutting a hole in the middle so that one of the big lights could fit inside it for the top of the tree.

Gosh, I always loved decorating that tree!  After I was older, our handcrafted ornaments became a bit more sophisticated.  My sister Susan and I made a whole bunch of scrap fabric-covered balls decorated with sparkly rick-rack, fake pearls and seed beads with straight pins and glue...When Mama died and we divvied up things I took a few to hang on my tree..I love them, even though they are about to fall apart.  Maybe I will make some new ones!

circa the 70's!
After moving away from my hometown and living on my own, I did some ornament making on my own...here are some little clothespin and paper angels...love the one with pasta hair!


One year I got ambitious and tried to duplicate a stuffed angel I saw in a magazine...only I didn't have a sewing machine, so I stitched her and her friends all up by hand.  I gave them as gifts that year.


Poor little thing, her spanish moss hair and potpourri dried flower bouquet have seen better days!

I tried to find a few crocheted angels and ornaments I used to make with tiny cotton thread, but alas they were nowhere to be found.

Good times, good times!  What memories from past Christmases do you have?

Thanks for stopping by our Open House!  Please go and check out the discounts and other fun things that have been posted today.  Here is a link to the original Welcome post!!


Its all about the sequins.

Sequins transport me back to my Grandma's house. My maternal grandmother made many of her Christmas decorations. She had lived through the Depression, and was a consumate saver... but also a very crafty woman. My sisters and I all have a love of embroidery - passed down to us from our mother, from her mother. My older sister has chosen embroidery as her primary medium and has taken it to a whole new level. ( You can see her work here.) I think Grandma would be tickled.

Grandma loved sequins, but didnt really feel the need to follow any set directions. Her colors and patterns are exuberant to say the least. Between Grandma and Mom, my siblings and I all had handmade felt stockings to hang on the mantle, beaded and bedazzled and sequined.  I  have a few of her felt embroidered ornaments on my tree every year.
My Mom - also an extremely creative one! She loves embroidery and can sew a mean streak. As a kid this was our Christmas tree topper. He was a puppet, and carries jingle bells - very merry!
After my siblings and I grew up and set out to households of  our own, Mom made a stunning announcement. She was giving up the iconic Snowman in favor of a commercially purchased angel?!!??! Well - I am happy to say, the Snowman now tops MY tree every year!

The love of sequins has been passed down to me as well. Mom gave me this kit she was no longer interested in... and it was a labor of love, I must say. But it is now one of my favorite holiday decorations!
And I sequined and embroideed a stocking for my nephew before he was even here! So the tradition continues...

All these posts sure are stirring up the holiday excitement for me. Its Thanksgiving Day, glorious smells are wafting up from my sister's kitchen, my nephew is racing cars downstairs... So many things to be thanksful for.... I hope your holday is festive!

Thank you for stopping by our Holiday Open House! And please feel free to browse our shops. As the season starts today with Black Friday we have many sales and tempting treasures... You can find all the details at our Holiday Open House page.


Make merry under the mistletoe!

Mistletoe. How did a parasitic evergreen plant with poisonous berries become associated with kisses?  It was described in 1820 by American author Washington Irving in his "The Sketch Book of Geoffrey Crayon":
"The mistletoe is still hung up in farm-houses and kitchens at Christmas, and the young men have the privilege of kissing the girls under it, plucking each time a berry from the bush. When the berries are all plucked the privilege ceases.

Mistletoe is very prominent in the Norse myth of the death of Baldur. He dreamt of his death, and lest it come true... his mother Frigg, Goddess of Love, had all living creatures swear to do Baldur no harm. Except the mistletoe, omitted for no apparent reason.  Leave it to Loki, the Trickster, to wreck havoc and trick blind Hodor, Lord of Winter,  into slaying Baldur. Frigg's tears of despair were said to crystalize into the white mistletoe berries. Baldur was resurrected, long story short. Mistletoe became a symbol of love and peace, not death. 

Mistletoe, which was sacred to Celtic Druids because it mysteriously grew on the most sacred tree, the oak, was ceremoniously cut and a spray given to each family, to be hung in the doorways as good luck. Druid priests cut it from the tree on which it grew with a golden sickle and handed it to the people, calling it All-Heal. To hang it over a doorway or in a room was to offer goodwill to visitors. Kissing under the mistletoe was a pledge of friendship. 
Mistletoe Santa - antique postcard. 
Mistletoe dress! What holiday finery!


 The evolution of the "Kissing ball" 

Originally, during England’s Middle Ages, “holy boughs”—made from interlocking evergreen 
branches and supporting figurines of baby Jesus or the holy family—graced passages. Throughout the holiday season, the holy bough hung from entryways as an omen of goodwill for embracing visitors.
After a period of unpopularity, thanks to the Puritans, Victorians brought the holy bough back from obscurity, refurbished with a new look and a new name. It now became an elaborately decorated apple or potato replete with herbs and foliage. The herbs on each “kissing ball” were not only chosen for their beauty, but also for their symbolic value. Lavender and rosemary signified loyalty and devotion, while thyme promoted courage. Mistletoe was a popular decorative choice symbolizing good fortune and fertility.
The kissing ball began to emphasize romance, rather than mere good will. Dancers waltzed under the kissing ball laced with mistletoe for a peck, and single women stood in wait for potential suitors. Eventually, sprigs of mistletoe superseded all other greenery and became the enduring symbol of holiday affection that we know today. (motherearthliving.com)

And an easy tutorial
As well as more information if you are interested...And one more article...

I think I will try this this season, it looks simple enough, and I love the smell of fresh greens in the house!

Thanks for stopping by! And please feel free to browse our shops. As the season starts today with Black Friday we have many sales and tempting treasures... You can find all the details at our Holiday Open House 
page.

The Holly and the Ivy

Shiny lustrous dark green leaves, accentuated by bright candy like berries... holly is a holiday icon, a staple of decorating in its real form and many silk ( and plastic...) facsimiles. As a kid growing up in Maryland we had a HUGE holly tree in our yard - lovely to have so much green through the winter. And a veritable apartment building for the birds...

Image credit: www.flowersociety.org
And at this time of year - the British carol "The Holly and the Ivy " comes to mind. But why holly and ivy at Christmas time?
"The holly and the ivy,
When they are both full grown,
Of all trees that are in the wood,
The holly bears the crown:
O, the rising of the sun,
And the running of the deer
The playing of the merry organ,
Sweet singing in the choir.

The traditional lyrics link go on to link the red of the berries to Christ's blood, and the prickly leaves to the Crown of Thorns. The ivy is barely mentioned at all, and that was what had me wondering about the roots of the song, perhaps in older Celtic folklore?


Folklorist Cecil Sharp recorded older versions depicting a contest of sorts between Holly ( masculine) and Ivy (feminine):

Holly stands in the hall, fair to behold:
Ivy stands without the door, she is full sore a cold.
Nay, ivy, nay, it shall not be I wis;
Let holly have the mastery, as the manner is.
Holly and his merry men, they dance and they sing,
Ivy and her maidens, they weep and they wring.
Nay, ivy, nay, it shall not be I wis;
Let holly have the mastery, as the manner is.
There are records of Midwinter dances held in rural villages, complete with singing exchanges between the genders. Resolution - under the mistletoe, naturally! These three plants are very prominent evergreens in the English winter landscape, and as such work their way in to folklore over the years. 

I found a really charming mention of a British Midwinter/Yule tradition: The holly boy and the ivy girl. Representing the masculine and feminine, they sang and processed through town, carrying evergreens to symbolize eternal light and life during the darkest point in the year. 

In Celtic lore, the Holly King ruled over the "dark" half of the year, as days grow shorter. His reign ends at the Winter Solstice, when days gradually become longer...(His counterpart is the Oak King. ) Holly has been brought inside as a garland since ancient times - its evergreen heartiness a symbol of encouragement and fortitude in the bleak winter. Ivy was very popular for decorations, and "decking the halls" during the Victorian era...

And yes - that IS mistletoe they are hanging... stay tuned for folklore on that most merry of plants!

Thank you for stopping by our Holiday Open House. And please feel free to browse our shops. As the season starts today with Black Friday we have many sales and tempting treasures... You can find all the details at our Holiday Open House page.

Jenny
Www.jdaviesreazor.com


The best - and easiest - homemade bread EVER

There was a time when I was growing up that money was a real issue for our family. My mom was a single mom for several years, and then remarried - except that both she and her new husband were free-lance musicians in New York City. (And you know how well THAT pays!) They sacrificed a lot for me and for my brother - among other things, they scraped money together to send us to a private school a few blocks from where we lived so we could get out of the New York public schools - in the 60's those schools were a little rough, especially in the area where we lived, and successive strikes and riots made the decision a no-brainer for them in spite of the financial challenges it posed.

I know all this now, but as a child I was oblivious. We were beloved, we had enough, and we had no idea that money was tight or any of the other ways in which our parents sacrificed for us. (One more thing to have been thankful for as we raised our glasses yesterday.)

One of the ways my mom saved money was to make all our meals from scratch, as much as possible, including our bread. It was an involved process that was fascinating to me and my brother, and it was a real treat to be allowed to climb up on a stool pulled up to the counter and help with the kneading and turning and flouring. (There's a family story involving my brother at the age of 6 or 8, kneading bread rather violently as he said, "Take THAT, [insert name of person he was angry about here]!" My mom knew all about redirection before it was a popular child-rearing technique.)

I went through a phase where I baked bread for my own family, but honestly - a military wife, working full time, with a small and very active child, plus trying to complete my college degree in an adult education program, and eventually taking that much time to create a fresh loaf of bread became something that dropped off my "must do" list. And anyway, I could never replicate those gorgeous artisan loaves that came out of professional ovens, with the crisp, thick, golden crusts and dense, chewy interiors, which is what bread is really all about.

Enter Pinterest. I pinned this recipe a while back, but it seemed so ridiculously easy that I thought, "There must be a catch."

15---Oh-yum-2


Nope. No catch.

About a month ago, I gave this a try and was so floored by the results - and how EASY it is! - that I've been making a loaf every few days. Because temperature, humidity, and a whole host of other things make a huge difference, I tweaked the recipe over successive bakings until I zeroed in on the perfect bread for us. Try my version or the linked version and then adjust it in small increments until you come up with something that works for you, both in terms of taste and texture. Here's mine (complete recipe at the bottom of this post):

Put six cups of all purpose flour, two teaspoons of dry active yeast, and two teaspoons of salt in a large bowl. Stir to combine thoroughly, then slowly add 2-2/3 cup of liquid. (I use one bottle of dark beer poured into a large measuring cup, topped off with water to make the full 2-2/3 cup measure.)

1---Adding-Liquid-


It's going to be a wet, sticky dough, but that's OK - that's what you want. Stir with a rubber spatula until everything is combined, being sure to get all the way down to the bottom so there are no pockets of flour left. When you're done, you should have something that looks roughly like this.

2---The-Blob


Cover the bowl tightly with plastic wrap, and leave it to sit on your counter in a warm, draft-free place for 12 - 36 hours.

You read that right. I started with 18 hours the first time I made a loaf, but it didn't rise enough for me and both Nick and I prefer a sourdough or malty-tasting bread, so the addition of the beer and the longer rise time to 36 hours wound up being perfect for us.

So here's the deal: take five minutes one evening to combine these ingredients in a big bowl and then walk away. Just... walk away. Come back two mornings later, and you'll have something that looks like this.

3---Bubbles


It should have darkened slightly and have lots of bubbles on the top. And the smell.... oh my gosh. The smell will be heavenly.

Lay out a large sheet of parchment paper on your counter. Sprinkle it with flour. (Trust me on this - the original recipe suggests a cotton kitchen towel. Don't fall for it. You want parchment paper.)

3a--Parchment


Take your trusty rubber spatula and scrape around the sides of the bowl to bring the dough together a little bit before turning it out onto the parchment paper.

4---Fold-together


Sprinkle a little more flour on top - and then, gently and quickly, form it in to a sort of a ball shape by pulling the sides away and tucking them under, turning them as you go. When you're done, you should have a smooth-topped blob of dough with all the edges tucked in. And really messy, sticky hands - you should flour your hands first, but even so there's going to be no way to get around this part. Sorry.

5---Getting-Ready


6---Sticky-Hands


7---Ready-to-Go


Sprinkle with a little flour and then cover with a clean cotton kitchen towel (not terry cloth) and let rise for two hours. (Total active time invested at this point: 10 minutes, max.)

8---Tucked-into-Bed


When you're a half hour from the end of that rise time, turn your oven on to 425 degrees. (For our UK friends, that's Fahrenheit - I have no idea what it is in Celsius!!) Put the oven rack smack dab in the middle of the oven.

Then - and this is the key - grab a 6 - 8 quart covered Dutch oven. I use this awesome one I got on eBay.

9---Dutch-Oven


(It is EXACTLY like the one my mom used to make homemade soups when I was growing up. EXACTLY. I totally heart this piece of kitchen hardware.)

Put the Dutch oven in the oven and leave it there for the last 30 minutes of the dough's second rise. At the end of the half hour, the pan and the oven will be screaming hot, which is exactly what you want.

Now, let me take a quick detour to tell you why this is necessary. Those gorgeous crusty boules you get at artisan bakeries have those beautiful, thick, crisp crusts because of the steam the bakers use in their high-heat ovens. Trying to replicate that in a home oven is a pain in the keister - believe me, I've tried it, complete with partially opened oven door and a squirt bottle aimed at a hot baking stone. Not fun, and way way way too much work.

Enter the screaming hot, cast-iron Dutch oven. When paired with a wetter-than-usual bread dough in an enclosed environment, you get... steam. So essentially, what you're doing is creating an oven within an oven, which captures the moisture from the wet dough and uses it to create that gorgeous crust that even a spray bottle can't replicate.

So here's how you do it.

Put a cooling rack on your stovetop or countertop, close to the oven. You want to work quickly, but don't rush - those pans will stay plenty hot for what you need to do next. Just have everything lined up and ready to go. Put the Dutch oven on the cooling rack and remove the top.

Your dough will have plumped up and and flattened out a little. And trust me when I tell you it is still gooey. Which is a good thing. Remove the kitchen towel, and slide your hand underneath the parchment paper, picking up the gooey mass.

10---Ready-for-the-Pan


If you're taking photos, get your husband to take pictures as you carefully flip the dough - upside down, seam side up - into the screaming hot Dutch oven. (And no, you don't need to oil it first.) Flour is going to go everywhere, but it will make your kids laugh and it cleans up easily with a damp paper towel.

11a---Ready-to-Flip


11a---Flipping


11a---Flipped


Carefully peel the parchment paper off the bottom (now the top) of the dough. (Now do you understand the wisdom of parchment paper??)

12---Peeling-off-the-paper


Put the lid on the Dutch oven and put it back in the regular oven. Set a timer for 45 minutes, go put on a flowey, gauzy dress and water your plants while sipping an ice cold crisp Chardonnay. If you're into that sort of thing.

In other words, you've now spent a total of about 12 minutes total active time on what is going to be the best bread you've ever tasted. Go do something fun with the time you're saving.

After 45 minutes, take the lid off the Dutch oven. Try not to scream with excitement over the gorgeousness that is in your oven. (My "gorgeousness" unfortunately did not include a clean oven. Please pardon me.) Active time check: 12.25 minutes.

13---Almost-Done


Leave the bread in there for another 5 - 10 minutes. Check on it about half-way through - the point here is to let the bread get a deep chestnut color, but not burnt.

14---Oh-yum


OK, seriously. This smells sooooooo good.

Take the Dutch oven out of the oven. Turn the boule out onto your hand - using a hot pad, 'cause that sucker will be really hot - and put it on the cooling rack right side up. (Set the Dutch oven someplace safe and let it cool before washing it. Don't warp or crack your enameled iron pieces!)

15---Oh-yum-2


And then lean in and listen closely to the bread. Because the bread will start singing to you.

No, I have NOT had too many glasses of ice cold crisp Chardonnay! The bread will literally begin to make an amazing crackling sound as it cools. It's going to be really, really hard, but make yourself wait to cut into the bread until it's completely cooled on the outside. If you cut too soon, the inside will get gummy. (I know this because I could not make myself wait on the first loaf. Even gummy, that loaf was better than anything from the store.)

Then take it to your friend's house for Thanksgiving and let them oooh and ahhhh over the amazing home-made bread you slaved over for them. And drink their wine.

16---Sliced


17---A-Loaf-of-Bread-and


Total active time: less than 15 minutes. Seriously. There is no reason NOT to do this. Cheap. Absurdly easy. And really, really good. No excuses - the linked recipe includes some substitutions if whole wheat is your thing.

So there it is - from my house to yours, the Watson version of Amazing No-Knead Bread just in time for the holidays. Leftover bread makes awesome croutons or stuffing. Seriously. And if you actually attempt this, drop me a line and let me know - I'd love to hear how it turned out!

*******

This post is part of the Art Jewelry Elements 2012 Holiday Open House, 
and is cross-posted over on my blog, www.francescawatson.com, where I am also hosting a giveaway.


Art Jewelry Elements team members are offering special deals in their online shops to AJE readers starting today and going through Cyber Monday (November 26). You can see the complete list of participating members and details about the discounts here.

Please help support the artist community by buying handmade for your gift-giving this year.

*******

The Watson Version of Amazing No-Knead Bread

Ingredients:
  • 6 cups all purpose flours
  • 2 tsp. active dry yeast
  • 2 tsp. kosher salt
  • One bottle of dark beer, plus enough water to make 2-2/3 cup liquid total
Equipment:
  • Cooling rack
  • Heavy 6 - 8 quart covered Dutch Oven
  • Large bowl
  • Rubber spatula
  • Parchment paper
  • Cotton kitchen towel
  1. Mix dry ingredients together in a large bowl.
  2. Slowly pour liquid into dry ingredients, stirring as you pour and scraping flour up from the bottom of the bowl. Ensure all flour has been combined.
  3. Cover bowl tightly with plastic wrap and set in a warm, draft-free place for 12 - 36 hours. The dough should be slightly darkened with bubbles all over the top.
  4. Turn the dough out onto floured parchment paper and sprinkle with flour over the top.
  5. Working quickly with floured hands, stretch the sides of the dough down and out to make a smooth top, turning the ball and tucking the ends under as you go.
  6. Set the dough ball seam side down on the floured parchment, and sprinkle a small amount of flour over the top. Cover with a clean cotton kitchen towel and let rest for 2 hours.
  7. 30 minutes before the second rise time is complete, turn on oven to 425 and place the covered Dutch oven on a rack in the middle of the oven.
  8. When the 2 hour rise time is complete, remove the Dutch oven from the oven and remove the lid.
  9. Working quickly, remove the cotton towel from the dough and slide your hand under the dough. Carefully flip the dough into the hot Dutch oven and peel away the parchment paper.
  10. Cover the Dutch oven and return it to the hot oven for 45 minutes.
  11. Remove the lid and bake for 5 to 10 minutes longer, until the bread is a deep chestnut brown.
  12. Turn the bread out onto a cooling rack and cool completely before cutting.
  13. Bread should not be stored in plastic wrap or in the refrigerator, to preserve the crisp crust. Store in the cooled Dutch oven on the counter, or in a brown paper bag.