Showing posts with label aje holiday open house. Show all posts

Friday, November 23, 2012

Christmas In a Pickle


Although I do love a big roast Christmas dinner with all the trimmings, my favourite meal of the holiday season is actually the traditional english boxing day spread of cold cuts of meat, cheeses and pies with all the salads, pickles and relishes that accompany them. I love pickles and chutneys and for the last couple of years I've been making this recipe by British chef Hugh Fearnley-Whitingstall both to eat at home and to give as gifts and it always goes down well.

Fig and Cranberry Chutney 

Makes 2-4 jars


Ingredients

  • 500g onions, chopped
  • Scrap of oil
  • 1kg diced apples, any will do but try to include some Bramleys
  • 500ml cider vinegar
  • 400g demerara sugar
  • 200g dried figs, diced
  • 125g dried cranberries
  • Zest and juice of 1 orange
  • Generous glass of port
  • 5cm piece root ginger, roughly chopped
  • 6 cloves
  • 12 cardamom pods
  • 1 tsp coriander seeds
  • 100g walnuts, roughly chopped

Method

  1. Start by sweating the onion in a scrap of oil then add the apple. Pour over the vinegar and sugar and and stir well until the sugar has melted.
  2. Add the fruits to the pot then after that the orange zest and juice, followed by the port.
  3. Next it's time to put together your spices. Tie the ginger, cloves, cardamom pods and coriander seeds in a clean square of muslin and secure with string. Immerse the pouch deep in the simmering chutney and let it bubble away for an hour or so, making sure to stir it regularly so it doesn't catch on the bottom.
  4. Add the walnuts and cook for a final 30 minutes. If you can part your chutney and see a little bit of pan on the bottom you are done.
  5. Decant the warm chutney into sterilised jars, seal with vinegar-proof lids and allow to cool.
Enjoy!

Don't forget to check out the AJE teams Black Friday sales - details and coupon codes here.

Lesley

Where the magic happens...

Ever wonder what artists' studios look like? I do - studio tours are one of those things I really love. So here's a peak into some of the studios of our AJE team members.

Here's one side of my space (recently rearranged and not yet finished):

Studio

I'm really fortunate that I have a lot of natural light. Under the windows is a two-level metal working set up. The higher table is where I do soldering and sawing; waiting to be set up is a Dremel drill press and a grinding/polishing machine my best friend got me for my birthday. Underneath is an old TV stand which holds boxes of focal beads, metal sheet, and wire. The next level down is where I do my metal working, pounding, polishing and form-folding. (You can't see my vise, which is bolted to the table and is hidden by the chair.) I have a second bench pin there to brace things against when I'm using my flex shaft, placed right between the two levels so I can use it in both places. The wheelie chair lets me roll from station to station.

To the right of the metal station is a small table which holds the TV, modem, and wireless network stuff. In front of that is a rolling cart that holds a bunch of miscellaneous stuff. Behind the metal station is another table that I use for layouts and final fabrication. Right now it's covered with bags of wire that I'm sorting through. The whole thing needs a thorough cleaning - and there's more to show, but I'll hold off on a complete studio reveal until the reorganization is complete.

Jo Tinley works in this beautiful space, an 8 x 12 workshed in her garden:


She has a whole blog post up about it, which you can check out here if you want to see more.

Linda Landig works in this pretty space, complete with a gorgeous old printers cabinet. It was a gift from her wonderful husband, and she's mighty partial to it - and the entire AJE team covets it in the nicest possible way. (In fact, I suggested I might swing by her place next time she goes out of town and she suggested she might sic zombies on me!)


Jenny Davies-Reazor loves her glazing fort - in fact, her whole studio is her sanctuary. She's able to work in it for three seasons out of the year, but in the coldest months, she moves into her dining room. 


So there's a little glimpse into where some of us spend our time creating - hope you enjoyed it! From our studios to your hearts, happy holidays!

*******

This post is part of the Art Jewelry Elements 2012 Holiday Open House. 


Art Jewelry Elements team members are offering special deals in their online shops to AJE readers starting today and going through Cyber Monday (November 26). You can see the complete list of participating members and details about the discounts here.

Please help support the artist community by buying handmade for your gift-giving this year.

I'm also hosting a special giveaway over on my blog, here: www.francescawatson.com

*******

Inexpensive Holiday Wines

This is the time of year when people who aren't regular wine drinkers start thinking about how on earth they're going to pick the right wine for the holiday festivities. It's overwhelming to face racks and racks of bottles with no clue about how to get started. So here's my list of inexpensive wines, just in time for your next hostess gift or holiday meal!

Reds

Goats Do Roam Red - 2011 - A nice, mellow blend of reds. Some tannins, but not overwhelming. Not as fruity as some reds, with a good balance of flavors and a nice smooth finish. Under $10 a bottle in our area.

House Red Wine - Another blended red, a little bigger in flavor than the Goats Do Roam recommendation above. Some fruit, with more tannins but a good, smooth finish without the dry, bitter mouth feel of a tannin-heavy red. Under $12 a bottle in our area.


Menage a Trois - I hate this name, but since this is a blend of three red varietals, I finally got past my personal issues and gave this wine a try. It's a terrific, easy-drinking wine with a lot of fruit (but not sweet) and very little tannins. A good all-around choice for people who are nervous around red wine. Under $10 a bottle in our area.


Sparkling Wines

Cristalino Brut - Very inexpensive, light and flavorful sparkling wine. If I was giving out stars, this one would get five. Excellent for toasting or in mimosas, and at about $8 a bottle, it's a great choice for big parties.


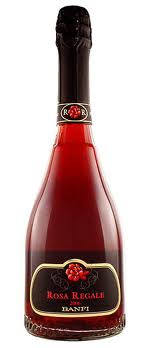
Rosa Regale - OK, before you tell me you don't like dessert wines, give me a minute to tell you why you need to try this one. It's faintly sweet without being cloying, has the most gorgeous rose color and aroma, and is filled with super-fine bubbles that fizz on your tongue. You will not be sorry - pair it up with a light, fruit-based dessert like a pavlova to knock everyone's socks off. (And their website is fun, too.) Less than $15 a bottle in our area.


I don't drink a lot of white wines, so I'm sorry to say that I have no recommendations for those. Give one of these a try and let me know what you think - and please drink responsibly!! (If you over-indulge,   AJE team member Lesley Watt has thoughtfully compiled some "cures" - but use them at your own risk!)

Happy holidays!

******

This post is part of the Art Jewelry Elements 2012 Holiday Open House.


Art Jewelry Elements team members are offering special deals in their online shops to AJE readers starting today and going through Cyber Monday (November 26). You can see the complete list of participating members and details about the discounts here.

Please help support the artist community by buying handmade for your gift-giving this year.

Book Review and Give Away: Bead Soup

Have you added Bead Soup: 32 Projects show what happens when 26 beaders swap their stash book by Lori Anderson to your wish list? Well, today I am giving away my review copy of the book.


Technically that means I am supposed to review the book. But here's the thing....I supplied a soup filled with lampwork beads for the book; and I received a soup of ceramic beads by Melanie Brooks that I made into a necklace. So....I am kind of biased towards loving the book. I would still love it even if I wasn't. So it is possible I'm not biased.

However, the fact remains that I have two copies of this book and that is one book too many for my overflowing library. You have the opportunity to win this book. Which will be shipped via media mail to someone in the United States. 

How it works:

1-Leave a comment. 
2-Follow this blog and leave a comment
2-Share this giveaway on Facebook and/or Twitter and leave a comment that you did
3-Like us on Facebook
4-Follow us on Pinterest 

Winner will be announced at 10:30 pm tonight here on the blog. 

We are having a special sale this weekend for you, our wonderful readers. Find out how you can save money on handmade components and art jewelry by clicking this link. 

-Jen Cameron
Glass Addictions

The best - and easiest - homemade bread EVER

There was a time when I was growing up that money was a real issue for our family. My mom was a single mom for several years, and then remarried - except that both she and her new husband were free-lance musicians in New York City. (And you know how well THAT pays!) They sacrificed a lot for me and for my brother - among other things, they scraped money together to send us to a private school a few blocks from where we lived so we could get out of the New York public schools - in the 60's those schools were a little rough, especially in the area where we lived, and successive strikes and riots made the decision a no-brainer for them in spite of the financial challenges it posed.

I know all this now, but as a child I was oblivious. We were beloved, we had enough, and we had no idea that money was tight or any of the other ways in which our parents sacrificed for us. (One more thing to have been thankful for as we raised our glasses yesterday.)

One of the ways my mom saved money was to make all our meals from scratch, as much as possible, including our bread. It was an involved process that was fascinating to me and my brother, and it was a real treat to be allowed to climb up on a stool pulled up to the counter and help with the kneading and turning and flouring. (There's a family story involving my brother at the age of 6 or 8, kneading bread rather violently as he said, "Take THAT, [insert name of person he was angry about here]!" My mom knew all about redirection before it was a popular child-rearing technique.)

I went through a phase where I baked bread for my own family, but honestly - a military wife, working full time, with a small and very active child, plus trying to complete my college degree in an adult education program, and eventually taking that much time to create a fresh loaf of bread became something that dropped off my "must do" list. And anyway, I could never replicate those gorgeous artisan loaves that came out of professional ovens, with the crisp, thick, golden crusts and dense, chewy interiors, which is what bread is really all about.

Enter Pinterest. I pinned this recipe a while back, but it seemed so ridiculously easy that I thought, "There must be a catch."

15---Oh-yum-2


Nope. No catch.

About a month ago, I gave this a try and was so floored by the results - and how EASY it is! - that I've been making a loaf every few days. Because temperature, humidity, and a whole host of other things make a huge difference, I tweaked the recipe over successive bakings until I zeroed in on the perfect bread for us. Try my version or the linked version and then adjust it in small increments until you come up with something that works for you, both in terms of taste and texture. Here's mine (complete recipe at the bottom of this post):

Put six cups of all purpose flour, two teaspoons of dry active yeast, and two teaspoons of salt in a large bowl. Stir to combine thoroughly, then slowly add 2-2/3 cup of liquid. (I use one bottle of dark beer poured into a large measuring cup, topped off with water to make the full 2-2/3 cup measure.)

1---Adding-Liquid-


It's going to be a wet, sticky dough, but that's OK - that's what you want. Stir with a rubber spatula until everything is combined, being sure to get all the way down to the bottom so there are no pockets of flour left. When you're done, you should have something that looks roughly like this.

2---The-Blob


Cover the bowl tightly with plastic wrap, and leave it to sit on your counter in a warm, draft-free place for 12 - 36 hours.

You read that right. I started with 18 hours the first time I made a loaf, but it didn't rise enough for me and both Nick and I prefer a sourdough or malty-tasting bread, so the addition of the beer and the longer rise time to 36 hours wound up being perfect for us.

So here's the deal: take five minutes one evening to combine these ingredients in a big bowl and then walk away. Just... walk away. Come back two mornings later, and you'll have something that looks like this.

3---Bubbles


It should have darkened slightly and have lots of bubbles on the top. And the smell.... oh my gosh. The smell will be heavenly.

Lay out a large sheet of parchment paper on your counter. Sprinkle it with flour. (Trust me on this - the original recipe suggests a cotton kitchen towel. Don't fall for it. You want parchment paper.)

3a--Parchment


Take your trusty rubber spatula and scrape around the sides of the bowl to bring the dough together a little bit before turning it out onto the parchment paper.

4---Fold-together


Sprinkle a little more flour on top - and then, gently and quickly, form it in to a sort of a ball shape by pulling the sides away and tucking them under, turning them as you go. When you're done, you should have a smooth-topped blob of dough with all the edges tucked in. And really messy, sticky hands - you should flour your hands first, but even so there's going to be no way to get around this part. Sorry.

5---Getting-Ready


6---Sticky-Hands


7---Ready-to-Go


Sprinkle with a little flour and then cover with a clean cotton kitchen towel (not terry cloth) and let rise for two hours. (Total active time invested at this point: 10 minutes, max.)

8---Tucked-into-Bed


When you're a half hour from the end of that rise time, turn your oven on to 425 degrees. (For our UK friends, that's Fahrenheit - I have no idea what it is in Celsius!!) Put the oven rack smack dab in the middle of the oven.

Then - and this is the key - grab a 6 - 8 quart covered Dutch oven. I use this awesome one I got on eBay.

9---Dutch-Oven


(It is EXACTLY like the one my mom used to make homemade soups when I was growing up. EXACTLY. I totally heart this piece of kitchen hardware.)

Put the Dutch oven in the oven and leave it there for the last 30 minutes of the dough's second rise. At the end of the half hour, the pan and the oven will be screaming hot, which is exactly what you want.

Now, let me take a quick detour to tell you why this is necessary. Those gorgeous crusty boules you get at artisan bakeries have those beautiful, thick, crisp crusts because of the steam the bakers use in their high-heat ovens. Trying to replicate that in a home oven is a pain in the keister - believe me, I've tried it, complete with partially opened oven door and a squirt bottle aimed at a hot baking stone. Not fun, and way way way too much work.

Enter the screaming hot, cast-iron Dutch oven. When paired with a wetter-than-usual bread dough in an enclosed environment, you get... steam. So essentially, what you're doing is creating an oven within an oven, which captures the moisture from the wet dough and uses it to create that gorgeous crust that even a spray bottle can't replicate.

So here's how you do it.

Put a cooling rack on your stovetop or countertop, close to the oven. You want to work quickly, but don't rush - those pans will stay plenty hot for what you need to do next. Just have everything lined up and ready to go. Put the Dutch oven on the cooling rack and remove the top.

Your dough will have plumped up and and flattened out a little. And trust me when I tell you it is still gooey. Which is a good thing. Remove the kitchen towel, and slide your hand underneath the parchment paper, picking up the gooey mass.

10---Ready-for-the-Pan


If you're taking photos, get your husband to take pictures as you carefully flip the dough - upside down, seam side up - into the screaming hot Dutch oven. (And no, you don't need to oil it first.) Flour is going to go everywhere, but it will make your kids laugh and it cleans up easily with a damp paper towel.

11a---Ready-to-Flip


11a---Flipping


11a---Flipped


Carefully peel the parchment paper off the bottom (now the top) of the dough. (Now do you understand the wisdom of parchment paper??)

12---Peeling-off-the-paper


Put the lid on the Dutch oven and put it back in the regular oven. Set a timer for 45 minutes, go put on a flowey, gauzy dress and water your plants while sipping an ice cold crisp Chardonnay. If you're into that sort of thing.

In other words, you've now spent a total of about 12 minutes total active time on what is going to be the best bread you've ever tasted. Go do something fun with the time you're saving.

After 45 minutes, take the lid off the Dutch oven. Try not to scream with excitement over the gorgeousness that is in your oven. (My "gorgeousness" unfortunately did not include a clean oven. Please pardon me.) Active time check: 12.25 minutes.

13---Almost-Done


Leave the bread in there for another 5 - 10 minutes. Check on it about half-way through - the point here is to let the bread get a deep chestnut color, but not burnt.

14---Oh-yum


OK, seriously. This smells sooooooo good.

Take the Dutch oven out of the oven. Turn the boule out onto your hand - using a hot pad, 'cause that sucker will be really hot - and put it on the cooling rack right side up. (Set the Dutch oven someplace safe and let it cool before washing it. Don't warp or crack your enameled iron pieces!)

15---Oh-yum-2


And then lean in and listen closely to the bread. Because the bread will start singing to you.

No, I have NOT had too many glasses of ice cold crisp Chardonnay! The bread will literally begin to make an amazing crackling sound as it cools. It's going to be really, really hard, but make yourself wait to cut into the bread until it's completely cooled on the outside. If you cut too soon, the inside will get gummy. (I know this because I could not make myself wait on the first loaf. Even gummy, that loaf was better than anything from the store.)

Then take it to your friend's house for Thanksgiving and let them oooh and ahhhh over the amazing home-made bread you slaved over for them. And drink their wine.

16---Sliced


17---A-Loaf-of-Bread-and


Total active time: less than 15 minutes. Seriously. There is no reason NOT to do this. Cheap. Absurdly easy. And really, really good. No excuses - the linked recipe includes some substitutions if whole wheat is your thing.

So there it is - from my house to yours, the Watson version of Amazing No-Knead Bread just in time for the holidays. Leftover bread makes awesome croutons or stuffing. Seriously. And if you actually attempt this, drop me a line and let me know - I'd love to hear how it turned out!

*******

This post is part of the Art Jewelry Elements 2012 Holiday Open House, 
and is cross-posted over on my blog, www.francescawatson.com, where I am also hosting a giveaway.


Art Jewelry Elements team members are offering special deals in their online shops to AJE readers starting today and going through Cyber Monday (November 26). You can see the complete list of participating members and details about the discounts here.

Please help support the artist community by buying handmade for your gift-giving this year.

*******

The Watson Version of Amazing No-Knead Bread

Ingredients:
  • 6 cups all purpose flours
  • 2 tsp. active dry yeast
  • 2 tsp. kosher salt
  • One bottle of dark beer, plus enough water to make 2-2/3 cup liquid total
Equipment:
  • Cooling rack
  • Heavy 6 - 8 quart covered Dutch Oven
  • Large bowl
  • Rubber spatula
  • Parchment paper
  • Cotton kitchen towel
  1. Mix dry ingredients together in a large bowl.
  2. Slowly pour liquid into dry ingredients, stirring as you pour and scraping flour up from the bottom of the bowl. Ensure all flour has been combined.
  3. Cover bowl tightly with plastic wrap and set in a warm, draft-free place for 12 - 36 hours. The dough should be slightly darkened with bubbles all over the top.
  4. Turn the dough out onto floured parchment paper and sprinkle with flour over the top.
  5. Working quickly with floured hands, stretch the sides of the dough down and out to make a smooth top, turning the ball and tucking the ends under as you go.
  6. Set the dough ball seam side down on the floured parchment, and sprinkle a small amount of flour over the top. Cover with a clean cotton kitchen towel and let rest for 2 hours.
  7. 30 minutes before the second rise time is complete, turn on oven to 425 and place the covered Dutch oven on a rack in the middle of the oven.
  8. When the 2 hour rise time is complete, remove the Dutch oven from the oven and remove the lid.
  9. Working quickly, remove the cotton towel from the dough and slide your hand under the dough. Carefully flip the dough into the hot Dutch oven and peel away the parchment paper.
  10. Cover the Dutch oven and return it to the hot oven for 45 minutes.
  11. Remove the lid and bake for 5 to 10 minutes longer, until the bread is a deep chestnut brown.
  12. Turn the bread out onto a cooling rack and cool completely before cutting.
  13. Bread should not be stored in plastic wrap or in the refrigerator, to preserve the crisp crust. Store in the cooled Dutch oven on the counter, or in a brown paper bag.

Potato Latkes

I wanted to share a family recipe for potato latkes, so I called my cousin, in New Jersey, and asked if she had a recipe from her mom or our grandmother.  She said she didn't and confessed that she never makes them herself, though she can remember making them with grandma when she was a little girl.  Grandma, who was an awesome cook, never followed a recipe.  It was just a handful of this, a pinch of that and add salt till it tastes right.

So I went searching online for a recipe that sounded like it would result in the latkes of my memory.  I soon found out that there are as many variations of latkes as there are families making them.  I found latkes with grated apples or zucchini in them, latkes with or without matzoh or eggs added.  I even found out that some people sprinkle their latkes with powdered sugar, (really!??).

My cousin and I agreed that the latkes should be as crispy as possible, and preferably served immediately, right out of the frying pan.

It is important to extract as much water from the potatoes as possible. That is why most recipes call for you to pre-salt them, let them rest a bit, then wrap the grated potatoes in cheesecloth and wring them as much as possible. Twist a wooden spoon handle in the cheese cloth to give yourself some leverage. Then think about something that really ticks you off and take it out on the potatoes, till all the water is squeezed out!


Crispy  Latkes 

Use 1 pound potato per person as a main course or half that as an appetizer.  This recipe is for one person, multiply as needed to fit your crowd.

  • 1 pound Russet potato, peeled
  • 1/4 pound onion
  • Kosher salt
  • 1 egg, beaten
  • 1/4 cup all-purpose flour
  • 1/4 teaspoon fresh-ground black pepper (optional)
  • vegetable oil for frying
  1. In a food processor or on a box grater, grate the potato and onion and mix together. Mix in 1.5 teapoons of kosher salt, cover, and let sit for 15 minutes.
  2. Squeeze down a bit and drain off excess water from the bowl. Take a handful or two at a time, wrap the mixture in a double layer of cheesecloth or a clean dish towel and wring the liquid out of them. Get them as dry as possible. Then give them one more squeeze for good measure.
  3. Stir in the eggs, flour, and pepper and another 1/2 teaspoons of salt (since much of the original salt will have washed away).
  4. In a large skillet, heat about 1/8 inch of oil over a medium high flame.  Toss in just bit of potato. It should immediately sizzle, but the oil shouldn’t be smoking. (You can use less oil, but they will be less delicious).
  5. Depending on what size you like your latkes, use 1/4 to 1/3 of a cup  of potato, and add it to the oil. Immediately flatten to about 1/3 inch. You don’t want much thickness because the inside has to cook before the outside burns. Form the rest of the latkes the same way.
  6. When the first side is a dark, deep brown (see picture above), flip and continue cooking. When both sides are done, remove to a plate lined with paper towel. Sprinkle on a bit more salt.
  7. Its a good idea taste the first ones (no, you can not eat them ALL!) to make sure it is cooked through. If not, reduce the heat a bit or make the next batch thinner.
  8. Serve with applesauce, sour cream (my favorite!) and more salt on the side.


For "dessert", listen to Peter Yarrow sing his Hanukkah song "Light One Candle". This song has always meant a lot to me.

To get discount codes for our art jewelry and art jewelry elements shops, simply click this link.

Give the gift of handmade.  Give something uniquely made, with passion and love.

Check in throughout the day for all the Holiday Open House activities going on,

recipes, giveaways, discounts and just alot more fun!!


Welcome to our Holiday Open House

Good morning! Rather than braving the crazy on the streets and in the shops, we're staying in and inviting you to our virtual holiday open house.

Here's how it's going to work...and this may get a bit crazy at times. But what's a party without a little bit of crazy?

-Starting right now, most of the AJE team has discounts just for our AJE readers. The code is: AJEholiday and the full details will be at the bottom of this post.

-There will be a new post about every 30 minutes until 10pm est. That's 29 posts in a single day.

-Why should you keep coming back? Well...because not only will there be discounts, but you will have the chance to win door prizes, get new recipes, and learn some folklore.

-posts will be short and sweet. Who wants to spend an entire party reading? We want you drinking and making merry too! Maybe do some beading between posts...

To thank all of you, our awesome AJE readers, we are offering this discount code. Feel free to share AJE with your friends if you think they would enjoy reading AJE and also enjoy the discount.

Discount code: AJEholiday 

You can use the code at the following shops:

Jen Cameron: Jen Cameron Designs for 20% off today through Cyber Monday (Nov 26)

Francesca Watson: Francesca Watson Designs 15% off today through Cyber Monday

Diana Ptaszynski: Suburban Girl Studio 20% off today through Cyber Monday

Linda Landig: Linda Landig Jewelry  20% off today through Cyber Monday

Lesley Watt: THEAtoo and THEA jewellery  20% off today through Cyber Monday

Jenny Davies-Reazor: Jenny Davies-Reazor 20% off today through Cyber Monday

Joanne Tinley: Daisychain Extra and Daisychain Jewellery  20% off today through Cyber Monday

Melissa Meman: Melismatic 20% off today through Cyber Monday

Rebekah Payne: Tree Wings Studio 15% off today through Cyber Monday

Susan Kennedy: Sue Beads  20% off today through Cyber Monday

Kristi Bowman: KristiBowmanDesign 15% off through Cyber Monday

Karen Totten: Starry Road Studio 20% off through Cyber Monday

Grab that cup of coffee or tea and have fun browsing the shops. But make sure you come back in 30 minutes.

-Jen Cameron
Glass Addictions