Showing posts with label coins. Show all posts

Wednesday, June 8, 2016

Playing with prongs

I tend to go through phase's of making things and my current favorite thing to make is prong set trinkets and treasures. You may have guessed by some of my recent work....

Prong set necklaces
Being self taught does however have it's draw backs. Occasionally (most of the time) I want to make something and I either have no idea how to make it or I have none of the tools needed as was the case with these prong settings!
This is when my love of problem solving kicks in and I thought I would show you how I made these  prong settings (now you have to remember I am making this up as I go and I am pretty sure it is not the "correct" way to make one)!....
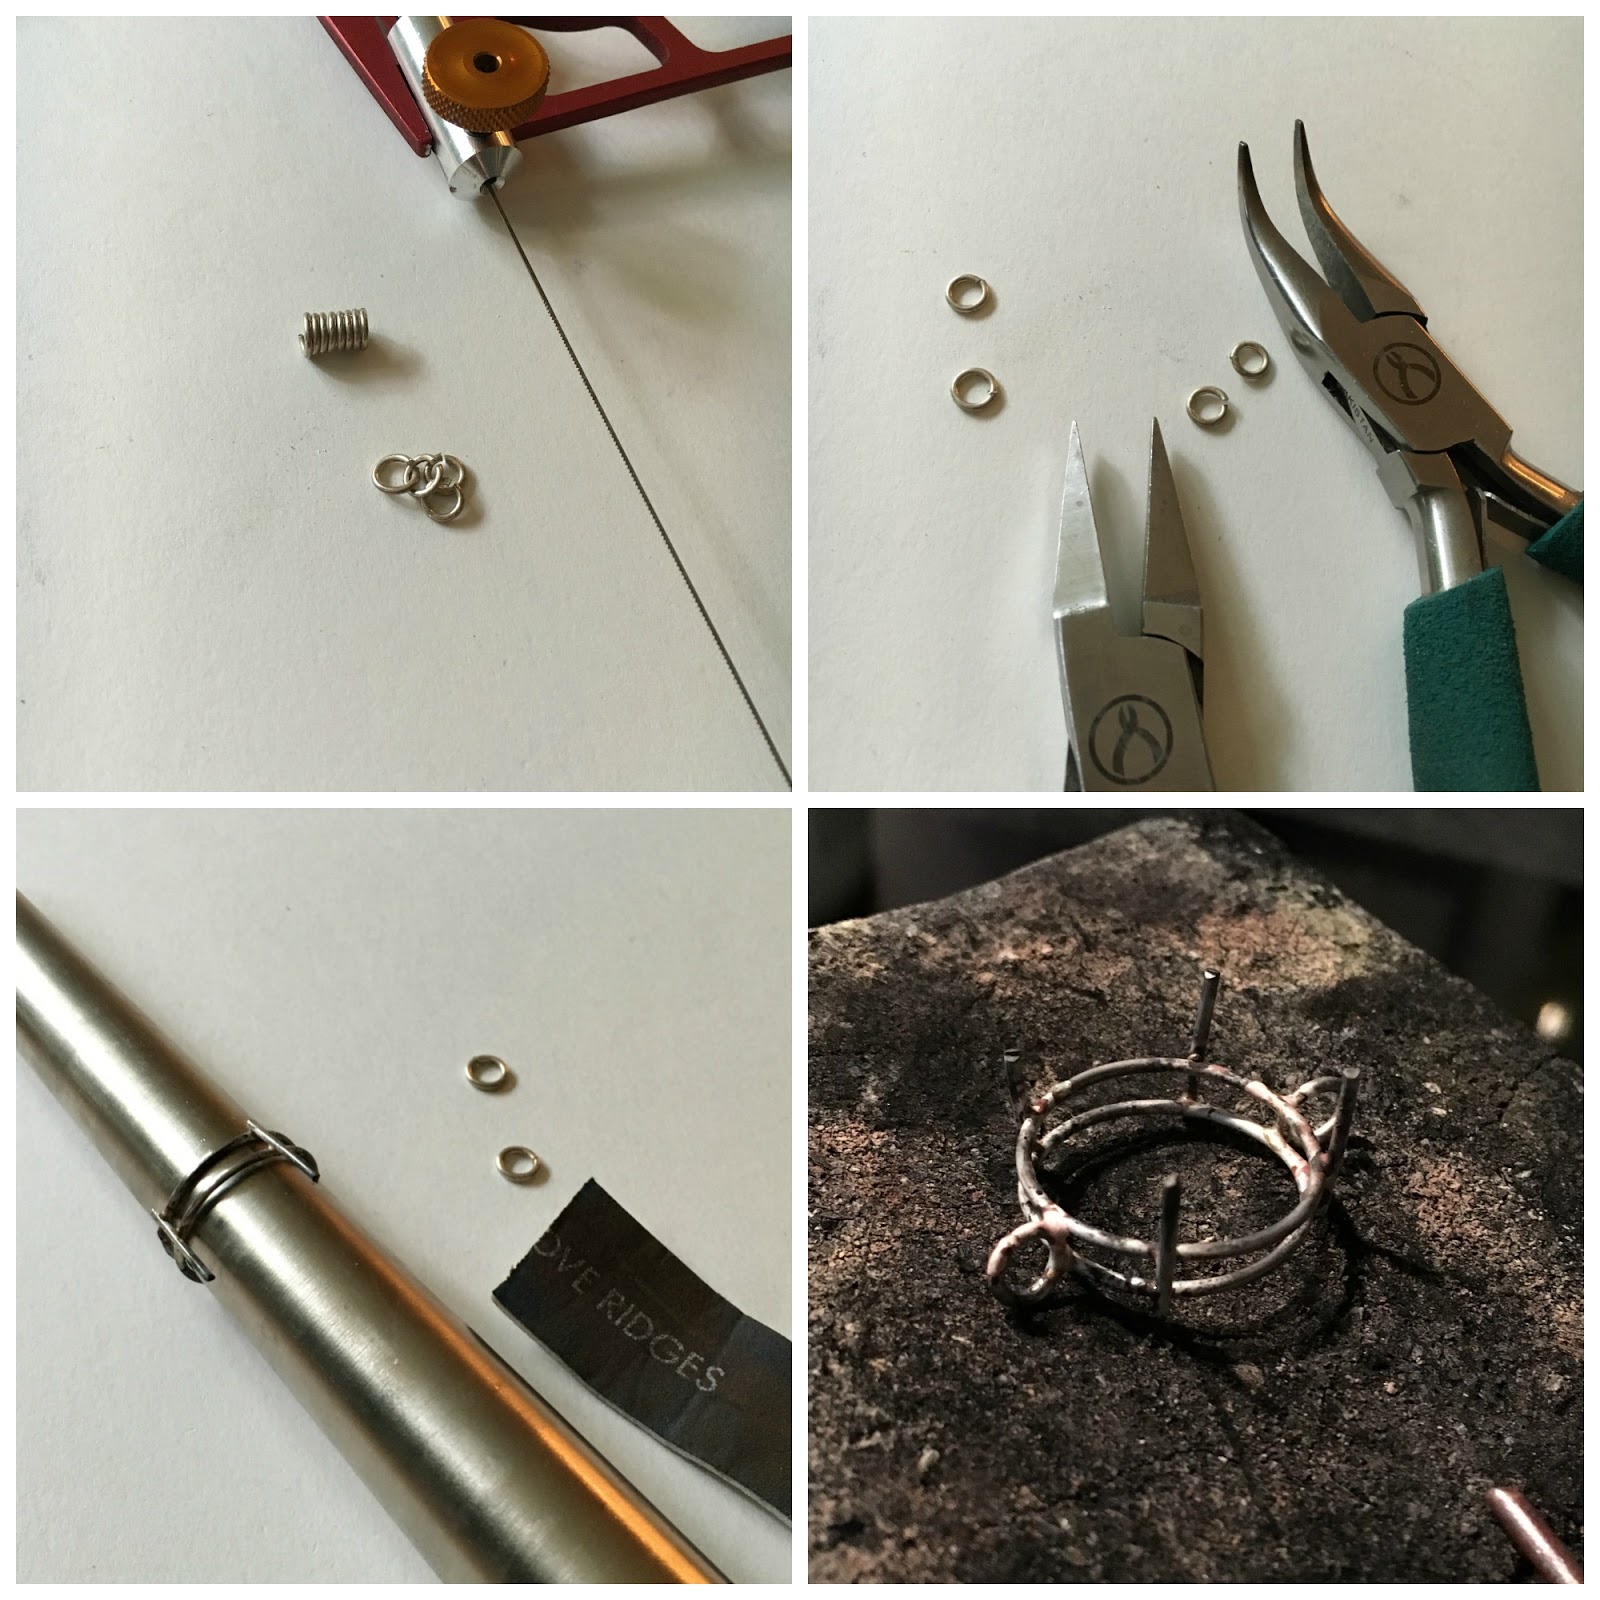
Making Base Rings
I use 1mm thick sterling silver wire to make two rings per prong setting, (they are wrapped around any random round object that I can find that is slightly smaller then the object I am setting). The wire is cut with wire cutters and then the ends are filed smooth for a nice flush joint. They are then soldered together with medium solder paste. 

Adding Prongs
Next I make my prongs by soldering two pieces of wire into a cross (I tend to just guess at the length), again I use medium solder, once cool I give the pieces a gentle sand down so that they are all clean for soldering (the pieces could be pickled to get them clean but I use safety pickle and find it takes quiet a long time and sanding is just quicker). I then shape my cross using plyers so that each side is bent down and touches the edge of the ring and trim each leg to the same length so that I can stand it as shown on the soldering block. I solder each join with medium solder being careful not to direct the heat onto the new joins and not the one on the top of the cross. 
Each join must be touching the ring. I use the thick copper wire to balance it on for several reasons, first my solder block is not flat so things roll all over the place and second I like to file the bottom flat on sandpaper after I have soldered it so it looks all neat rather then worrying about things moving slightly as I am soldering and being uneven.

Adding the Second Ring
Once the piece is soldered I snip off the top of the wire cross with my wire cutters and manipulate the wire so that each of the prongs are in contact with the next ring (I use the thick wire again to make sure the gap is even and to help hold things in place) this time I solder it in place using easy solder paste.

Balancing Act
Using 1mm silver wire I make some small jump rings about 5mm in diameter (they need to be big enough to make contact with both of the larger rings) now of course I forgot to take a photo at this point so I shall have to try and explain rather then show you! I place the thick copper wire into the jump rings to hold them in place, this part is rather fiddly and probably the hardest part to do, you need to make sure that the jumpings are in contact with both of the larger rings and that the wire holding it in place is not too close to the solder that you accidentally solder it into place! Some times if I am finding it hard to balance the pieces I solder them one at a time being very careful not to over heat the piece and melt the wire. I use easy solder and very slowly heating the piece. Once the rings are on I check that all the joints are still intact and when happy with it I put it into the pickle pot.

Clean Up
Next I check that the item fits into the setting by placing it into the prongs (it should sit on top of the top most wire ring and not fall through) then using wire cutters trim the prongs to desired length, then I remove the item and start the clean up process! 
I make sure the back of the piece is all filed flat with a needle file and that each prong has a nice round top by using a  cup burr in a drill, then I either polish it with rouge and a polishing bit in the drill or I pop it into the tumbler depending on how patient I am feeling.
Not bad considering I am just making it up as I go! And there are so many ways you can change up the look, imagine how cool these would look using a thicker wire with stamped wording on the back, or square wire or even a mixed metal look with silver and copper wire twisted together or textured wire, so many possibilities!!!

All Set

I hope you enjoyed a peek into my creative process and I would love to know if any of our readers just make things up as they go?!


Wednesday, May 18, 2016

Hoards: The Hidden History

I have always loved the idea of buried treasure, The thrill that must go with uncovering something not seen in such a long time, the mystery as to why they were never recovered and of course jewels, antiquities and coins!!!
So when I found out that The British Museum had a exhibition titled - Hoards: the hidden history of ancient Britain, I decided that I really should go especially since it ends in less then a week!

The British Museum
A hoard in its broadest sense is a group of items kept together, and hoards from the past are either deliberately discarded or ultimately lost.

One of the displays I was particularly looking forward to seeing was The Frome hoard, I had come upon an article about the discovery a while ago and was rather excited to get to see it in person....

The Frome Hoard
The Frome Hoard was found in April 2010 by metal detectorist Dave Crisp in Frome, Somerset. The hoard consists of 52,503 Roman bronze and base silver third century coins commonly known as radiates and is the biggest hoard ever discovered in a single vessel in Britain.

Coins From the Frome Hoard
The hoard also boasts the largest group of coins of the British Emperor Carausisus that have been found together and a group of five very rare Carausisus silver denarii (seen above). Oh think of all the things I could do with those lovely coins!

One of the most interesting aspects of the exhibition is the way that they explored the reason behind why the hoards were buried, I had never put much thought into this side of things and had always just assumed things were buried for safe keeping and then lost/forgotten.
It is thought though that due to the location of the Frome Hoard was found, the quantity of low value coins and the fact that the pot was too fragile to be lifted out of the ground once filled with those coins (as well as other reasons) that it may have been a ritual offering made by the community.

Other hoards thought to be ritual offerings from the display include....

Miniature Shields from the Salisbury Hoard
One of the largest hoards of prehistoric metal objects found in Britain, The Salisbury Hoard, near Netherhampton, Wiltshire, was found in the 1980's. The items found were dug up with out the land owners permission or knowledge and sold illegally to a dealer who then sold on many of the items. When it came to light that a large amount of artefacts with out any provenance had come onto the antiques market people started to look for the culprits, four years later they were caught and charged with Theft.

The hoard consisted of over 600 objects, with a mix of Bronze Age metal work and iron age model weapons including 24 miniature shields, 46 model cauldrons (as shown in the photos above and below), 173 socked axes and a variety of tools such as knives, chisels, punches, a hammer and anvil.

Model Cauldrons from the Salisbury Hoard
Then there are founders hoards where the value is in the raw material rather then their face value and the metal for example may have been put aside for recycling.

Vessel from the Water Newton Hoard, Cambridgeshire
The Water Newton hoard found in 1974 contained 30 gold coins dating from AD 337 to 350 inside a leather purse at the bottom of a bronze vessel that was inside a ceramic bowl with weighed amounts of folded up pieces of silver sheet (which were once a bowl and vessel) on top of the purse. The weights of the silver pieces are significant (321g and 642g) weighing one and two Roman pounds in weight.

Purse hoards (accidental losses)

Replica of a money bag
While this Replica (very cool 3D print out) of a money bag from the Beau Street hoard before it was cleaned and separated, is not really a purse hoard (not a small accidental loss as there were 8 bags) it shows what a purse hoard would look like (on a larger scale) if you managed to dig it up intact! Traces of the leather bag that held the coins could be found on the outer most coins as a powder. Then there are Emergency hoards hidden in times of conflict and economic insecurity or spoils of war or proceeds of theft.
Hoard From Near Milton Keynes
This hoard from near Milton Keynes contains the raw materials for forging coins. The three vessels contain bronze pellets, hammered metal discs used to make coin blanks and coin blanks ready for striking with the design, there is also an upper and lower coin die. It is thought that the hoard was hidden to avoid the authorities discovering that the owner of these items was illegally forging coins.

Lastly there are also Grave goods, generally items placed in graves are not considered to be hoards but this tends to be a grey area as human bodies can completely decompose leaving no trace only the items buried with them.

I have always been really inspired by hidden treasures and ancient coins and hope that I will continue to be inspired, here are a few of my designs containing ancient items or inspired by treasure....

Collection of treasure jewellery
Top right 1641 coin with ceramic dagger by P......, top left Treasures necklace with old coin, polymer heart by the fab Rebekah of Tree Wing Studio and lamp work by the wonderful Genea of Genea Beads, bottom right treasure coin locket and bottom left ancient split Djenne Bead set studs.

I do know I could never part with any of my treasured bead hoard, could you?


Monday, January 11, 2016

Treasure lockets tutorial

One of the pieces I made quiet a few of last year were coin treasure lockets. It's no surprise that I love coins and I use them quiet often in my designs, but what I really love about these pendents is that they are rather simple and can be worn every day.

Coin Lockets
I like to try and make some jewelry that is not too out there and that my "non art jewelry friends" like too (some of my pieces have left some of them with confused looks on their faces and mumbling along the lines of "oh, that's.... different!" which generally means it's a "very artsy piece", which are the one's I like the best, but are not to everyone's taste), however these seem to go down well with everyone!

What you will need-
  • a pair of coins (here I have used Irish 3d coins)
  • 8mm cabochon
  • 0.8mm sterling silver wire enough for three jump rings
  • 5mm bezel wire
  • doming block & brass hammer
  • 400 grit sandpaper
  • Medium and easy solder paste
  • Soldering equipment
  • Dremel with a polishing wheel
  • Rouge
  • Nail buffer
Doming the Coins
  • First gently dome your coins, I use the size 7 and then size 6 on my block. But make sure you go slowly and do not hit them with too much force, you don't want to lose any of the detail on the coin, nor do you want to hit the coin so hard that it just cracks rather then domes (this I have done many times).
  • Sand the lip of the coin flat on a piece of sandpaper, aim for the flat edge to be about 1mm thick this means that your locket will sit together neatly. (I normally stick a blob of blue tack on top of the coin to hold it while sanding and then sand in a circular motion).
Cutting the Jump Rings
  • Using your sterling silver wire you will need to make a small pair of jump rings and one larger one to use as the bail (you don't need as many as I show in the photo I just tend to make them up in batches, or you could use pre-made ones) I use a 2.5mm knitting needle to make my smaller rings and the small end of my bail making pliers which is about 3.5mm to make my larger one. Once I have the coils wrapped I make a small grove on the top one with my cutters so the saw has some where to bite and then I saw by hand (slow and steady and please be careful of your fingers).
  •  If you are using bigger coins to make your lockets you may want to use larger jump rings and thicker wire.
  • Once you have cut your jump rings use a couple of pairs of pliers to close the small jump rings (don't worry about the large ones just yet).
Making the Bezel
  • Wrap the bezel wire around the stone and cut and file the ends to fit. Make sure the ends fit together perfectly and are spotlessly clean.
  • Using the medium solder paste solder the joint closed (please remember to follow all safety precautions) leave to cool.
  • Once cool check the bezel fits the stone and clean up the joint with a file.
  • File the base of the bezel wire so it is spotlessly clean, if it is not spotless the solder will not flow!
Soldering the Bezel
  • Sand the inside of one of the domed coins until it looks clean enough to solder (I use a small amount of sand paper and the tip of my finger), apply medium solder paste around the inside sanded edge of the bezel and place into the domed coin (solder side down). I then place the coin into a small hole in my soldering block so that it is flush against the surface and I can solder the jump ring on at the same time. 
  • Make sure you place the joint of the clean jump ring against the sanded and clean top of the coin so that when you solder it also closes the seam, once soldered leave to cool.
Soldering the Lid
  •  Sand the top of the domed coin that you will be using as the lid, place it on the soldering block as shown above, again with the solder paste over the opening in the jump ring.
  • Solder gently and leave to cool.
Set the Stone
  • Once both have cooled open your larger jump ring and place through the top and bottom of the locket, close and carefully solder closed with easy solder.
  • At this point your coins will be black, don't panic this is normal! For some reason pickling the coins will not remove any of the fire scale, so I just skip to giving them a light rub with a wire brush and then a gentle rub with the number two file on a nail buffer.
  • They can be left like this (with a little Ren wax) for a nice contrast so you can really see the hare or you can finish them how I like them, with a really beautiful high polish. For this just use a Dremel with a polishing head and a bit of rouge.
Amethyst Hare Locket
Of course this can be done with other coins and you can set all different types of stones too, here are some I made a while ago....
Farthings and Six Pences
But, please be aware that not all coins work. Newer plated coins for example tend to crack when domed and melt when soldered!


Friday, September 11, 2015

Turning coins into clasps


I have always loved coins, and tend to think of them as little works of art. Then came a love of jewelry making and the next thing I know I'm making coins into beads and clasps and here is how I do it....

Doming Coins
First I dome the coins using my dapping block and brass mallet, it is always best to start off on the biggest size dome and then work your way through the smaller sized ones because if you just go straight to the smaller size you can crack/split the coins. Two or three sizes is normally sufficient.

Making hook clasps
Next I make the hook clasps, If I am using silver coloured coins then I use sterling silver wire if the coins are not silver then I tend to use copper wire. The wire needs to be around 1.2mm thick about 16 gauge or the clasp will not be strong enough when finished and will bend.
Checking the Fit
The size of the clasp depends on which coin I am using and the finished clasp needs to sit comfortably inside the domed coin.


Cleaning the Insides
Next the inside of the coins need to be spotlessly clean for the soldering I tend to do this with either the ridge remover part of a nail buffer pulled off the buffing block or some fine grit sand paper.


Spotless
It is important that they are really clean or the solder will not flow properly! I also give the hook clasps a once over with the sandpaper just to make sure there is no grease or dirt on there either.

Ready to solder
Then all suited up in my protective clothing (apron and goggles) I set to soldering! I use easy solder paste on the two places where the clasp touches the coin and prop the clasp in place using tweezers and a few coins to hold the tweezers in place. While soldering I heat the coin and not the wire as I don't want the wire to melt (using the tweezers like this also helps to protect the wire from over heating).


Cleaning up
After a dip in safety pickle and a rinse in bicarb the coins come out looking pretty ghastly, so I give them a rub over with a brass brush to remove some of the crusty stuff and throw them into the tumbler for an hour. The tumbler dose not bring the coins back to silver but it dose clean them up a little and helps to work harden and polish the clasp.

Polishing
They come out of the tumbler shiny but still rather black so I use my rotary tool and a block of rouge to polish them up and bring back the silver colour.
All Shiny
There you have it shiny coin clasps!


Monday, May 18, 2015

First attempt at working with gold

For as far back as I can remember I have always preferred silver to gold, even as a small child when I was aloud to pick out a necklace or ring to wear from my grandmothers jewellery box, I would always pick out the silver pieces. Gold was yellow and I did not like yellow, simple as that, well until recently that is.....

Gold Body-Chain from the Hoxne Hoard in the British Museum
I blame all the recent trips to the Museum's that I have been to! Seeing all the ancient jewelry, the history, the story's behind the pieces and the pieces them selves, so much gold and all so intriguing! How could you not LOVE this Roman body chain with it's garnets, beautifully created shape and it even has a coin on the back.....

Back Join Comprises of a Gold Coin of Emperor Gratian (AD 367-383) 
And just look at this stunning gold bangle, the colours, the stones, the shapes,  just amazing....

In the collection of the British Museum
All of this exposure to this amazing gold jewellery got me thinking, I would quiet like to have a play with some gold, to see what I could create. The most unactractive thing about gold is the price, oh wow the price! So I wanted a design that would not require much gold, light bulb moment, prong studs!

9ct Gold Wire, Ear Pins and Butterfly Backs
6 inches of 0.8mm 9ct gold wire, 6 ear pins and 6 butterfly backs later and I was well on my way to making my first pair of gold earrings. Making them was pretty much the same as making them in silver although there is the slight fear at the back of your mind of how much the gold cost if you mess it up, which of course I did!!!

Prongs Soldered and Shaped
I managed to slightly melt some of the gold, but luckly not too much that I could not use it! One of the things I did notice about the diffrence between working with silver and gold was that after soldering the silver is very soft and pliable where as the gold was still rather stiff and much harder to bend over the stones.

Finished Gold Studs
I have now made these earrings in gold and silver and I suprisingly like the gold ones more! The colour seems less harsh and it seems to suit the stones mores. Which do you prefer?

Gold Studs Compared to Silver Studs

As much as I love the gold studs I don't see myself work with much gold in the future, the prices is just way too high and if you think soldering is scary, try soldering with gold, I was so worried about melting it that I held my breath the entire time! Still now I have decided that I quiet like gold I may well try some mixed gold/silver pieces maybe even some Keum-boo. As always the best thing about trying some thing new is the places that it may lead! Have a great day.

Niky Sayers Artisan Jewellery

Friday, January 9, 2015

A few loose coins...

Happy New Year! My first AJE post of 2015 - and I have a few more thoughts on coins. Spare change so to speak, from my Boxing Day post. (And a shout out to the Canadian readers I may have neglected on the 26th...). 
Greco- Roman coins, Medieval coins... 
I wanted to take the coin idea into the studio - and show you a few pictures, a few ways that your local art jewelry designers have integrated coins... 


Lindsay sent me this - WOW! Tooled leather cab by her spouse, her beadwork, and coins! As fringe, as elements incorporated into the chain...

Lindsay again - she claims this is the limits of her metal skills. Coins drilled and domed as buttons. 

Earrings from Sue  - she is addicted to these beaded beads and I love them! What better way to use coins than as a personal, inexpensive, yet meaningful souvenir?! 

Barbara Bechtel of Second Surf makes these cheeky Penny charms. I love that Gandhi's quote ("Be the change you wish to see in the world.") meets Lincoln's visage. And I am a fan of word play as well. She recently posted a great video documenting her process - you can find it here. 

This one is mine - a relic from another life, its at least 20 years old. I enameled a British penny (unadulterated penny shown at right). It was a reminder of my college time spend living in London, and yes, it includes a sixpence as well. The myth/symbolist in me loves the sixpence: it bears the 4 plants representing the 4 nations in the UK. ( Tudor rose - England. Leek - Wales. Thistle - Scotland. Shamrock - N. Ireland) 

Since Boxing day - I have amassed a pile of coins on my work table. One made it into a finished piece - seen below. Its a franc, stamped for my friend Betsy. She lived in France, and had chosen "Balance" as her word for 2015! ( She hasn't seen it yet, so please don't tell her...LOL)

Do YOU have any spare change on your work table? How are you planning on incorporating coins into your work? Inquiring minds...