
I've spent much of the past week or so preparing my home for the arrival on Friday of decorators who are giving it a much needed top to bottom face lift. Because they are doing the whole house I was trying to make sure everything I needed could be accessed as the contents of each room inevitably get shuffled around the house...I've already failed on that score but more about that later.
Even thought my studio extension was only built last year it is included in the make over so that some settlement cracks can be fixed and the paintwork can be freshened up. I'm not a collector by nature but I while I was in there trying to get it organised I realised that this was the one area of the house where I do tend to hold on to things and my worktable is home to a little collection of ephemera. This got me thinking and I asked my AJE team mates what they had in the their studio's that inspires them or keeps them focused. I was thinking artwork, memento's, books, signage...anything other than tools that helped them with their work. Well, their answers were far more interesting than mine so l decided to share them here in their own words since they are far more meaningful than anything I could write.
First up is this beautiful work in progress from Francesca which obviously holds deep significance for her...

Francesca says "This piece will never be finished, from a weekend's worth of classes I took with Thomas Mann two years ago. There's a lot of complicated stuff wrapped up in it for me, and it is nearly always in view when I'm working. The photo is of my mother, who died much too young. This is my favorite photo of her. The class with Tom was brutally hard but also hugely gratifying. This piece represents the moment when I broke through a mental block I'd had about using the jeweler's saw, and reminds me not to give up when I'm tackling something challenging. I began to see jewelry design in a whole new light as a result of this weekend, both in terms of technique and content, and this piece reminds me to take a "no BS" approach to the work - especially when I am feeling a little too full of myself".
Karen sent me some photos full of intriguing things which clearly influence her design ethos...
"The first part of the image is my bear fetish from zuni pueblo that I bought when I was traveling in the area 23 years ago. This was a 3 week solo trip. I rented a jeep and traveled / camped throughout the southwest. Bear is a very important animal totem to me, for a number of reasons I won't go into here. And yes I do plan to make my own bear totem some day."
I think I may just have seen that bear totem come to life on Facebook this week...

"The lower part of this image shows my altar where I keep him along with other items from my medicine bundle. This is located on my main workbench so it is daily in front of me. The white statuette is Tara, a female bodhisattva in mahayana buddhist tradition. (http://www.wildmind.org/mantras/figures/greentara).I was named after the 3rd of 21 forms of Tara (Golden Tara or Sonam Dolma) by my lama back in the early 2000's when I was studying tibetan buddhism. Interestingly, the southwest pueblo culture, in particular the Hopi, and the Tibetans are connected: https://artofdharma.com/when-tibetans-are-scattered-throughout-the-world-the-dharma-will-come-to-the-land-of-the-red-man/... I only learned of this connection recently but it kind of fits with my studies. I am deeply inspired by these sources. Some of the symbols and forms that I use come from them.
The wooden cat figure is from my dad - from when he was on tour in SE Asia during the Viet Nam war (he was an AF navigator, flew KC135s)".

"The second image is of my personal medicine bundle, that I have carried with me since childhood (I didn't use to call it that - it was just my little mini cigar box of stuff). It contains a collection of rocks, fossils, items my kids made for me, etc. The red arrowhead has a story behind it... my brother Jake found it in a cave near our house in south St. Louis when he was a teenager and gave it to my dad, who put it on the fireplace mantle. My dad decided to give it to someone who he thought would like it (I don't remember who)... but weeks later it reappeared back on the mantle even though the person had not been back to visit since having received it. So... my dad next gave it back to Jake, and Jake gave it to a friend of his, but again, sometime later, it reappeared back on the mantle. At this time I was living in Cambridge MA, while attending school there. When I visited over the holidays, my dad gave the arrow to me. And it has stayed with me ever since. This was before I developed an interest in native culture, but I feel it was a precursor to that, a "sign" if you will...
As you can see many of the items have influenced my work - the textures, forms, etc.
Fascinating stuff Karen!
Now Caroline has just moved into a lovely purpose built studio and I know she has spent a lot of time getting it to be her perfect working environment and she has created a wall of special art work that has helped her do this...

"I am hugely inspired by the Scottish artist Pam Carter. I was introduced to her by a friend, who is sadly no longer with us, when she sent me a card with a print of one of her paintings. It was an image of the beach on the West Coast of Scotland where we met and became friends. I loved Pam's style and use of colour, so bought more of the cards for my new workshop. These sit on the wall next to my lamp work bench for a shot of colour inspiration and escapism when I need it"
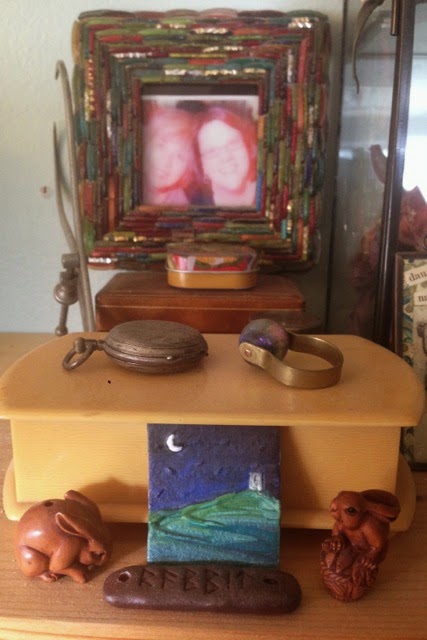
Having spent time at Jenny's home this summer I new that her studio was full of things of deep meaning and significance to her and of course when I asked she came up with the goods..
"I have a shelf right above my jewelry table - With a huge glass case of seeds, pods, shells, and other fragile natural inspiration. Next to that is this view. A runic charm made by a super talented fae friend. Rabbit netsukes - rabbits are my totem if you will, and a symbol of fertile creativity. A polymer landscape from a stamp I carved of Glastonbury Tor. This is a pilgrimage site to me and means quite a bit mythically and spiritually. A vintage celluloid box with treasures inside. And the frame? Me and my bestie Cooky taken by friend and mentor Keith LoBue a few years ago (in San Diego). Living in San Diego helped reorient me on the jewelry mixed media path, so their presence in my creative space is essential."
"My altar/meditation table set up for Fall and the Dia de los Muertos."

"On my work table: I believe in having feminine
goddess/muse images in many places. This old bronze was an auction find.
And flotsam and jetsam end up here: a shell fragment, a single
labyrinth earring, a UK coin..."

If you'd like to know more about Jenny's inspirations keep and eye on her blog as I know she is planning to cover this in more detail there soon.
And what about me then...well I'm beginning to regret not having that collectors gene as I have nothing so interesting as these ladies. I do have a collection of my early work and pieces from all the jewellery making courses I've been on - sadly I cant show you these because one of those shufflings I mention earlier happened while I was out yesterday and my work table is now hidden behind a wall of furniture and kilns - epic planning failure there then!
Like Caroline I do have a favourite piece of art that anchors me to my home town which I see very little of these days. I was born in Welwyn Garden City, one of the first developments to come about as part of the garden city movement - "a method of urban planning that was initiated in 1898 by Sir Ebenezer Howard. Garden cities were intended to be planned, self-contained communities surrounded by "greenbelts", containing proportionate areas of residences, industry and agriculture" (Wikipedia)
.jpg)
This is a reprint of the posters that were created to sell houses in the town in 1940 designed by Charles Paine who also designed posters for the London Underground around that time. The posters - one for each season were reprinted in 1990 and I bought a complete set for my parents. When they passed away I took 'Autumn' and 'Winter' and my brother has 'Spring' and 'Summer'. I love the late Deco feel of this design and the bold lines and strong colours not to mention the subject matter. If only modern real estate advertising were so beautiful!
Once the decorating is done they will be off to have new mounts and then back in pride of place along with a couple of other projects I have planned. Having met so many talented creative people in recent years I've acquired a fair bit of art work which is sadly, mostly hidden in cupboards and drawers so I'm aiming to create a dedicated Artisan wall to display all these pieces....I think that will get a post of it's own in the future. I'm also planning to try and do something with my glaze test tiles which until recently I made as very rough and ready strips of clay like these...
.JPG)
More recently however I've been using a these wheel formats with a view to turning them into some sort of morphing art installation... maybe using magnets to attach them to a wall so that I can remove them to refer to and repostion as the mood takes me. Early days on that one yet and need a lot more tiles but watch this space.
.jpg)
So I hope you enjoyed that little insight into some of our studios... what do you surround yourself with to make your working environment more comfortable or inspiring..? we'd love to hear.
Lesley
The Gossiping Goddess

Even thought my studio extension was only built last year it is included in the make over so that some settlement cracks can be fixed and the paintwork can be freshened up. I'm not a collector by nature but I while I was in there trying to get it organised I realised that this was the one area of the house where I do tend to hold on to things and my worktable is home to a little collection of ephemera. This got me thinking and I asked my AJE team mates what they had in the their studio's that inspires them or keeps them focused. I was thinking artwork, memento's, books, signage...anything other than tools that helped them with their work. Well, their answers were far more interesting than mine so l decided to share them here in their own words since they are far more meaningful than anything I could write.
First up is this beautiful work in progress from Francesca which obviously holds deep significance for her...
Francesca says "This piece will never be finished, from a weekend's worth of classes I took with Thomas Mann two years ago. There's a lot of complicated stuff wrapped up in it for me, and it is nearly always in view when I'm working. The photo is of my mother, who died much too young. This is my favorite photo of her. The class with Tom was brutally hard but also hugely gratifying. This piece represents the moment when I broke through a mental block I'd had about using the jeweler's saw, and reminds me not to give up when I'm tackling something challenging. I began to see jewelry design in a whole new light as a result of this weekend, both in terms of technique and content, and this piece reminds me to take a "no BS" approach to the work - especially when I am feeling a little too full of myself".
Karen sent me some photos full of intriguing things which clearly influence her design ethos...
"The first part of the image is my bear fetish from zuni pueblo that I bought when I was traveling in the area 23 years ago. This was a 3 week solo trip. I rented a jeep and traveled / camped throughout the southwest. Bear is a very important animal totem to me, for a number of reasons I won't go into here. And yes I do plan to make my own bear totem some day."
I think I may just have seen that bear totem come to life on Facebook this week...
"The lower part of this image shows my altar where I keep him along with other items from my medicine bundle. This is located on my main workbench so it is daily in front of me. The white statuette is Tara, a female bodhisattva in mahayana buddhist tradition. (http://www.wildmind.org/mantras/figures/greentara).I was named after the 3rd of 21 forms of Tara (Golden Tara or Sonam Dolma) by my lama back in the early 2000's when I was studying tibetan buddhism. Interestingly, the southwest pueblo culture, in particular the Hopi, and the Tibetans are connected: https://artofdharma.com/when-tibetans-are-scattered-throughout-the-world-the-dharma-will-come-to-the-land-of-the-red-man/... I only learned of this connection recently but it kind of fits with my studies. I am deeply inspired by these sources. Some of the symbols and forms that I use come from them.
The wooden cat figure is from my dad - from when he was on tour in SE Asia during the Viet Nam war (he was an AF navigator, flew KC135s)".
"The second image is of my personal medicine bundle, that I have carried with me since childhood (I didn't use to call it that - it was just my little mini cigar box of stuff). It contains a collection of rocks, fossils, items my kids made for me, etc. The red arrowhead has a story behind it... my brother Jake found it in a cave near our house in south St. Louis when he was a teenager and gave it to my dad, who put it on the fireplace mantle. My dad decided to give it to someone who he thought would like it (I don't remember who)... but weeks later it reappeared back on the mantle even though the person had not been back to visit since having received it. So... my dad next gave it back to Jake, and Jake gave it to a friend of his, but again, sometime later, it reappeared back on the mantle. At this time I was living in Cambridge MA, while attending school there. When I visited over the holidays, my dad gave the arrow to me. And it has stayed with me ever since. This was before I developed an interest in native culture, but I feel it was a precursor to that, a "sign" if you will...
As you can see many of the items have influenced my work - the textures, forms, etc.
Fascinating stuff Karen!
Now Caroline has just moved into a lovely purpose built studio and I know she has spent a lot of time getting it to be her perfect working environment and she has created a wall of special art work that has helped her do this...
"I am hugely inspired by the Scottish artist Pam Carter. I was introduced to her by a friend, who is sadly no longer with us, when she sent me a card with a print of one of her paintings. It was an image of the beach on the West Coast of Scotland where we met and became friends. I loved Pam's style and use of colour, so bought more of the cards for my new workshop. These sit on the wall next to my lamp work bench for a shot of colour inspiration and escapism when I need it"
Having spent time at Jenny's home this summer I new that her studio was full of things of deep meaning and significance to her and of course when I asked she came up with the goods..
"I have a shelf right above my jewelry table - With a huge glass case of seeds, pods, shells, and other fragile natural inspiration. Next to that is this view. A runic charm made by a super talented fae friend. Rabbit netsukes - rabbits are my totem if you will, and a symbol of fertile creativity. A polymer landscape from a stamp I carved of Glastonbury Tor. This is a pilgrimage site to me and means quite a bit mythically and spiritually. A vintage celluloid box with treasures inside. And the frame? Me and my bestie Cooky taken by friend and mentor Keith LoBue a few years ago (in San Diego). Living in San Diego helped reorient me on the jewelry mixed media path, so their presence in my creative space is essential."
"My altar/meditation table set up for Fall and the Dia de los Muertos."
If you'd like to know more about Jenny's inspirations keep and eye on her blog as I know she is planning to cover this in more detail there soon.
And what about me then...well I'm beginning to regret not having that collectors gene as I have nothing so interesting as these ladies. I do have a collection of my early work and pieces from all the jewellery making courses I've been on - sadly I cant show you these because one of those shufflings I mention earlier happened while I was out yesterday and my work table is now hidden behind a wall of furniture and kilns - epic planning failure there then!
Like Caroline I do have a favourite piece of art that anchors me to my home town which I see very little of these days. I was born in Welwyn Garden City, one of the first developments to come about as part of the garden city movement - "a method of urban planning that was initiated in 1898 by Sir Ebenezer Howard. Garden cities were intended to be planned, self-contained communities surrounded by "greenbelts", containing proportionate areas of residences, industry and agriculture" (Wikipedia)
This is a reprint of the posters that were created to sell houses in the town in 1940 designed by Charles Paine who also designed posters for the London Underground around that time. The posters - one for each season were reprinted in 1990 and I bought a complete set for my parents. When they passed away I took 'Autumn' and 'Winter' and my brother has 'Spring' and 'Summer'. I love the late Deco feel of this design and the bold lines and strong colours not to mention the subject matter. If only modern real estate advertising were so beautiful!
Once the decorating is done they will be off to have new mounts and then back in pride of place along with a couple of other projects I have planned. Having met so many talented creative people in recent years I've acquired a fair bit of art work which is sadly, mostly hidden in cupboards and drawers so I'm aiming to create a dedicated Artisan wall to display all these pieces....I think that will get a post of it's own in the future. I'm also planning to try and do something with my glaze test tiles which until recently I made as very rough and ready strips of clay like these...
More recently however I've been using a these wheel formats with a view to turning them into some sort of morphing art installation... maybe using magnets to attach them to a wall so that I can remove them to refer to and repostion as the mood takes me. Early days on that one yet and need a lot more tiles but watch this space.
So I hope you enjoyed that little insight into some of our studios... what do you surround yourself with to make your working environment more comfortable or inspiring..? we'd love to hear.
Lesley
The Gossiping Goddess


