Showing posts with label birds. Show all posts

Friday, March 20, 2015

Freeform Friday: Antique Ephemera

Read about my previous Texas inspiration from January 2013... 
This past week I was in Austin, Tx visiting family. I adore travel, and I love the heightened awareness that I get when traveling. The DE-TX route is one I do a few times a year; even though my sister's and my parents' houses feel like home - the travel awakens me. I am more alert, tuned in to my surroundings as they are familiar but different. I am almost guaranteed to be inspired, and rejuvenated to return to the studio. This trip it was a day trip to Georgetown, TX and a few fabulous antique stores...

The loot from Gatherings. 
Rosary cases for mixed media necklaces? 

We were having a bit of show and tell over a glass of wine - and my Dad was incredulous that I was SO excited over this little pile of ephemera. But I have big plans:

This leather rosary case joins a leather coin purse in my tray of treasures. I see them with grommets to allow for a secure attachment that won't damage the leather. I imagine personal treasures inside: pictures, notes to one's self, a small object to wear close to your heart...


The Optometrist lenses are a classic component of mixed media pieces, and I admit I find them lovely to use. I like to collage on antique paper, worn thin and translucent. The resin does the rest. I think the layers reveal and conceal words and images in a way that engages the viewer. The resin lens shown was one half of a pair of spectacles. As the the buckles - I DO have a stock pile of these. I like to use them as frames, enshrining a word or image. The piece below was created in tandem with my artist friend Betsy Mortenson, the shapes and words play off the images in a giclee print of hers.
Optometrist lenses and an antique Mother-of-pearl buckle. 
This one may look familiar? Another buckle on the top right... and a look back at the mixed media COM's from January 2014! I'm pretty excited - I'll be teaching this mold making/polymer/mixed media class at Bead Fest in April
Buckles destined for Mixed media; like  I am teaching at Beadfest! 
And last but not least, a flock of feathered friends in the form of cigarette cards. Popular from the 1870's until the early 1900's these advertising cards decorated and stiffened soft packs of cigarettes. They are quite collectible, but at $1 each I don't think these corvids and owls are in high demand.
Cigarette cards - a company of corvids. 
The sales woman asked me what I was going to do - I think the phrase mixed media artist piqued her interest. I had been sketching shrine pendants in the airport already - so here are a few excerpts from my pages:
From my sketchbook... 
The cards are a bit large and I may have to trim them. My basic idea is to create a copper and mica sandwich, or alternately a copper and plexiglass sandwich. The piece would be attached with rivets, microvolts, etc. I could even do a peyote stitch ribbon around the piece, ( sketch on bottom left) to circle the poleax and sit flush between the copper pieces. Hmm. SO many ideas!
What will these be? Time will tell... 

And last but not least:
Antique watch crystals, some tiny and some medium. I am going to keep these a secret for now... but I am SO excited about these! They were in a Mason jar! So many, I was sorting through them, tempted to buy more!

I have a studio day planned today! Mixed media, metal, polymer, and perhaps a few hares... it IS March. Until next time... 

Jenny

Saturday, November 8, 2014

Make Your Own ~ On Wild Autumn Winds Earrings


It's no big secret that autumn is my very favorite season! I love everything about it—the bright colors of the changing leaves, the grey skies, the first frosty mornings, the bright starry night skies, and… even the bitter cold winds. For me, one of the most magnificent wonders of autumn is seeing the trees swaying in the gusty winds and watching their leaves take wing. Oh! And don't forget the flocks of migrating birds flying in the wild winds. Yes, the name of my studio was inspired by those gorgeous moments!

Today I'm making earrings again—care to join me? Good! And today, I'm working with a brand new component in leather made by my uber talented sister, Bethanne. If you don't know already, she joined my shop and the ranks of art jewelry element creators just a few months back—such exciting times!!

Okay, lets get creating…


Supplies you'll need:
- 22 gauge bronze wire
- 2 headpins
- 2 earwires
- 2 10mm carnelian coins
- 2 rustic chevron leather rectangles
- 2 raven black aster wheel disc beads
- 2 rustic tribal white seabird beads

* The chevron rectangles, aster wheels, and seabirds are available in my etsy shop.

Tools you'll need:
- tape measure
- wire cutters
- round-nose pliers
- flat-nose pliers
- bent-nose pliers
- large needle


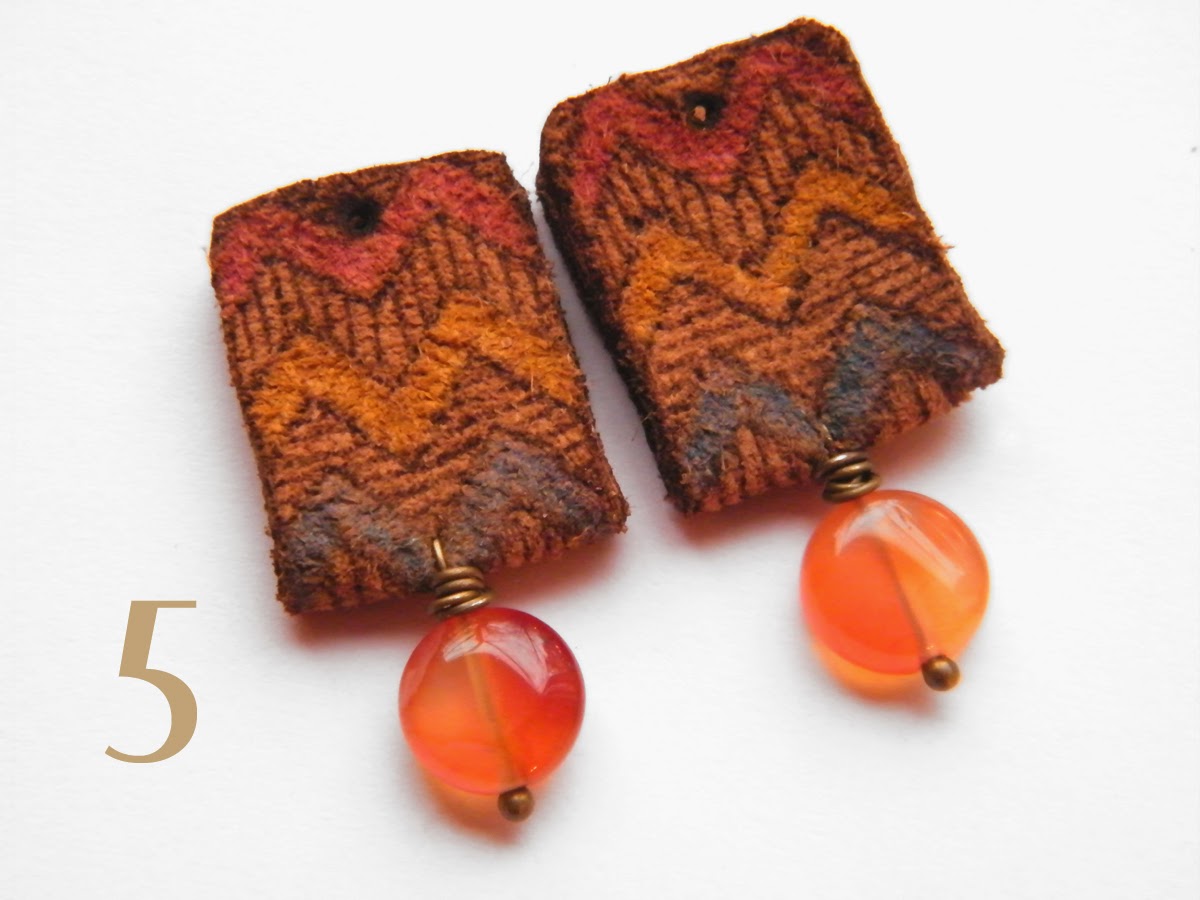
1. Put the carnelian coins on headpins.


2. Fold the chevron rectangles in half and using a large pointed needle, pierce a hole going all the way through both sides of the fold.


3. Pierce the second chevron rectangle.


4. Put the headpins through the holes and bend straight down, leaving a little space above the carnelian for wrapping.


5. Wrap both carnelians drops.


6. Cut two 14 inch lengths of 22 gauge wire.


7. Sandwich the aster wheel between the chevron rectangle and put them at the center of the wire.


8. Wrap several times through the aster wheel and chevron rectangle to secure them in place. The holes are a bit smaller on the chevron rectangle than the aster wheel, so I wrapped two times around the aster wheel first… and then through the holes of the chevron rectangle a few more times to give me enough wraps to keep everything together.


9. Bend one wire up straight and wrap the other tightly around once just above the aster wheel. Place the seabird just above the wrap.


10. Form a wrapped loop at the top of the seabird. Don't wrap the wire beneath the seabird yet!


11. And now, wrap the wire at the base of the seabird. Wrapping the top loop first makes it easier to make the base wrap tight and consistent. Do steps 7 though 11 to make the other earring… add earwires, and you're done!

Enjoy your new earrings!!


Have a fabulously creative weekend!


Rebekah Payne

Saturday, July 12, 2014

Birds of a Feather...

Last fall, when I first started playing with polymer clay, I played around and created a few little birdies.  Just experiments, didn't even finish them.  I thought they were cute, but not really sure how I would pursue them.

My 1st attempt!
Fast forward to this week...I found some polymer clay on sale at Michael's and bought a bit and played a little and decided to revisit the birdies.  My 1st ones were a bit flat, although I love the addition of the flowers.  This time I tried to keep them a bit rounder, made the flowers a bit smaller and started out with a neutral base.


Here is sort of a flow chart collage of their evolution!


I wasn't sure where to go from there, but stumbled on a tutorial from an artist I admire, Staci Louise Smith, on a crackle glaze technique.  Note to self, make sure you have the correct materials before you start a process!  I had everything but the crackle glaze, but since I am impatient and want to do everything when I want to do it, used a different type than the tutorial stated that I found at Michael's...I will be ordering the kind Staci recommended. My version didn't actually crackle!


Here is where I am now...aside from the "no-crackle" finish, I am smitten by their shabby folk-art look.  I definitely see more polymer clay birds in my future!

Melissa Meman

Monday, June 3, 2013