Showing posts with label Facebook. Show all posts

Friday, May 15, 2015

How To Create A Facebook Destash Group

 I'm getting to be "that age" where many people start thinking about downsizing their possessions and their homes.
This is what too much studio stuff looks like:
My husband and I have our names on a waiting list for a nearby retirement community and we've been sorting through nearly 40 years of stuff and tossing or giving away a lot of it.  I've been making jewelry nearly all of my adult life and my studio is overflowing.  I must destash or we will never be able to move.  My husband jokes that perhaps we should keep our current house for a studio and move to a smaller home to live in!

Its not just that I'm a messy creative, its also that there is no place left to put things, so it just accumulates on every horizontal surface.  In our new home, I won't even have a separate room for a studio, so where will I put all this debris then?

So I've set up a destash group on Facebook.  Its working quite well, so I thought I'd share some tips for success, in case your bead stash needs thinning out too. 

 First take a look at the Facebook selling groups you already belong to. If they are well run, study their policies and rules.  For example, I belong to the Ceramic Art Bead Market on Facebook.  This group has nothing to do with destash.  They sell ceramic artisan beads and pendants. The group is well managed and has been quite successful.  I studied their policies and thought about what would be applicable to my destash group.  In a like manner, I studied policies from a lampwork selling group and a couple of destash groups, then I formulated my policies to create guidelines for the way I wanted my own group to be run.
Your policies must include how you want your members to let you know that they want to buy something, how they will be billed and how they will pay you. Your shipping policies must be clear.  How much will you charge for different weights?  Will you combine shipping?  How long after payment will it be until you ship? You must include if you expect payment within 24 or 48 hours of receiving the invoice and what will happen if they don't follow through with payment in a timely manner. I recommend that you also include language that addresses polite discourse in the group and what will happen if a member self promotes, spams or treats others disrespectfully.  Its best to address these issues upfront.  Its much harder, if not impossible, to restore a friendly atmosphere once it has been damaged.

I looked over my calender of commitments and decided that I would hold my destash sales on Wednesday's only, as that was my least busy day. This gives me a week in between sales to take care of invoices, shipping and photographing items for the next week's sales.  This works very well for me, but other groups have more or less continuous destash going on.  You have to think about what will work for you.

I've decided to just write the price on a piece of paper and put it in the photograph.  This saves me typing time, when I'm listing items.  Not elegant, or sophisticated, but it works and is easy.  I generally try to record the price per bead whenever I make a purchase, and this has enabled me to state what the retail price was and what I'm offering the items for.  Members can see that they are getting an awesome deal by being a part of this group.  I'm intentionally pricing things low, because my primary objective is to move things out of my studio.  Getting reimbursed for doing so is nice, but it is secondary for me.  I include a penny in the picture for size reference.
I start my sales at 3:30 PST and list about 15 sets of beads and pendants.  Last week the sale was over by about 5:00 pm PST.  When someone claims an item, I always be sure to thank them, then I edit the original listing wording to say "SOLD to (name)".

Later the same evening, I send out invoices through PayPal.  Once an item is paid for, I "hide" the picture on Facebook, so it is easy to see what is still available for sale, without having to wade through all the pictures of sold items.  I ship out items by Saturday or earlier and then I start the whole process over again.

Like any online selling, you have to do promotion or all this work will be for nothing.  I started off by personally inviting about 5 of my friends, just to get the group started.  Then I posted links on my timeline, my business page and on all the Facebook jewelry groups I belong to.  I included a picture and wrote:
Linda is destashing her bead supply in preparation for moving to a smaller home. Want some great deals on 30 years worth of beads? Follow this link and then ask to join! https://www.facebook.com/groups/1438318213129493/
Shortly before my first destash sale I made a collage, like the one below and included a link to my group. I posted this all over Facebook, as well.
 For the 2nd sale, I made another announcement, with the same wording, but new pictures.  I plan to have new preview pictures every week, to help build interest and anticipation.
 I'm excited about this group and it makes me happy to know that my extra beads are going to people who will put them to good use, making the world a little bit more lovely.
Linda Landig  
Linda Landig Jewelry


Thursday, April 17, 2014

Throw out that expensive camera

I refer to my iPhone 4S as a camera that is also a phone. With a few easy to learn skills, it's difficult to take a bad photo with an iPhone and several other brands of phones. I'm often surprised when people share bad photos they've taken with their phone, because these phones take such great pics. I share photos of my work taken with my phone all the time. I even use them in listings.

Don't get me wrong. I also use a nice camera to take product photos...specifically a Canon EOS Rebel XTi that I got about 7 years ago with a macro lens I've had for a little over a year. Since I got this phone, I find the process of taking photos, uploading to the computer, editing, then posting them online to be TEDIOUS. I've never had a desk job and find that I have a difficult time working on the computer more than 1 hour at any given time.

For example, I like how my headpins look held as a "bouquet" in my hand using my phone and  natural light, cropped, with no other editing:


Better than the photo of them in the photo tent using a macro lens:


To try to help you take better camera phone photos, I grabbed a couple pieces out of my jewelry box. I purposely took bad photos, then took better photos to illustrate the difference. 

Example #1

The first photo has at least two major problems. While there's natural light, it's direct late afternoon light, which is harsh, casts lots of shadows, and adds a lot of gold to the photo. Since I prefer to do as little editing as possible, the golden glow and shadows are unacceptable. The other big thing that's wrong is that the photo is just plain boring. The shot is too wide. 


These photos were all taken on my kitchen tile. So to correct for the shadows and gold color cast by the sun, I moved to an area that wasn't in a patch of sun. That is the ONLY difference I made. These photos are completely unedited. However, it's still boring (and completely uncropped). 


This next photo, the key is still in direct sun, but I've angled the phone and come in as far as I could for a more interesting shot. It makes a big difference to the interest level of the key, and the glass looks really sparkly in the sunlight. However, I do NOT like the shadows being cast for a product shot. If it was simply an "artsy" shot to share on Facebook or Instagram, this would be totally acceptable. 


The next photo of the key is close-up, slightly angled, and out of direct sun-light. The ONLY editing I did was to crop it into a square-ish shape. 


When trying to get up close and personal with your jewelry (or other product), it's best to get the camera as close as possible then crop further if needed. Do not use the zoom feature. Here's an overdramatized example. 

Original unedited uncropped photo taken too far away:


What happens when keeping the camera at the same distance but zooming in instead:


What happens when you crop the original photo taken at a super wide angle. The quality isn't perfect (because I cropped this an excessive amount as an example of the difference), but it's a heckuvalot better than the photo above.


Do you know how to crop your photos on your phone? 

On my phone, when looking at a photo, it looks like this. Click on the edit button at the bottom. 


Then perform the correct function. Crop is that overlapping square symbol on the bottom right. Flipping the photos (which I clearly did) is bottom left. 


Example 2:

What's wrong with this photo? Golden sun casting shadows. Some areas look washed out. The angle is too wide. 


The color and light is better, but the angle is too wide. And it looks like maybe I didn't focus this one where I wanted the focus to go. 


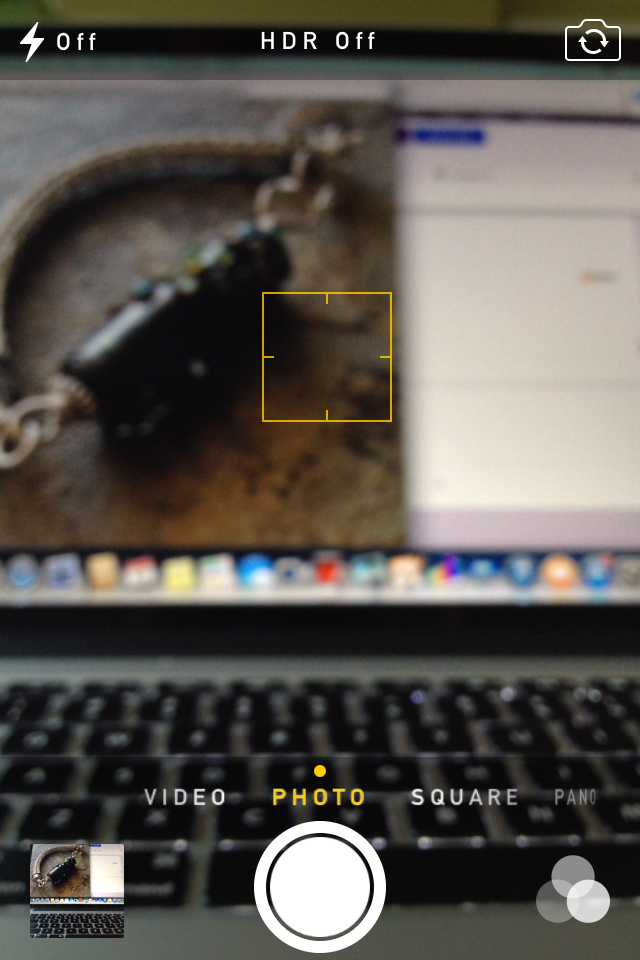
How does one adjust the focus? I can tell you how to do it on my phone, but it's kind of tricky to show it. Use your finger to touch the area of the screen on the object you want to focus on. The other thing this does is automatically adjusts the color/lighting to the object your focusing on to (usually) make it better. 

Here's a screen shot of the camera working on focusing right after I've touched a spot on the screen. The yellow square is the area I am having the phone focus on. Once it's focused, the square goes away. 


The next photo the bracelet fills the frame and isn't bathed in bright golden light. 


And remember that if you do super tight photos, you will want to show multiple views. 


And for the final example, I photographed this gorgeous beaded necklace by Kristen Stevens using one of my Nightmare Insomnia beads. Shadows, sun, too far away to see any of the detail that makes this necklace so special. 


The next one it has been removed from direct sunlight. The lack of shadows helps show a bit more of the detail, but it's still too far away to really draw the viewer in. 


And here is the focal portion with the camera held as close as possible and at a more interesting angle than straight above. You can now see more details in the piece than before. 


The above photo was cropped in Instagram. I used zero filters on it. If I'm selling a piece, I prefer to use no filters so the color looks as accurate as it possibly can. 

However, sometimes I use filters when I'm just showing a piece. I mostly like how the filters highlight certain areas of the photo and add a small border without any actual work. Below are three different filters of the photo above. Having comparisons like this can show you exactly how the filters change the look of the piece you're photographing. The change can be subtle, or striking.  

Mayfair:


Hudson: 


Sierra: 


In the above photo, we get a good look at the focal. But what about the rest? We (your potential customers) want to see the beading. And the clasp. So change the view, rearrange, move the phone. Here's another view of the same necklace above. The focal is blurred and moving off into the distance. The beading is front and center. Notice the empty space in front? All these aspects of the photo work together to create interest, tension, and to keep the viewer's eyes moving. 


And here is the same exact photo, but using the XPro filter on Instagram. It makes the background fade away and adds more emphasis to the beading. I love this look! 


Will I ever really throw out my digital SLR camera? Heck NO! But knowing how to take great photos with a smart phone really makes having an online presence easier. 

Go forth and take great photos!

-Jen Cameron