Friday, May 31, 2013

Fortune smiles on... these winners!

Fortune favors.... 

Roman goddess of Fortune with the wheel of fate. 

These lucky winners:
Jean
Elisabeth
Sarajo
and Leah!


Why are there four? Because as I pulled the last slip out of the dish they stuck together. I decided - the more the merrier, right?

Look for an email tonight!

And to anyone else who wants to participate - there will be more charm pairs listed in my Etsy shop early next week. I will announce on my FB page - but have a show this weekend... so maybe Tuesday? Wednesday? 
Feel free to use the code "AJEfree" if you decide to order - free shipping!


Please don't forget the AJE earring challenge...
I cannot wait to see what you create with these organic ceramic charms!


Jenny

www.jdaviesreazor.com


May Component of the Month Reveal - SueBeads

Today is the Component of the Month Reveal day for May!  As you may recall, here's what we're working with this month - my lampwork ruffle discs!


I'm very excited to see what everyone made with the ruffle discs!  Here's a list of the participants - please go visit everyone and see how wonderfully imaginative they are!

Guest Bloggers

Lorelei Eurto http://www.lorelei1141.blogspot.com
Birgitta Lejonklou   http://lejonklou.blogspot.com/
Heidi Post   http://www.expostfactojewelry.blogspot.com/
Lola Surwillo   http://beadlolabead.blogspot.com/
Kay Thomerson   http://kayzkreationz.blogspot.com/

AJE Team

Jennifer Cameron  http://glassaddictions.com/
Jenny Davies-Reazor   http://www.jdaviesreazor.com/blog
Susan Kennedy   http://www.suebeads.blogspot.com/
Linda Landig   http://www.lindasbeadblog.com/
Melissa Meman    http://melissameman.blogspot.com/
Rebekah Payne   http://www.treewingsstudio.com/
Jo Tinley     http://daisychaindesignsjewellery.blogspot.com/
Lesley Watt    http://thegossipinggoddess.blogspot.com/


Thursday, May 30, 2013

A few of my favourite things

Like most crafters, no matter what craft we enjoy, I love tools! I could spend ages browsing through the Cookson Gold catalogue, fondly known as the Cook Book, a trip to the DIY store has me eyeing up the power tools, and even a trip to a car boot sale (garage sale to my friends from the States I think?) sees me making a bee line for the stalls selling old tools and wondering what textures the old battered hammers would create on metal sheet.

My favourite tools by far are some of the oldest I have, ones that I inherited from a friend's parents. I am lucky enough to have a well workshop with modern equivalents of these, but if I had to choose three items to save in (heaven forbid!) a fire, it would be these three.


I have shown this hammer off before on my own blog. If someone had told me a decade ago that I would have such a thing as a favourite hammer then I would have thought them crazy, but this hammer is officially known as Jo's Favourite Hammer to all of my students. It is old. It is battered. But it is its age and the battering the head of the hammer has taken over the years that makes it give a beautiful texture on metal sheet and wire. I left it at college locked away in our equipment cupboard after one evening class and almost had a panic attack when I realised! Thankfully I was back teaching at college again the following evening!


For years all of the holes I drilled where made using this bowline drill. It must be about 40 years old, and the technology that it uses is older than the Egyptians, but modern day bowline drills look almost identical - although of course I think mine is weighted better and works more smoothly! I now use a pendant drill for most of my drilling purely because it is quicker, but if I just need one or two holes drilled then this is what I reach for.


And the last of the trio? You probably didn't expect to see a screwdriver on a jewellery blog! I actually use this for stone setting. My friend's Dad had ground down the edges and shaped it beautifully so that it is perfect for pushing the sides of a bezel over a stone and for burnishing, especially in tight spaces. The handle sits perfectly in the palm of my hand - it could have been made for me!

I would love to hear about your favourite tools - are they old favourites like mine? Were they made specifically for your craft or have you adapted them from other uses? Let me know!

Jo Tinley
Daisychain Designs


Wednesday, May 29, 2013

Book Review: Bead Projects from a Beading Insider


This book literally arrived in my mailbox for my review yesterday. Rather than bother reading the synopsis, I dug right in because all I saw was BEADING INSIDER on the front cover and was intrigued by the idea that I was going to get insider info.

Well....after reading it cover to cover, this book didn't exactly contain the info I thought it would, so I was disappointed. What it did contain was a wide range of basic jewelry designs and techniques with the author's personal tips to help increase success.

Probably the most intriguing thing to me personally, was the idea of dying pearls. That particular design ("Dyeing to be Stylish") was one of the two designs in the book that really appealed to my personal taste in jewelry.

The book is divided into sections based on topic. The first topic is called "Skill Building Workshops" and covers wrapped loops, wire crochet, gilding, beadweaving, plain loop, crimping, multistrand, wire-wrapped briolettes, custom color, and color combinations. Each of these topics is glossed over in two pages, large color photos, with some step-by-step photos and alternative designs or earrings, plus the "insider tips". All in two pages. Some of these topics are fine in two pages, but if you want to learn to wire crochet or how to beadweave, I wouldn't get this book specifically for those skills.

There is a section called "Creativity Boost" at the end of the skill building workshop which covers leftover beads, patterns, and materials.

The third section is called "Designing With" which covers gemstones, earthy materials, art bead, charms, lucite, crystals, chain, ribbon, bold stones, silver, gold, copper, clear (stones, crystals), exotic, and asymmetry. Again, each project is covered in two pages, with some "insider tips" sprinkled in, large photos, and alternative design or matching earrings.

There is another creativity boost section that has a memory wire project, a project encouraging you to redesign a piece that you don't love, and a project called classic update that uses pearls and chain and is the only other design in the book I really like other than the Dyeing to be Stylish necklace.

The final section is all about materials, supplies, techniques, and resources. I like that there is a resource list because I'm always looking for new suppliers that I've never heard of. However, including the sources for some of the more unusual findings in the supplies lists would be helpful.

When I do a book review, I try to be as honest as possible without being rude to the author. I know they work hard and I personally would hate to write a book and no one like it. For this particular book I highly recommend you take a look at it in a local bookstore before buying it. It might be just what you're looking for. However, after reading dozens of beading books over the last few years, I can list several others that I personally prefer.

-Jen Cameron
Glass Addictions

Tuesday, May 28, 2013

June Component of the Month and ... a giveaway!

News Flash: 
June is right around the corner. Hello Summer! And this month's CoM is... 

... earrings pairs!

April/May issue
I am thrilled to share these with everyone - for a few reasons:

  • My kiln was broken for 2 months. My friend Marsha helped me trouble shoot causes, order parts, and taught me elemental repairs. ( Kiln humor - we replaced the heating coil elements as option 1). I am very happy to have my bestie up and running again - this was her first glaze load! 
  • These organic earring pairs were included in Step by Step Wire magazine this past past issue. 
  • I will be expanding this line to porcelain, and high fire glazes in time for Beadfest in August!


My pieces and Suebeads below. 

And you have heard that we are in the midst of a fabulous 52 week earring challenge, right? With a Pinterest board and all that. Here are the details if you are late to this... 


So without further ado: 
Organic ceramic earring pairs.


Hand stamped, from organic forms including star anise, poppy and eucalyptus pods!


Here's how the giveaway, challenge, and blog-hop will work (please read all the information carefully!):

  • I will give away 1 earring pair to each of 3 winners selected randomly from those who leave comments below this post. 
  • Please include your EMAIL address in your comment so that I can contact you ASAP should you win.
  • Please (PLEASE) only leave a comment if you can commit to creating a finished piece and blogging about it on the reveal date.
  • I'll choose the color, so you'll be surprised!
  • The names of the 3 winners will be announced on May 31st in the evening so I can get international packages out if need be!
  • The blog reveal will be Sunday, June 30th!

I am excited to share these with you! Do you want in on this organic ceramic goodness? 

Jenny


www.jdaviesreazor.com

Monday, May 27, 2013

Tutorial: Fun with UV Resin

I have very little patience (ironic for someone who works with clay, I know) and while I love resin I don't like waiting for it to cure. UV resin is the solution! If you work regularly with resin though, this may not be economical. If you are like me and enjoy busting out the resin from time to time, this stuff is perfect!

Today I'll show you how to set a fossil inside of an open-backed ceramic pendant.


You'll need a few things first:
  • UV lamp (You can use sunlight but we are trying to be as quick as possible here.) 
  • Open-backed ceramic pendant or another open-backed bezel/pendant of choice. 
  • UV resin (I prefer Magic Glos
  • A fossil or something to add to the center of your pendant. 
  • A small piece of scrap wire 
  • Clear packing tape 
  • Paper towels 
  • Goo Gone (available at Target)

Add a piece of packing tape to the back of your pendant.

Open your UV resin and apply a small amount to a paper towel first, to help remove air bubbles.  Then add a layer of resin to your pendant.  Place the pendant under the UV light for 15 minutes.


Remove the pendant and apply another layer of resin.  Drop the fossil into the center and use your scrap wire to help move it into position.

Place the pendant under the UV lamp for another 15 minutes.

Remove the pendant from the lamp and peel away the tape.  Use some Goo Gone to wipe away the tape residue on the back of the piece.  Then gently rinse with water.  Pat dry.


Now you can incorporate your new pendant into an awesome piece of jewelry!

Happy Beading!

Diana P.

Sunday, May 26, 2013

Earring Challenge Reveal 10 - Weeks 19 & 20/52

Welcome to the 10th reveal for the AJE challenge and I hope you all are having a fabulous Memorial Day weekend.  Please take a moment to remember all those who give their lives for our freedom.

If you're blogging about your designs then don't forget to add your link at the bottom of this post.

It must be the holiday weekend, because there weren't many earring submissions as I write this.  But I picked some that I thought were great to highlight this reveal!  The first pair are by Mon Urquhart.  While I love the lampwork beads and the swarovski hearts, I really really love her ear wires - they are fantastic!


This next pair is by Pam Sotheran.  I love the brass butterfly charms - perfect for the summer!


Next up we have Renetha Stanziano - again, I love the lampwork beads, but I really love her unique earwires!

And finally, a pair by Kimmy Sayers.  I love the color combination and the swirled eyepin she made!


Please join us in two weeks for another Earring Reveal!  And remember, keep pinning your earrings for a change to be featured on the blog!


Saturday, May 25, 2013

Cute and Cuddly

After my last post two weeks ago on mixing new polymer colors, I fully expected to have some work in progress photos to share and maybe even a mini tutorial. Nope. I only finished a handful of new beads total and my new colors weren't cooperating at all for the design ideas I had in mind.

Unispiration is going around a lot these days—–with everyone it seems. And yes, I caught it again.

Out came my design notebook and I turned my favorite music on. That worked for a while…

But when that failed too, I went window shopping on Etsy. Browsing through the creations of my favorite artists always helps to rekindle my creative flame. This time I was looking at critters. Cute and cuddly critters. You already know that I love making critter beads, but I also enjoy looking at what others create——it's amazing how the same animal can take on so many different forms and totally adorable expressions——all dependent on their creator!

I recently became the happy owner of one such critter:
My little keepsake doggy bead was carefully fashioned by Lauren of Maybeads after my own sweet girl Pepper.


Lauren makes dogs of all kinds.

And even the occasional orange hippo!

On my journey through Etsy I found many more cute and cuddly critters, here are just a few of my favorites…

More pooches, this time from elukk.

And kitties. I love her rustic style!

And wild horses from ChevreFeuille. I can never resist horses——they have a very special place in my heart.

A sweet little owl from lagrenouillerose. I love the color combinations that she uses in her critters.

And a very mod turtle named Ophelia from DeniseAnnette. She really has a knack for bold colors.

This goofy kitty is from bykeiara. His eyes say it all!

I love this little smiling murrini turtle from loribeads. I would put him on a bracelet… but then again, I put just about everything on bracelets. I like being able to see the jewelry I'm wearing.

This pretty blue owl from fellow AJE member Lesley Watt looks like she would would be good at keeping secrets… you might know she's got a secret by her eyes, but she would never tell it! lol

Okay, I found another bead from loribeads that I want too! This little dachshund is so ready for his forever home.

The adorable chickens from 2CoolBeads have been one of my favorites for a long time. I bet you didn't know that growing up I cared for a flock of 150 hens——and yes, most of them had names.

I also once had a pet yellow jacket. Honest! I was probably about 7 years old and her name was Clover. Surprisingly, even though she was very well behaved my parents did not let me keep her! These sweet bees are from TheGlassBunny.

This crackled glazed gorgeous bluebird is from SlateStudiosSupply. Crackle glaze is a favorite of mine.

And lastly, but not at all least some cute rustic owls from kylieparry.

And now I'm going to have to ask Linda for a drawer (or two) in her antique Hamilton printers cabinet so I can adopt all the cute critters I found! ;-)


I hope you enjoyed my eye candy post today. Do you make critter beads? Or maybe you have some favorites that you've adopted recently?


I'm going now to follow Jen's prescription for unspiriation and am going to clean my studio… see you in two weeks…

Have a wonderful holiday weekend! I hope you all have a good time with family… and maybe some time for your beads!


Friday, May 24, 2013

Art Bead Organization

Jen's recent blog post, "Why Are You UNinspired" really hit a chord with me.  If you follow me on Facebook or my own blog, you'll have noticed that I haven't added any new jewelry in a couple of weeks.  Jen suggested that when her studio reaches epic proportions of disorganization, that she finds herself avoiding it altogether.  A lightbulb went on in my head.  While I am not a compulsively organized person, the mess becomes a roadblock for me when a) there is hardly any floor space to have even a narrow path through my studio and b) there is no room on my work table in which to actually, um, you know, work!  When I look at a cluttered mess like that, I feel overwhelmed and don't even know where to start.  Its easier to waste time on Pinterest collecting pictures of gorgeous studios, than actually making progress toward organizing my own space.


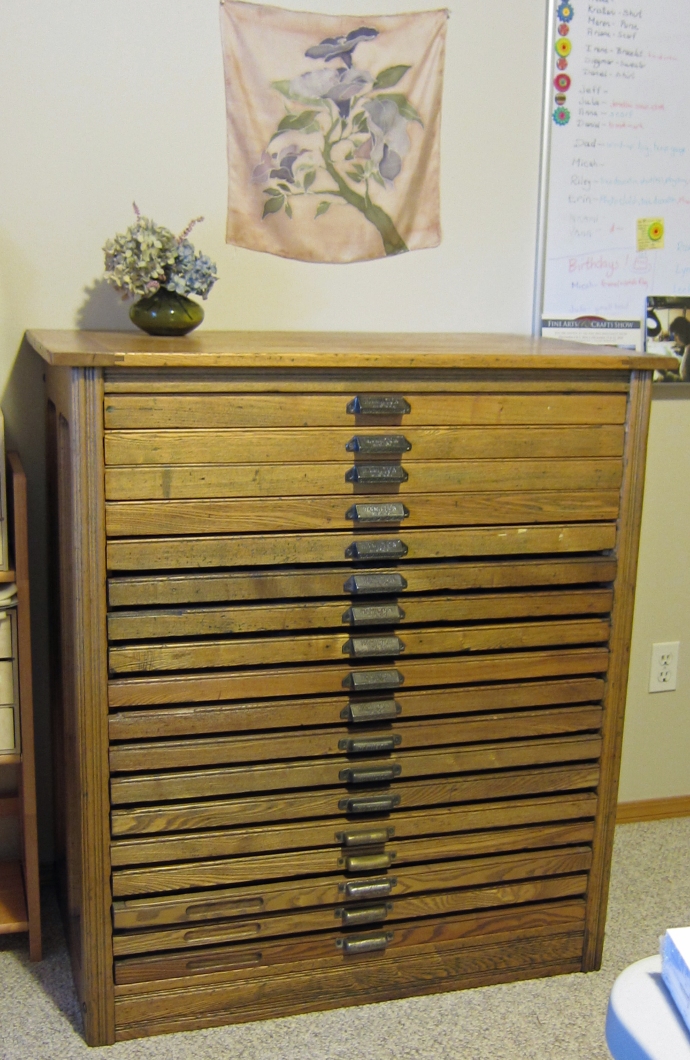
My husband gave me a gorgeous antique Hamilton printers cabinet for Christmas 2 years ago. I keep all my art beads in those drawers and I realized that my clutter clearing had to start there.  When I first got the printers cabinet, all my lampwork beads fit nicely in the top drawer and my collection of artisan ceramic beads fit in the 2nd drawer.  In the meantime my collection has grown considerably and I've added handmade metal and polymer clay components as well.


The beads were now piled several layers thick, so I could not even see what was beneath the surface layer.  And new acquisitions had absolutely no place to go, so they littered the top of my worktable, my desk, trays stacked up on the floor, the living room coffee table etc. I realized I could never clear space for work, until I addressed the overflowing storage issues.


Now you may be thinking, "This is all well and good but most people don't have the luxury of having an antique printers cabinet, in which to store their beads".  And you are right in that respect.  Believe me, I know I am fortunate.  But the process I went through works just as well for an overflowing bead stash in fishing tackle boxes, tool boxes, dresser drawers or shoe boxes.  It doesn't matter where you store your beads, when the mess stops you from being creative, it's time to address the issue.

I decided I now needed 2 drawers for the lampwork and 2 drawers for ceramic.  I probably need a drawer for metals and polymer clay too, but I haven't gotten that far yet.  You may need an extra hardware box, shelf or whatever. To make room for 4 drawers of art beads, I had to do a lot of rearranging.  I pulled all the seed beads out of the second drawer and piled them on top of the cabinet (I use Tic Tac sized boxes to store my seed beads).


I decided to put all the "cool" colored lampwork in one drawer and the "warm" colored lampwork in the next drawer.  So I removed all the lampwork beads and sorted them into the two drawers by color. Its so much easier to find and see what I have now.  Next I took on my even messier ceramic drawer.  


Look how deeply stuff is piled on top of each other, especially toward the front of the drawer!  Plus I was forever misplacing things.  I'd get the impulse to create and then wouldn't be able to find a recently ordered pendant.  Maybe I'd find it on the bathroom counter next to the sink, or maybe I wouldn't be able to locate it at all and the creative impulse would fizzle out with frustration.

I organized the ceramics by warm and cool colors, too.  Each drawer is divided into 3 parts and each part now has one color family, with one or two exceptions.

Cool Colors:  Blue
I was amazed that I had so many blue beads.  
I need to make more blue jewelry for a while!

Purple/Violet/Pink/Cream

Green

Warm Colors:  Orange/Gold  
I was surprised at how few oranges I have.  Its one of my favorite colors, 
so I guess my orange beads get used up more quickly, than less favored colors.

Red

Brown/Earth Tones

Part of my organization process includes keeping track of which artisan made which piece and the cost per component.  Usually I cut the the maker's business card apart and attach the upper portion to the bead, along with the price.  But if I have ordered multiple beads and the artist sent one business card, then I just use a tag and write the important information on it.


Different systems work for different people, but here are some possible takeaways from today's post, that could be useful, no matter what kind of storage containers you are using.

  • You can organize art beads/focal beads separately from commercially made beads, if you wish.  I like to do this because my design process almost always starts with an inspiring art bead or pendant.
  • You can organize art beads and commercial beads by color.
  • You can tag beads with the price and maker, so you can credit the maker and get an accurate accounting of the costs involved in your jewelry designs.  Its a low tech method, but it works for me.
  • Whatever system you have now, will evolve over time and will need adjusting as your needs change.
Please share some of your favorite organizing ideas with everyone, in the comment section below.  Keep the conversation going.