Showing posts with label earthenware. Show all posts

Wednesday, May 25, 2016

Ceramic Art Bead Buying Guide


A little while ago Jennifer wrote a guide for buyers of lampwork beads and that got me to thinking that something similar would be useful for lovers of ceramic art beads. There is a vast array of these for sale today and a huge variance in quality too. Every day I see beads that are precious little works of art but all too often I see work of dubious quality too so, after consulting with my fellow ceramic bead makers at on the AJE we've come up with this guide

Ceramics in itself is a topic with huge breadth and depth so this guide will of necessity only cover the basics as they apply to jewellery components but, I will add a few links at the end for anyone who wants to investigate further.

Types of Clay 

There are literally thousands of different types of clay on the market so I am only covering the three basic categories and their distinctions: Earthenware, Stoneware and Porcelain. Different clays 'mature' or become vitreous (will not absorb water) at different temperatures and the higher the firing temperature the more vitreous the end product. Whilst water absorption is not as critical for jewellery components as say an outdoor planter, the level of maturity does have an impact on strength.

When buying ceramic beads you may have come across the terms high fire, mid fire or low fire clay or to cones - a term derived from the pyrometric cones used to monitor the  temperature at which kilns fire (see link to video at the end of this post). Commonly used temperature ranges are:

High Fire – Cone 8 – Cone 10 (2305 F -2381 F or 1263C to 1305C)
Mid Fire – Cone 5 – Cone 6 (2185 F – 2232 F or 1196 C to 1222C)
Low Fire – Cone 06 – Cone 04 (1830 F – 1940 F or 999 C to 1060C)

Porcelain

Porcelain, often considered the hardest clay to work with is a fine grained clay that fires to high temperatures to produce a very strong vitreous ceramic. It is usually pure white in colour and can be translucent when used thinly and is therefore often used for delicate pieces.

Stoneware

Stoneware is a coarser grained mid to high firing clay that becomes very durable after firing with little or no water absorption due to the levels of iron and other impurities it can contain.

Earthenware

Earthenware is a low firing clay (includes terracotta) and because of this the most porous of the three clay types and therefore the least durable. Earthenware will melt if fired at higher temperatures.


Note: You may have seen beads made from air dry clays for sale - this is not a fired clay and by it's nature therefore not as robust as fired clays but since I have no personal experience of working with it I am not including it in this guide.

Glazes

When it comes to glazing there is also a basic difference between the different types of clay. With mid to high fire clays the glazes fuse more fully to the clay body further increasing its strength. With earthenware the glaze forms a separate layer over the clay which still strengthens the piece but not to the same degree. Because they are highly vitreous, porcelain and stoneware pieces can be used unglazed whereas earthenware is usually glazed (although outside the bead world you will of course have come across unglazed terracotta where the 'breathability' of the clay can be an advantage for items susceptible to cracking in climate changes).

None of this means that earthenware is not suitable for jewellery components - it is and there are many talented designers working with low fire clays. One of the big advantages of low fire clays is that there is a far wider range of glaze colours available particularly in bright and vibrant shades (as you can see below) that don't tolerate high firing. It just means that there are a few extra things to look out for when buying your beads as I will highlight shortly .

Whilst I've used 'glaze' as general term colour and decoration can be added to ceramic beads in many different ways depending on the clay type and firing technique.

To colour these porcelain pods Rey of Grey Bird Studio mixes her own colours and sealants to her own recipes from pigments, oils, waxes and resins - and to great effect.

Porcelain beads by Grey Bird Studio

These pieces use standard mid range stoneware glazes...
Stoneware components by Lesley Watt
And these use standard low fire glazes...

Earthenware components by Lesley Watt
Underglazes are pigments that can be used with a clear glaze or unglazed as here...


This lovely piece by Jenny uses Oxide stains and underglaze on porcelain for a more earthy effect.


What to look out for when buying beads

Whatever type of clay the beads you are considering buying are made from there are some basic things to look out for but I would like to add a caveat here... I am talking about handmade artisan beads so I am in no way suggesting that beads have to have precise uniformity and no imperfections - that would just stifle creativity and miss the point completely.

The aim is simply to point out some areas to look out for to make sure you're getting value for money.

Strength and purpose

The first thing to remember when buying ceramic beads is that however strong they are they are not indestructible. I've dropped plenty of stoneware beads and had them bounce but I've also had them land on ceramic tiles or granite and break or chip. Porcelain is tough but if your piece is delicate it's not going to withstand rough handling. As a rule if you treat your ceramic beads as would lampwork beads you should be ok.

As the less durable of the clays I would add a couple of caveats when buying earthenware pieces...this is what happens when you drop one getting it out of the kiln...poor puss!


Very thin pieces may not be that strong as you can see from this early bracelet bar of Caroline's which she managed to snap just with her fingers. At 3mm this was a bit too thin, especially for a bracelet bar which is likely to get knocked about about during wear. Pendants don't get so much wear and tear so perhaps don't have to be quite so robust.


If you're planning to use your purchase with jump rings or wire, make sure the holes are big enough and not too close to the edge of the piece. Wire wrapping or opening and closing too tight jump rings will put the piece under pressure and beware those pliers!


Bead holes

Bead holes should always be clean and smooth with no rough edges, no blockages in the holes and no chips to the glaze. The last thing you want is to make a piece of jewellery only to have the beads slice through your stringing medium!

Good holes...


Not so good holes... here you can see bits of clay stuck in and around the holes and chipped edges.


Caroline very kindly supplied these images of some of her bead 'fails'.. and we all have them. Here the glaze has run into the holes and stuck to the wires during firing causing sharp edges and an imperfect appearance.


Another thing to look out for around bead holes is cracking... here are some of my stoneware beads that were fine after the first bisque firing (lower temperature) but when fired to maturity cracks appeared.


The positioning of the holes is also worth taking note of too as badly placed holes can have an impact on how you design with your beads. I made these lentils by joining two halves together but when I put the holes through I missed the centre which means the beads will be heavier on one side and may not hang well.


Wire Attachements

High Fire wire (Kanthal/NiChrome) is often used in component design and again there are a couple of things worth checking. First up make sure that the wire is substantial enough to support the piece and the plans you have for it. Although it is designed to be fired at high temperatures the wire does weaken somewhat during the firing process and if the gauge is too thin it may buckle or break further down the line. 

Wire can also cause cracking in the clay as I found to my cost with these poor bunnies and whilst the wires are still firmly in place I would not sell them in this condition.


Here the wire shank on a button has been pushed too far in and is protruding sharply through the front of the button - not good.


Warping

Warping is a common problem particularly at higher temperatures and with thinner pieces. This is not necessarily an issue if you're looking for an organic design or not too worried about it being flat - then a little warpage can add character. If you're looking for a cabochon to fit in a precise setting that requires a flat back though, it may cause you problems so it pays to think ahead a little.


Rustic style

Rustic or free form designs are growing in popularity and well made they have a wonderful aesthetic appeal but rustic is not an interchangeable descriptor with rough. Artists making this style of component will go to great lengths to ensure that any organic or unfinished detail is safe to the wearers skin and their clothes by smoothing away any sharp edges that can catch. This piece by Jenny is a good example...
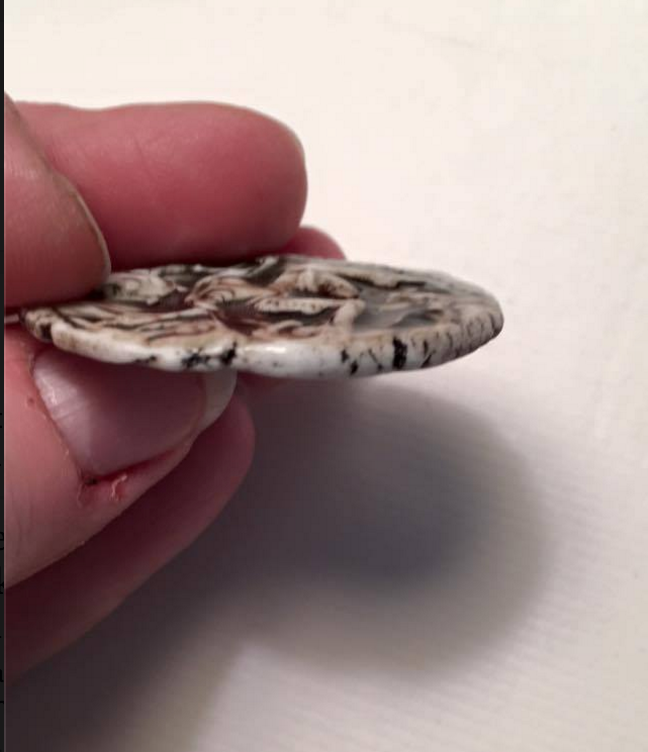


Glaze faults

One of the most exciting thing about working with glazes is that you're never quite sure what alchemy is going on in your kiln and what you're going to get when you open it. Glazes often do things you don't expect and things can happen that theoretically are flaws. Sometimes these flaws become a happy accident that creates a whole new look but sometimes they're just flaws and should be consigned to the reject bucket...

Tiny pin holes in a glaze can sometimes create a nice textural effect but not when they look like the ones I got here which are likely to chip and could snag on clothes and skin.


Glaze application should generally be smooth and even unless there is an intentional design element at play and sadly this little fellow has a nasty case of blotchy glaze that has been applied too thinly in parts.


So there are just a few things to look out for when you are buying ceramic art beads and I hope you've found it useful. As I mentioned before we are talking about handmade beads and the very fact that they are all unique is their charm. Good designers will always be aware of the limitations of their mediums and create accordingly with love and attention to detail because they want you to be as happy with your purchases as they are making them.

 Of course, it can be difficult to pick up these points when you're buying online but good clear listing photographs should make any issues apparent (personally I do not buy from poorly photographed listings) and if for any reason you're not happy with your purchase contact the seller as soon as you can to discuss.

If you're new to ceramic art beads and want to see more pop along to the Facebook auction group Ceramic Art Bead Market.

Glossary of ceramic terms

Friday, July 25, 2014

Freeform Friday: Majolica!

Majolica -
In one word, one style there is so much history culture and tradition...


In my next pair of posts I would like to dazzle you with pictures, place Majolica in art/ceramics history, and show you how I am applying it to a series of pendants and charms. Ready? Cool...

Majolica is a tin glazed pottery - which translates as a colored earthenware clay body, with an opaque white (tin-based) glaze. Decorations are painted on top of the white glaze...
"Tin-glazed pottery is pottery covered in glaze containing tin oxide which is white, shiny and opaque. The pottery body is usually made of red or buff colored earthenware and the white glaze was often used to imitate Chinese porcelain. Tin-glazed pottery is usually decorated, the decoration applied to the unfired glaze surface by brush as metallic oxides... The makers of Italian tin-glazed pottery from the late Renaissance blended oxides to produce detailed and realistic polychrome paintings.

The earliest tin-glazed pottery appears to have been made in Iraq in the 9th century... From there it spread to Egypt, Persia and Spain before reaching Italy in the Renaissance, Holland in the 16th century and England, France and other European countries shortly after." (Thanks Wiki)


1. Dish with bird, in Islamic-derived style, Orvieto, ca.1270-1330
2. A Hispano-Moresque dish, with Christian monogram "IHS", . Valencia, c.1430-1500.

3.Iznik dish - British Museum. Dated 1540-1550.
4. Persian Pottery from the city Isfahan, 17th century.

Tracing its history is an amazing cultural trek across the Medieval landscape. And I love that kind of thing... Persian pottery ---- Islamic Moorish Spain---Renaissance Italy---then a jump to the left  (Is the Time Warp playing in your head now?) and into Victorian England where they really change it up... It's Maiolica in Italy. It's Faience in France. It's talavera in Mexico... I can't get enough!
1. An albarello (drug jar) from Venice or Castel Durante, 16th century. Approx 30cm high
2.  plate depicting the birth of Venus, by Francesco Xanto Avelli of Rovigo, 1533
3. Coppa amatoria depicting Elena Bella, majolica, from Castel Durante, Urbino, c. 1540–50
4. 
storiato decoration on a plate fromCastel Durante, c.1550-1570

1. detail of plate by William de Morgan Victorian era/late 1800's
2. G Jones majolica quail game tureen 
3. from Pinterest... sorry no details.
4. 19thc Victorian French Majolica Palissy Ware. Pike Fish Platter
And the modern contemporary era? Yes, many current potters are still using the age-old techniques in new ways, with modern aesthetic sensibilities! 
1&3 - Posey Bacopoulos
2 &4 - Linda Arbuckle

Are your eyes dazzled yet? Do you want to time travel to the Middle Ages and serve an apprenticeship? ( I do, but I'm an art history geek like that...)

Majolica isn't for everyone. Some pieces is so over the top, so ornate, so colorful. Embellished to a crazy place. But, you ask... where is the connection to Art Jewelry? 

Let me leave you with a teaser for my next post in 2 weeks. I have majolica pieces in progress - pendants and charms. These are part of the all-encompassing countdown to Beadfest. Stay tuned in 2 weeks - to see the results. I promise to post them - whether they are good, bad, ugly, or over embellished! 


Until then - have a colorful weekend.
Jenny 


www.jdaviesreazor.com


Resources:

Friday, May 30, 2014

Freeform Friday: ovals, rings, links... Oh my!


So there has definitely been a theme here on the blog...  Many of us hear the clock ticking down to Beadfest. I know, its months away... but clay takes time! I was back in the studio yesterday after a hiatus that involved shows, travel, and a bit of vacation... I have two weeks until I start teaching summer classes and then the days REALLY fly by. I need to make them count.

Today - white stoneware. 

Stamped and textured. 

circles cut... 
Centers cut... 

Diverse piercings. You never know what the shape and configuration might inspire... 

I decided to save the center piercings and make tiny charms. Perfect for earrings.
I may loathe glazing them, but for now it seemed like a great idea. 
 So I made a huge pile of pieces: approximately 200 because I counted over 100 little tiny charms! Seems fast? Sure - but there is SO much to do to each piece before we get close to "finished". 

Sponge, sand. Dry. Bisque fire. Glaze and stain. Glaze fire... Its going to be weeks until all the stages in the process are complete! ( For more information on the kiln and ^10 reduction firing - see this previous post. ) 

When I first made these large ovals and links, it was on a whim, test them out and see how they were received. I did some in high fired stoneware ( ^10) - very earthy, rustic. I did others in my low fired earthenware with a diverse, more colorful palette. 

Stoneware on left. Earthenware on right. 

This is what I imagined their future to be when I created them: 


Hi fire stoneware oval pendant by Staci Louise Originals. 

Low fire earthenware pendant. Also by Staci Louise Originals.  Smaller charm by Barbara Bechtel/Second Surf. 
 This happened at the Bead Soup Blog Party this year. I am blown away! It shows how versatile these links can be - more so than I imagined! (Thanks to Sally Russick for sending this link in her soup! )
Hi fire Stoneware as toggle, created by Rose Rushbrooke

Hi fire Stoneware as toggle, created by Rose Rushbrooke

I am still excited to see my components used in such fabulous pieces. I suppose that never gets old! I admire the creative use of the oval as a link, and the presence of the negative space as a design element. It helps me see things with fresh eyes! 

This year will be my third Beadfest exhibiting and my first teaching. While I don't want to wish the summer away - I need time! I have things to do! - I am super excited... 

Hope you have a creative weekend!
Until next time... 

Jenny

www.jdaviesreazor.com


Friday, February 21, 2014

Freeform Friday - ready, glaze, fire!

Ready, glaze, fire! 


A photo essay of sorts this week... regarding my process of glazing pendants for a ^10 reduction* firing. I love ceramic clay, "real" clay as it is so elemental. Made of earth and water, it is tempered air and fire. There are many clays on the market, to be sure... but there is a magic, an alchemy in true ceramic clay and the transformations it goes through during the firing....

I work in two clays - stoneware and earthenware. The earthenware is a lower temperature clay, low fire glazes, brighter colors... another days topic, I promise. But make no mistake - still a fired ceramic clay -  fired to 1850 deg F, mind you!

At the ceramics studio where I work/teach we use stoneware; and we fire  "High fire" to ^10  - a toasty  2381 degrees F (1305 C)! The studio has a palette of glazes that we mix in house. They are made in 5 gallon buckets and are the correct consistency for dipping functional ware. I have the glazes I use most often in containers for brushing; I like them to be a bit thicker.  For my pendants - I glaze the top, and then wipe off the surface, leaving glaze in the designs. I showed the process below on a figurative sculpture:
1. Containers of glaze, and coffee! 2. Glaze brushed into designs. 3. Sponged off, leaving glaze in designs only. 4. Goddess figures ready for stain.
1. Pendants, bisques and ready. 2. Top surface glazed. 3. Edges and backs cleaned with a sponge. 4. Backs stained, holes cleaned of glaze.
 Since this is a communal kiln, loaded by the instructors - it needs to be streamlined, no fiddley stuff. There's no way to hang or stilt my pendants, so they are free of glaze on the back surface. In a group ceramics studio - the kiln is filled and fired as needed - when there is enough work ready to go. During a session in our studio, this is usually once a week. To be clear - firing the kiln TAKES a week! Not the firing itself...
Monday - load the kiln - 3 people, with breaks in the cold - app. 3 hrs. 
Tuesday - Fire the kiln. Varies due to ambient temps - app. 8-9 hours. 
Wednesday - the kiln cools. all day. 
Thursday - unload the kiln.
(Friday - no class) 
Pendants arranged on a piece of shelf for ease of kiln loading. 
Pendants visible midway up stack of shelves, on right side.
Can you still see the pendants? The kiln is almost half loaded here...
I believe the firing chamber is 5' tall at the center.


There is an air of excitement and mystery for every kiln unloading. The reduction process* creates a unique atmosphere in the kiln and results can vary every time.  Glaze application varies - thicker, thinner. So it is always exciting to see this:
After the door is removed, unblock the opening... 

Looks good! 

That carved tree? Its on the side of my shrine... and the pendants are at the bottom right corner of this picture. 

Success! Kiln harvest of the week.

I have probably written on this topic before - but I confess... its very exciting to have things in the kiln! I haven't had anything in the high fire glaze kiln since... November last year? These are new designs for pendants and components, stamps I carved from linoleum during the Polar Vortex days of January. And Berks Bead Bazaar is right around the corner.... So thank you for sharing in this week's journey! 

Jenny

www.jdaviesreazor.com


* Reduction - Reduction (adjective) refers to a kiln atmosphere which does not have enough oxygen in it to completely consume the fuel as it burns. Due to this deficiency, the flame pulls oxygen molecules out of the clay bodies and glazes, changing their character. Reduction can be also be used to describe clay bodies and glazes that are especially developed for reducing atmospheres. Reduction (noun) refers to the state of being oxygen-starved. It can also be used to replace the full term, "reduction atmosphere".

For more information: 
( These are simple overviews, not in depth treatises... ) 
The firing process - bisque and glaze


Friday, January 24, 2014

Freeform Friday - guilty pleasures

Polar vortex. Polar plunge. Snowmageddon. Whatever. It's a snow storm. Its a snow day. When I was teaching full time, I looked forward to a snow day as much as any student. If a teacher tells you they don't enjoy a snow day... well, they may need coffee, or wine. Because really? An unlooked for day of freedom, at home, warm and cozy? Bonus.
With the latest forecast for the Mid-Atlantic this week, I made sure to stock up on the essentials. (Altho I did make an Arctic expedition to the convenience store for cream.) I am a freelance teacher now, but the ingrained response to a snow day still takes hold of me. I don't do work, even though I usually work from home. There are tiles to sculpt, blogs to write... Nope. If its snowing - I can play... 


Bead embroidery feels like play. Not because its easy - quite the opposite. But its not my normal, chosen medium. Its something I am experimenting with, and I feel no pressure to produce work for a show. I like trying out pieces I have created in polymer, earthenware or stoneware clay - and seeing how they blossom enmeshed in wee tiny seed beads. The pieces are small, so I don't feel an acute loss if it has to be scrapped/torn apart/unstitched. The seed beads seem plentiful in my stash, and can be reclaimed from a piece gone wrong... So I drink coffee, watch Netflix, listen to dogs dream... and I bead the snow day away. 


Here are a few of my trial pieces from this winter... and we have had a few snow days here in Delaware! I would appreciate feedback as I continue to experiment with a very new (to me) medium! 


1. polymer cab. The Magician/Tarot image, peyote bezel
2. Steampunk angel - polymer wings, antique doll, gears
3. Triple butterfly - stoneware cab, "glaze tear" assorted beads
4. The newest one - earthenware goddess pendant. I was playing with gems here, lapis, moonstone, pearls. I strive for balanced asymmetry, yet ended up a little crooked. 
5. Triskele goddess - started it all! Great tutorial from NoEasyBeads on Etsy. 
6. Stoneware goddess cab, green garnet, peridot... 

What is your (bead/art/jewelry) guilty pleasure? 

I look forward to hearing from you... now I have to get back to work! 

Jenny 


www.jdaviesreazor.com