Showing posts with label bracelet. Show all posts

Monday, October 3, 2016

Down to the bare threads...


Bangles wrapped with sari silk and embroidery yarn and sewing thread (oh, and wire!)

There is something elementary beautiful in fabrics and the underlying threads they are made of. They way the form a pattern, how the can be soft and smooth and still hold their shape, and in the end, how gorgeous they look even broken down with all the threads coming lose.

Is it a wonder that so often small pieces of yarn, threads or fabric are used in jewelry?

Gorgeous bright blue silk from thailand wrapped with embroidery thread and (purple!) wire.

Just as a disclaimer or warning: If you have any hoarding collecting tendencies, this may not be the right blog post for you. You may end up really saving every tiny leftover that would normally have ended in the trash resulting in an accumulation of anything fabric related amass! This warning is way too late for me but maybe not for you! ;)

You see, a lot of smaller pieces of embroidery thread are stuffed down at the bottom of the little plastic bag! 

Since this is my second contribution at AJE (my first was my introduction), I was thinking really a long time about what to show you or what to write about. So I thought to show you a little bit more about my creation process and what kind of elements I love to incorporate into my work. This is quite simple so maybe not a real tutorial but I do hope I may inspire you!

In the end it is with jewelry like with all things in life: The small details can make all the difference. So I'll show you how I use some leftover yarn, sewing thread, pieces of silk and cotton fabric... and whatever else I may find!

These are not finished yet, just embroidery yarn wrapped on or two times around. The knotted ends are still not cut.

Fabric and yarn/thread is a great way to upcycle old jewelry. Even better, even thought you can completely change the look, it actually won't permanently damage the piece itself so it is always possible to change it back by just cutting off the added "stuff".

So for my first example(s) I use simple thin metall bangles. The kind you really can get everywhere and that would also look lovely mixed into a batch of wrapped bangles. The trick to start is quite simple: Fold the yarn or fabric and start wrapping over the folded part.

You could also just make a knot at the beginning.

It needs some time to get used to always hold with one hand all the time not only the bangle / bracelet itself, but also the next round of wrapped material. Go tight but not with too much force. Just that it will look quite neat.

To wrap over the ends of the yarn is the best way to secure it.

If you want to add another colour just start wrapping a piece of new yarn or fabric with the end of the old one (never use it completely!). This will hold the starting point in place and both sides are nicely secured.

During my first wrapped pieces I was hoping for a third hand... ;)

Don't worry about a little bit of "overhang". That you can always cut. Also normally the wrapping alone should be enough to hold everything in place. Still, you can also always add some glue to the ends.

Again, wrapping over the ends at the beginning or end is the best way to secure the yarn!

The trickiest part is the end...

Embroidery yarn is normally made from six to eight single threads that can be easily divided.

Since I also always add some more charms, wire, and whatever else I may find, I don't need and want a smooth finish. Embroidery yarn I simple divide and knot it around the bangle. The end of a fabric piece I just cut in half and make a knot around the bangle with both ends too. With sewing thread I always have some small piece hanging out from the start: Just knot it too.

I just can't get enough of these kind of wrapped bangles. Whenever some bangles are at a sale, I get them!

And some more examples how I finish off the ends: Simply knots that are cut quite close to the bangle (lower one), some that are secured and hidden a little bit with wire wrapped around on top (upper one) or I embraced the ends and actually braided all of them together (middle one). By the way, the purple one is made with silk and the other two with cotton fabric as basic layer.

I have (had actually) a lot of vintage indian beads. They are pressed glass beads that are quite often irregular and I love how they add to the charm of these bangles. 
This also works perfectly for all the cheap loop earrings one can get. This come with the bonus that this is the perfect earring to add a lot of dangles for a colorful bohemian and hippy style! One little trick: If I wrap earrings with fabric I am always starting at the side with the earstud and pierce with this through the fabric. That gives a nice starting point.


Again, like with the bangle, I just wrap the fabric around the hoop while holding the already wrapped fabric tight with my finger. 

Disclaimer: I worked with clay before I started taking images.... ehm... you may already have guessed!
At the end I just cut the fabric in half and use both end to knot around the earring. 


The lose ends and threads can be easily cut. If you are worried about anything coming lose, just secure it with a little bit of glue or maybe tightly wrapped wire. But normally it should just hold fine as it is!


As you may already have seen from all the examples, I love to wrap some more colours on top (it also add some more hold for the fabric and yarn). On fabric I love to use embroidery thread. This time I knot it at the back of the hoop...


...and simply wrap it around to the front and back again. The ends I also just secure by knotting them.
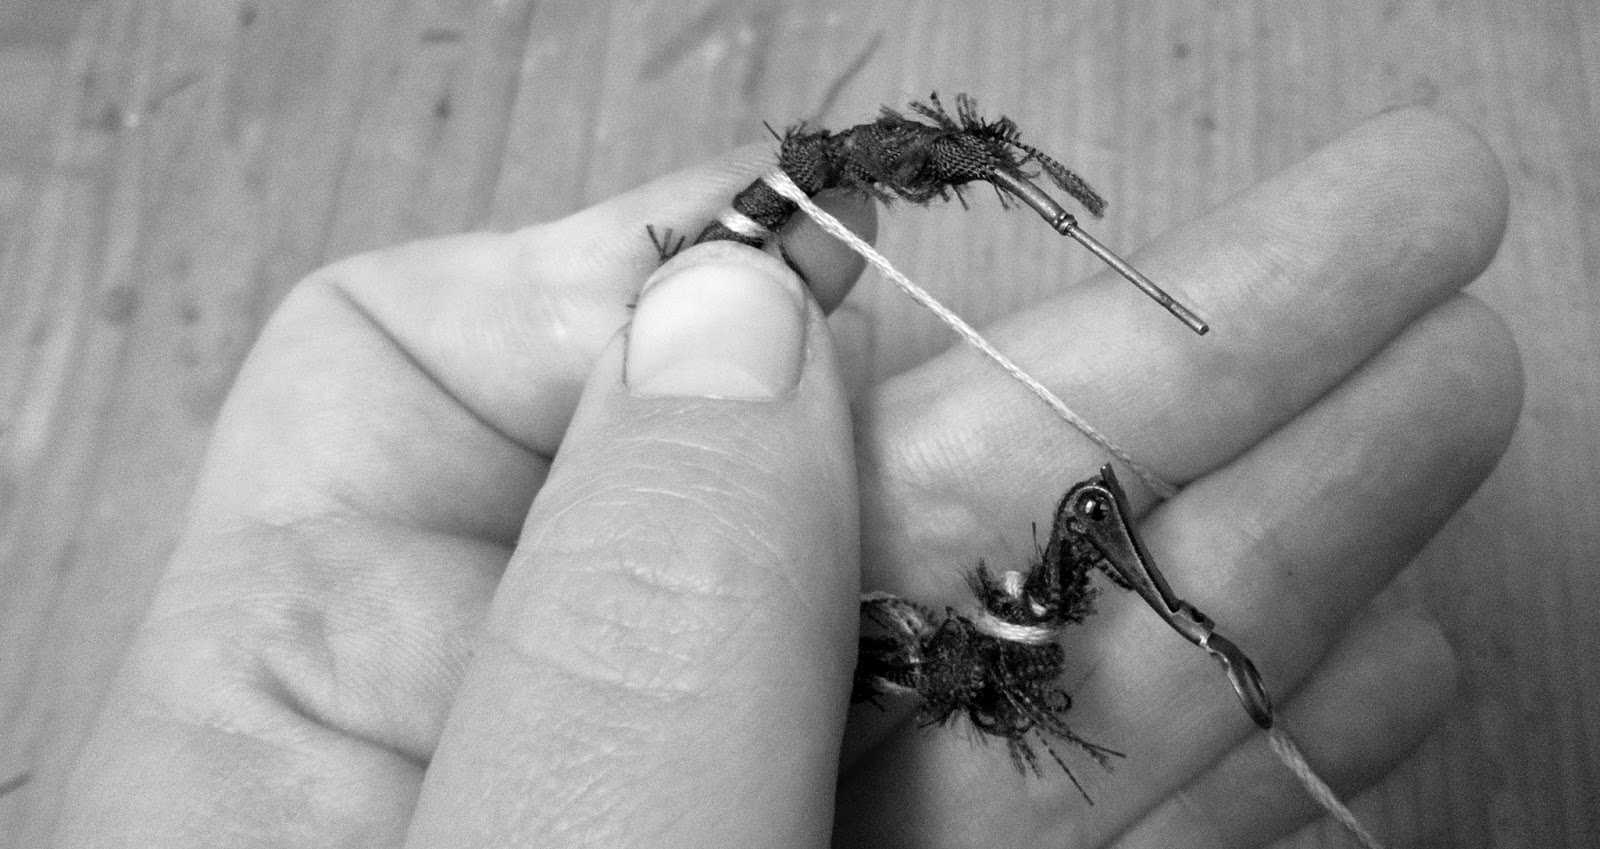
Can you see how I hold the yarn between my fingers? Always use the full potential of your hand ;)

Here is the finished earring. In case you wonder why I showed you some images in black in white... duh... I made the piece and took images in between. They looked fine on the small camera screen and I totally ignored what a beautiful sheen good silk has (yes, this is high quality silk from thailand). Sheen... light... camera... The bright blue and shiny colour overwhelmed my poor little camera and made absurd contrasts. Still... I already had wrapped the earrings and I also didn't want to unwrap them! No way!

But actually I have to admit that I like the black and white images (more than I thought I would) and may use them further in the future (but that time with purpose!).

The colours are still a little bit off... *sighs* But I wanted to show you at least one image of the lovely colour combination.
Here is another example of some of my favorite wrapped earrings (that I love like they are so much that the ends are still visible) made with some of my favorite african batique printed fabric. You can also see where I cut the ends and knotted them. 

The pattern of the fabric is lost but it creates different areas of colour wrappend around the wire.

And for the end... some more examples! 

Bangles in all colours...

All of them are done with embroidery thread as basic, sometimes sewing thread is used as accent as well as embroidery thread again.
And more close up impressions :)


Some really, really big earrings with some charms and beads dangling...


Or just really simple with changing colours...

The ends at the back of the earrings are a little thicker since I really made sure to secure the knotted ends!

I love this way to easily add color to a piece but furthermore, I really, really love that I am able to use every little scratch of fabric or yarn! I don't like to throw away even the tiniest piece of beloved fabric. But hey... it also has to be used somehow! ;)


Until next time! :)

Monday, February 15, 2016

Substitutions

I don't know about you but sometimes I fall in love with a pattern or technique in beading and then I see the materials list and.......
 Well I know how you feel and it happened again to me when I saw the newest Beadwork magazine.

 Cindy Holsclaw has a snippet of an earring pattern in there that uses dragon scale beads and makes a cute little flower.  I flipped to the materials list and there it was.  Half tilas and bugles.  Oh boy I have them but not to match the dragon scales so I started to play with substituting beads that are in my stash.

It worked but it wasn't quite the look I was going for.  It seemed a bit too high.

She showed a bracelet that was really what attracted me to the design.  This one was just a bit on the high side.  What to do.  I still don't have the half tilas but what if I dug through my bin to see if there were bugles hiding somewhere.

I thought with a tiny bit of white it would bring the flowers out more and you know it really did.

So sometimes you can just adjust a pattern or substitute a bead and still get the same effect.  I cant wait to finish this one.

Wednesday, September 2, 2015

Beadwork Netting - and a Tutorial

It's no secret, netting is one of my favorite beadwork stitches. For someone with super tight tension (like myself), sometimes it's hard to stitch up a supple fabric of beads! Netting is my go to stitch when I need something drapey with delicious texture. Being a quintessentially lazy beader, I also love that it works up FAST! Because you pick up multiple beads each stitch, and the shape of the stitch creates space between each row, whatever you decide to make will take less time than most other stitches.
Left - glass pearl collar, possibly from the 1950's, Russian type netting with a ruffly edge
Right - seed beaded collar, 1920'2-60's, vertical netting worked off of a daisy chain base.
Netting has long been one of the go to methods for creating large articles of self supported beadwork. The Egyptians, Japanese, African, Victorians - you name it, if there was beadwork going on, there was netting in some variation. Every time I encounter a broken piece of netted jewelry in my thrift/fleamarket/antiquing adventures I buy it to decode the old stitches.
Showcase of a few of the ways I use netting reguarly - amulet bags, Mobius strip bracelets, freeform, flat foundation for freeform embellishment, and so much more. Imagination is the only limit!
Netting has become a generic beadwork term for several different but similar looking stitches.
Clockwise from large picture, top left: horizontal netting (3, 5, 7 counts), vertical netting (3, 5, 7 counts), vertical netting with a 3 bead drop as the shared bead, Russian (brick stitch style) netting, "Ogallala Butterfly" otherwise known as netting where the bead count increases in each subsequent row, horizontal netting with a different count turnaround on each edge. 
Horizontal netting is stitched from left to right across the piece of beadwork. Vertical netting is worked up and down across the beadwork. Admittedly most of the time the difference between horizontal and vertical netting is just in the semantics. Either way, a stitch of netting will include a bridge of beads - usually an odd number (3, 5, 7, etc). The center bead in the stitch is called the shared bead - because you will pass through that bead on your next row, hence it is shared between two rows. In most of the above samples, the shared bead is a contrasting color from the rest of the bridge beads. There are endless variations and combinations of horizontal and vertical netting. You might have heard of Russian netting or seen super wide netted collars - this stitch is worked more similarly to brick stitch in that each row loops over the thread from the previous row, rather than passing through a bead. You can stitch regular flat netting, increasing to make ruffles, tubular (ropes and bags), circular, and so much more.

Now, I love doing all kinds of netting - they each have their place in my work. When the two-holed seed beads started coming out a few years ago, guess what the first stitch I played with was? That's right - netting! Without further ado, please share my fanaticism with this Two-Hole Bead Netting tutorial!

2-Hole Bead Netting Bracelet with button and loop closure 
These instructions are for use with the Czech twin beads. Bead count and size may need to be adjusted for different 2-hole beads, such as the Japanese Tilas.

Ingredients:

Twin Beads
Size 11 seed beads
Size 15 seed beads
Drop seed beads, Czech drops or daggers

Materials:
Matching thread, about 2 yards
Needle
Tread conditioner (optional)
String a stop bead (leave an 8” to 10” tail for later use) and your first row of beads – repeat 1 twin, 3 size 11, 1 twin, 3 size 11 until you achieve the desired width. String 1 extra twin, 2 size 15, 1 drop, 2 size 15, and pass the needle through the second empty hole in the last twin bead you strung. Tighten up the previous stitch so there is no slack between the last twin and the stop bead.
For the second row, the 15-drop-15 sequence that you just stitched is both the turn around and step up to the next row. The working thread should be coming out of the second hole of the twin bead now. Simply string an 11, a twin and another 11, and pass the needle through the empty hole of the next twin bead. Repeat until you reach the last twin bead of the previous row. When your needle is coming out of the second hole of the last twin bead, string an 11, a twin, 2 size 15, 1 drop, and 2 size 15. Pass the needle through the second empty hole of the last twin strung – tighten up the stitch. Now you’re ready for the next row again.

Repeat the two previous steps until the bracelet is about 1” shorter than you want the finished product to be – some of the length will be made up in the clasp, and some will be recovered due to the stretchy nature of netting.

Stitch the final row exactly like the first, by omitting the twin beads and picking up 3 size 11 instead.

When the last row is stitched, pass through a few of the previous rows, tying half hitches every few beads. Bring your thread back to the last row in preparation for making the clasp loop. DO NOT CUT THE THREAD.
Button Attachment: remove your stop bead from the tail end of the thread and transfer your needle to it. Work your needle back a few rows and attach a button/flat bead/captured cab/other object you would like to incorporate into the closure. It is best that this object sits a few rows from the end of the strip so that when it is on the arm it lays nice and flat. Stitch through the button hole several times, as much as you feel necessary for it to be secure. Weave in the tail of the thread and trim. This side is done.

Loop Closure: return the needle to the other end of the thread. String enough 11’s to create a loop at the end of the bracelet, just large enough to accommodate the button on the other end – keep in mind that the loop will become tighter with the addition of the second row of beads, so it is better to make it a little bit loose. Once you have enough beads, pass the needle through the last bead of the first row, opposite of where your thread is coming out. Pass the needle back through all of the beads of the last row of the bracelet and exit from the first bead of the loop. Stitch one row of peyote stitch using the 11’s, all the way around the loop. ***At this point, double check the loop for fit with the button. If it’s too tight, remove the needle and backtrack until you can add some beads to your initial loop. Too loose, it can be fixed by adding some 15’s to the interior of the loop until it’s tight enough. *** When the fit has been verified, circle the needle around the last row of the bracelet again, so you’re exiting the first up bead of the loop. Stitch another row of peyote stitch, this time using drops. This is your final row of the loop. When this row is finished, work the thread back into the bracelet and tie it off. Trim the thread, wear the bracelet!
Variations with (left to right) vintage 2-hole dimes, Czech Tiles, Japanese Tilas, vintage 1 hole triangles.
You can use this technique for any two holed bead, including the new shapes that have been all the rage lately. Sometimes you will encounter a need to vary the count or type of bridge beads or turn around beads, in order to accommodate a new shape - give it a whirl!  (Word of caution...the Japanese Tila variation pulls arm hair...(not my favorite!))
Button variations (left to right) crystal AB vintage glass, pink and sapphire vintage glass, artisan fused glass, Green Girl Studios pewter frog.
One of the things I love about this project is getting to use some of the fantastic small buttons that I've been hoarding, but you can also use your preferred type of clasp - it's all up to you!

Please share pictures of your latest netting project, or your version's of this bracelet! We would love to see what you come up with!

Saturday, July 11, 2015

How to Spark Inspiration/Motivation, Part 387-D

So, a short and sweet little lesson in sparking inspiration when you are so absolutely unmotivated you could cry! The last few weeks have been totally stressful for me...my day job has been converting to new financial systems and I have had to focus on training and learning an entirely new way of doing my job, which involves sitting at my desk staring at a computer screen. I have been so mind-weary every day, creativity has been lying dormant.

Today after work I decided to just sit at my bead table and look. There were some things that had been sitting there for a while that I just hadn't played with yet. I pulled out a couple of bags from recent purchases and looked at them. Walked away, came back, walked away, etc...

Small raku-fired beads by Keith O'Connor
I saw this pile of raku beads I got from Keith O'Connor's trunk show at my friends house.I remember loving them so much when I saw the stacks of these he had in almost every color of the rainbow. I wanted some of each, but was strapped for cash so chose pairs of my favs.  I intended to used them as pairs in projects...earrings, probably. When I saw them all in a pile like this, though, I thought...don't fight it! Use them all!

Copper bracelet with Keith's gorgeous beads.
I didn't add anything else, just wire-wrapped them with copper wire and made a quick clasp.  Simple, yet totally effective!  Disclaimer, I used a stupid headpin as my charm that wouldn't patina, so I'll have to go back and fix it!

Karen's gorgeous beads!
The second package I picked up was an auction I won at the Ceramic Art Bead Market on FB from our own dear Karen Totten!  I remember when I bid on them how much this color combination moved me.   I have been looking at them and fondling them for a while.

Wrap necklace with Karen's beads, an enameled bead by me, and one of Keith's raku beads.
I have been seeing lots of simple wrap necklaces...beads or other components on each end of a long chain that can be wrapped around the neck or just looped over in front.  I thought this was a cool way to show off gorgeous beads in a different way.  I hope to be creating a few more of these.  Again, pretty simple, yet colorful and unique!

So the crux of today's lesson: You don't have to be inspired or feel creative. Take the time you need. It's okay to walk away from something and come back to it as many times as needed. Trust your first instinct. Take a chance.


Monday, July 6, 2015

Tropical Bracelet Redo

I hopped a cruise ship to Bermuda yesterday.  Before I left I wanted to make a few extra pieces of jewelry to bring with me.  

I had made this bracelet earlier in the year to wear on the bead cruise but found that I had selected some beads that made it too heavy and the waxed linen began to stretch.  
Original bracelet
While it's a really cute bracelet, I couldn't have it expanding in size on me so I took it apart.  It turns out that it also contained some beads that went really well with a dress I purchased for my Bermuda cruise.
Dress Fabric
There were so many wonderful colors in this print to work with; aqua, cobalt, yellow, pink... I began pulling out lots of wood, lucite, shell and art beads to play with!
Messy Desk
Then I remembered I had some memory wire and thought it would be fun (and easy) to work with that.  After lots of pulling out beads, putting back beads, pulling out more beads, I had a finished bracelet!
Finished bracelet
I used art beads (bronze, ceramic & polymer), wood, brass, czech glass and shells.
Art beads
I'm really happy with the finished piece.  Although I do miss the original bracelet, this works so well with my sundress!  

Art Beads
Polymer: Humblebeads
Bronze: THEA Elements 

The next time a piece of jewelry doesn't quite work out the way you hoped, take it apart!  You'll find inspiration elsewhere...maybe even in a sundress!

Happy Beading!