Showing posts with label macrame. Show all posts

Monday, December 14, 2015

Beaded Wreath - Christmas Ornament Tutorial


Today I'm sharing with you a tutorial for a beaded wreath Christmas ornament that I devised by adapting my design for a silk macrame bangle - please excuse the fact that it's displayed on a laurel bush but my Christmas tree is not up yet. For this ornament I've used 15mm organza ribbon and 10mm glass pearls but you can literally use anything you like to create an ornament that suits your own decor...ribbons, cord and even fancy knitting yarn can all be combined with fun and funky results...just let your imagination run wild.

Materials
To make the ornament as I have you will need:

1  1/4 coils of memory wire
48" length of 15mm organza ribbon
12" length of 15mm organza ribbon
16 10mm glass pearls
1 10mm jump ring
1 charm or beaded dangle - I used ceramic birds from Blueberribeads
Round nosed pliers
Memory wire cutters
Scissors


This design is worked with a simple macrame square knot but the nature of the ribbon I used makes it a little tricky to see the technique so if you need clarification you can find a diagram here.

Step 1
With the round nosed pliers turn a loop at one end of the memory wire.


Step 2
Take the 48" length of ribbon, find the centre and tie it around the memory wire adjacent to the loop.


Step 3
Thread a bead onto the wire.


Step 4
Create the first part of a simple macrame square knot by taking the right hand ribbon and passing it over the memory wire which acts as your core. Then pass the left hand ribbon over the right hand ribbon and under the core wire and pull though to secure the bead. Don't pull the ribbon too tight - you want to aim for it to drape nicely around the bead.


Step 5
Add another bead. Create the second part of the macrame square knot by taking the left hand ribbon and passing it over the memory wire then pass the right hand ribbon over the left hand ribbon and under the core wire and pull though to secure the bead ( the reverse of the process in step 4).


Note
Because memory wire is springy this process can feel a little awkward at first but once you have a few beads in situ it becomes easier. I found I got more control by tucking the free end of the wire under my little finger.


Step 6
Repeat steps 3 - 5 until all the beads are threaded and the circle is completed. Tie an overhand knot to secure the ribbon.

.


Step 7
Make sure the beads are snug up to the first loop then trim the spare end of the memory wire and turn a second loop.


Step 8
Thread one of the ribbons tails through each of the loops pull together gently to close the wreathe then knot to secure.


Step 9
Wrap the tails around the loops a couple of times to hide them and then tie in a bow.


Step 10
Attach your charm to the large jump ring then take the shorter length of ribbon and pass it through the jump ring.


Step 11
Place the ribbon and charm under the bow and bring it up around the front and back of the bow making sure to centre it carefully. Knot the ribbon so that it creates a neat finish (not too tightly) to the bow and knot again to secure.


Step 12
Tie the shorter ribbon at the ends to create a hanging loop.


Step 13
Trim the tail ends of the bow and there you have your finished ornament.


I hope you enjoyed the tutorial and are inspired to have a go at creating some ornaments of your own.

Happy holidays.


Monday, June 9, 2014

Silk Macrame Bird Bangle Tutorial


Some of you may remember this bangle from my Spring Fever design challenge earlier this year and as it was so popular I've put together a tutorial so you can make your own.


Materials
  • Approx 12" 16 gauge wire
  • 1 bird bead 
  • 1 silk string cut into 2 equal pieces 
  • Size 5 Miyuki seed beads
  • Round nose pliers and wire cutters
Bird bead from Blueberri Beads
Silk strings from  Sowzere Designs
Notes: 
If you use different beads check your core wire will fit through the holes.
The silk strings used here are approx 50" long and sufficient for 1 bangle but you may require 2 strings if you use shorter ones.
The  amount of wire and the number of beads used will depend on the finished size of the bangle and the numbers quoted here are based on a bangle that fits my 7" wrist so adjust your requirements accordingly. There is a guide to sizing bangles here.

Step 1
Cut a loop of wire from a coil measuring approx 10"


Step 2
Starting at the centre of the coil tie a macrame square knot with the one piece of the silk using the the wire as the core - for a clearer diagram of a basic square knot see here. I hold to wire with my thumb and 3rd finger while knotting but it you find this awkward you can hold the wire in a vice to free up both hands for knotting.


Step 3 
Thread a seed bead onto the wire and repeat step 2.


Step 4 
Repeat steps 2 and 3 until you have 14 beads (or your required number) on the wire finishing with step 3.


Step 5
Turn the loop around and add your focal bead and then repeat the same process on the other side of the bangle with the second piece of silk.


Step 6
Bring the silk strings to the top of the wire and tie off in an overhand knot.


Step 7
Trim the ends of the wire to approx 6/8", files the ends smooth and turn a simple loop at each end - one on the vertical and one on the horizontal.


Step 8
With the remaining wire turn a simple loop at one end.


Step 9
Using round nose or bail making pliers curve the wire in the opposite direction from the simple loop to create a hook clasp. Bend the end up slightly, trim and file smooth. Hammer on the curve to work harden


Step 10
Use a jump ring to attach the hook to the horizontal loop of the bangle. The vertical loop forms the eye for the hook closure to connect with keeping it flat against the wrist.


Step 11
Trim the silk tails as you prefer - you can leave them long, cut them close, add beads or knot as you choose.


Alternative finish
I prefer this 'open' style bangle as I have large hands and to get closed bangles over them they end up quite loose on my wrist but, if you prefer a closed bangle you can simply forgo the hook and connect the simple loops to each other as shown here. If you choose this finish you will need to add extra beads to ensure the bangle will go over your hands - in my case 3 on each side. If your bangle gets misshapen while you are working on it you can ease it back using a mandrel or cylindrical item (baked bean cans work well) taking care around the focal.


And there you have it - you can of course adapt this to use any bead of your choice and I hope you'll give it a go and have some fun with this simple design. The bangles featured here are available in my Etsy Jewellery Shop.


Lesley
The Gossiping Goddess

Thursday, April 25, 2013

Wire Macrame Earring Tutorial


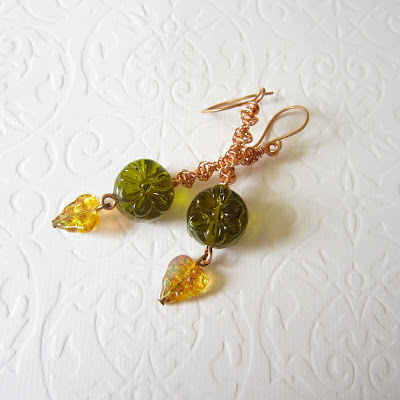
When I submitted these earrings for the AJE challenge a few months ago a lot of people asked me about the the wire macrame technique so I decided to put together a tutorial which you can adapt to your own design. I had a little difficulty photographing this today as it's a two handed technique and my tripod has gone awol but you can find the basic knotting technique here if you need clarification.

Materials 

Approx. 6" 0.9mm bronze core wire
Approx. 12" 0.5mm bronze knotting wire
2  focal beads
2 accent beads/dangles
1 pair of earwires
Headpins/wire
2 pairs of pliers
Table vice or something to secure your wire

Note: Different types and gauges of wire can be used for this and these will give different effects but remember that you may need to adjust the length of the wire according to the gauge used.

Step one
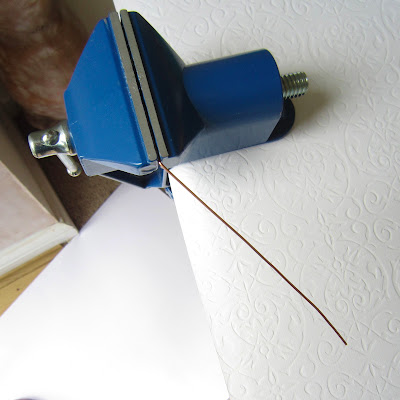
Secure your core wire to something that will keep it firmly in place -  I use a table top vice but you could also wrap it round a rigid object - don't forget to cut extra wire if you do the latter.


Step 2
Place your knotting wire beneath the core wire and bring both ends up around the sides. Pass the wire on your left over the wire in your right and back under the core wire and up through the loop of the wire on the right.


Grip both ends of the wire with your pliers and pull to tighten keeping an even tension. Don't be tempted to do this with your hands (especially with bronze wire) - it may not hurt at first but you'll find you have very sore fingers the next day - I know I tried!


Step 3
Repeat step 2 taking care to pass the wire in the same direction as this will create the spiral pattern.


 Continue repeating step one and the spiral pattern will begin to emerge...


Step 4
When the spiral is the length you want remove it from the vice and wrap one end of the wire around the core wire 3 times, cut off the excess and press against the core wire. Repeat the process with the other end of the wire wrapping it over the first wrap. Trim the excess and file any sharp edges.  This will form the top of the earring.


Step 5
Trim the top end of the core wire to remove any vice marks, file the end and turn a simple loop. Gently push the spiral up to sit snugly against the loop.


Step 6
At the other end add your focal bead, trim and file the wire and turn another simple loop or warp a loop if preferred.


Step 7
Add a headpin to an accent bead and turn a simple loop to create a dangle then add this to the bottom of your earring.

Step 9
Add an earwire of your choice.


Step 10
Repeat this process for the second earring to complete the pair.


Step 11
This technique is greatly enhanced by oxidising the wire and polishing back the high points to give added depth and texture. I've done this when the earrings are complete but if your beads are not waterproof you will need to treat the wire before you make up the earrings.


And there you have your wire macrame earrings.

I hope you'll have a go at making these and perhaps we'll see some of them coming up on the AJE Earring Challenge Pinterest board.

Lesley
www.thegossipinggoddess.blogspot.com