Showing posts with label handmade earrings. Show all posts

Friday, September 12, 2014

Digging Into The Bead Fest Stash

Anyone who has been to a big bead show knows the excitement of coming home with a handful or a truckful of new beads.  Well maybe not a truckful, but lots of new treasures.  For a few days you just stare at them lovingly and fondle them tenderly.  But eventually the urge to create overcomes you and you start to dive in.

I was exhausted after Bead Fest and spent a couple of days mostly alternating between bead fondling and napping (wherein I dreamed about beads and beady friends). But then the creative urge surged again and I was off and running.
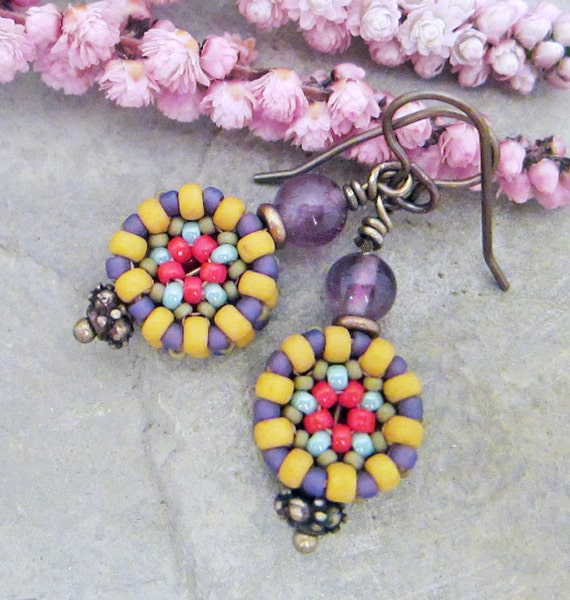
Earrings by Linda Landig Jewelry, Beaded Beads by Sue Beads.


So this week I began wondering what my fellow AJE team members had been doing with their new Bead Fest treasures.  I hope this bit of eye candy will inspire you to pull out your own new (or old) beads and give yourself the gift of some creative time.

Lesley went on an earring making binge!
Earrings  and bronze bead caps by Thea Jewellery. Teardrop headpins by Sue Beads. Enamel pieces by Ann Gardanne.  
Melissa made these striking earrings for our August Component of the Month Challenge.
Earrings and textured copper components by Melismatic. Leather feathers by Tree Wings Studio. Headpins by Glass Addictions. 
Jenny also combined her metalsmithing skills with some Bead Fest treasures.
Riveted and impressed copper by Jenny Davies-Reazor.  Pewter drops by Green Girl Studio.
Diana fed her passion for chainmaille by stocking up on supplies while at Bead Fest.
Bracelet by Suburban Girl Studio, with a chainmaille kit from HyperLynks.
 Have you been to a bead show recently?  What was your favorite purchase?  What did you create with it?  Do tell!

-Linda


Saturday, December 21, 2013

End Of Year AJE Earring Challenge

Welcome to the last AJE Earring Challenge Reveal.  We are so happy that you have chosen to play along with us.  I think there must be many of you who, like me, did not have new earrings every single week in 2013, but who made an effort to keep up with the challenge as best you could.  Congratulations to you!
Some of my earrings displayed in a wooden cigar box that team member, Francesca Watson gave me.
I sold a lot of earrings during my last (and only) Christmas show, so I was glad I'd made so many over the course of this past year. I hope that many of the earrings you made have found new homes too.
Two of my earring displays at a recent Christmas show.
Here are a few of the earrings that caught my eye, from the past 2 weeks.

These earring were made by Claire Fabian.  I love the ancient, rustic look she achieved on her handmade polymer components!
This next pair of earrings, by Alice Peterson features beaded beads by AJE team member Kristen Stevens and lampwork by Dancing Frog Jewelry.  The lampwork and beaded beads look spectacular together.
And finally, I want to highlight this pretty pair of earrings by Mon Urkhart. The beautiful bead-woven Forget-Me-Nots were made by Nancy Dale. I was not familiar with Nancy's work until I wrote today's blog post.  Her bead weaving is gasp-worthy!  You should visit her Etsy shop and blog.

Did some of you manage to get all 52 pairs of earrings made?  Please let us know in the comments below. Curious minds want to know!  And congratulations to all of us who took on such a big challenge.

This will be my last post for 2013.  I want to thank all our readers and my teammates for the many ways you have enriched my life this past year.  I wish you the happiest of holidays.


If you have earrings to share this week, be sure to link up for this last reveal.  Enjoy!

Linda
Linda Landig Jewelry – ArtFire 
Linda Landig Jewelry – Etsy
 

Sunday, June 23, 2013

Earring Challenge Reveal - Week 23 & 24

I just got back from a beachside barbecue with a bunch of friends.  The couple who hosted the dinner have a place on the water that has the most phenomenal view! They made foil packets filled with fresh veggies and salmon that they placed on a grill over an open fire.  Mmmmmm, heavenly!   But we left the gathering by shortly after 8:00 pm so I could get this post written and get a good night's rest before a show I have tomorrow.  I'll leave you with this view from their property!

South Puget Sound, with Mt. Rainier in the background.

Mt. Rainier is not the only gorgeous photo that I am posting this evening, though.  Here are some of the stunning earrings that grabbed my attention these past two weeks.

These polymer clay stud earrings by Mon Urquhart are just amazing!

I was also quite taken by these earrings by Sumi. I really like how she wire wrapped the ends of her self-made balled wires together.  I creates a very graceful line.


I was also quite smitten with Linda Newnham's earrings (Earthshine Jewellery).  As she pointed out, her ribbed lampwork glass ovals look like bee hives when they are accented by the little Vintaj brass bees.


Now, if you are part of this quarter's earring challenge, please add your link below.  One lucky challenge participant will win the giveaway that I wrote about on Friday.

And, whether you are an earring challenge participant or simply an AJE blog reader, please click on the links below to enjoy seeing all the great earrings from the past two weeks.  The next earring reveal will be on July 7th.

Linda
Linda Landig Jewelry - ArtFire 
Linda Landig Jewelry - Etsy 


Friday, June 21, 2013

Jewelry Show Preparation & A Giveaway

OK, I know you want to hear about the giveaway, but be patient.  The giveaway information is at the end of the post.

Show Prep

I live near a finger of land that juts out into the most southern part of Puget Sound, in Washington State, USA.  The area is called Boston Harbor, (for some unfathomable reason), and this weekend Boston Harbor is hosting its semi-annual garden tour and artisan show.  I will have a booth in one of the gardens there, along with a nice group of other local artists.  Keep your fingers crossed for pleasant weather!


Boston Harbor
I don't actually live on the water or even right in the little community of Boston Harbor, but water is never far away here.  Our home is tucked away in the woods and today you will find me there trying to get prepped for Sunday's show.

This afternoon I was checking through my jewelry and making sure that it had all been entered in my inventory spreadsheet, prior to the show.  I know that some of you have purchased programs that track inventory, supplies etc.  I just simply assign each piece an inventory number and then I add it to a simple spreadsheet.  For example, this bracelet is #1305.  That means it was the 5th item I made in 2013.  

AJE CoM bracelet, with focal bead by Starry Road.
My spreadsheet has columns for the type (earring, bracelet or necklace), the inventory number, the title of the piece (this piece is titled the "Blue Leaf Bracelet"), the main components it is made of, length, cost, & retail price. I have a second tab on the spreadsheet for sold items.  When I get back from the show, I'll "cut" the items that sold and "paste" them into the sold spreadsheet.  On the sold spreadsheet I also keep track of the venue from which they were sold, the date sold and the person to whom I sold it, if known.

After I entered everything into my inventory spreadsheet this afternoon, I then, sorted all the jewelry according to if I have a picture of it or not.  Even if something sells without ever being seen online, I still like to have at least one picture of it, for my records.  Most of my jewelry had been photographed, but not all.  So a photo shoot is the next order of business.

Matching earrings and necklace with copper components by
Kristi Bowman  Design.
If I were super organized (which is a joke for the likes of me) all my jewelry would already have earring cards or tags on them with the components listed and the price. However, this is another task that is only partially complete.  Tomorrow I'll finish adding tags, earring cards and prices to everything.  Its a tedious job and it will necessitate caffeine and loud, upbeat music.

Somehow, I'm never really satisfied with my tags.  But here are the cards I designed a couple of years ago, that I am still using.  Inside I write the title of the piece, the length, main components used, price and inventory number.  When I use these tags up, I think I will get some Moo Card Minis to use as price tags.


The "Lighthearted Necklace" and a few others still need tags added.

Heart Pendant by Suburban Girl.
My earring cards are just business cards that I designed in a portrait format.  I stick plastic earring adapters on the back and add the price and inventory number.  Here are some of my earrings from a show I did earlier this spring.   


The earrings below, plus about 5 other pairs still need earring cards after which I'm all done.  Then its "On with the show!"


AJE Giveaway!

Unfortunately not many people linked up for our last AJE Earring Reveal.  Our next reveal is this Sunday and  I'm writing the reveal post. I want to be able to choose the featured designs from lots of earrings! As an incentive our AJE team has gathered up all these goodies to giveaway to one lucky participant.  I rummaged through my newly organized bead stash and came up with bunches of art beads, as well as some gemstones, polymer clay, resin and glass beads.


Plus, Kristi is adding a pair of her awesome copper metal clay charms.
The giveaway charms will be these or something similar.
And Francesca will be adding a pair of her handmade argentium earwires!

One, randomly chosen earring designer will win all of the above items. All you have to do is add the link to your earring reveal, using the Linky Tool on the AJE blog.  I will post the Linky Tool sometime on Saturday evening (PST). To be entered to win, you must link up no later than Sunday at 5:00 p.m. PST. So get your photos up on Pinterest, dust off your blog (if you have one) and add your earrings there too! Good luck!

Linda
Linda Landig Jewelry - ArtFire 
Linda Landig Jewelry - Etsy 


Tuesday, May 7, 2013

A-HA!!

I was a participant in Lori Anderson's annual Bead Soup Blog Party this year - for the first time - and had a kind of "a-ha" moment in the course of making up my "soup" pieces. Among the many (many!) things my fabulous partner Michelle Beuttner sent me were two great pairs of hand-made copper earwires.


I used the ones at the top (with the extra swirls) to make one of my "soup" pieces and was really struck by the difference those big swirls made to the overall design.


I have always preferred using handmade earwires in my pieces, but I confess that I have stuck primarily to three simple basic styles: a simple flattened loop; a ball-end silver earwire; and a classic kidney shape. My thinking was that I didn't really want the earwires to compete with the design of the earrings.


Snakeskin Agate Hoop Earrings

Lavender Cathedral Cut Earrings

But the bead soup process - working with components that someone else chooses for me - forced me to work outside my usual comfort zone, and I realized that the earwires ARE part of the design of the earring. ("I coulda had a V-8!") It was one of those things I knew, but didn't really know I knew - or, at least, I had never consciously considered. This a-ha moment sent me back to my workbench to start experimenting with different styles of earwires for my earrings.

What about you? Have you had any a-ha design moments recently??

Until next time!


Sunday, March 31, 2013

Earring Challenge Reveal 6 (weeks 11-12/52) and a chance to join the Pinterest team

Happy Easter and welcome to the 6th installment of the earring challenge reveal. If you've been keeping up with the pace of a pair of earrings each week, you are my hero. I am not a fan of making earrings. I think I have what's called "2nd earring syndrome". Once I've made an earring, I don't want to make a 2nd one.

Did you make earrings using hand made art components this week? Link up at the end of this post so we can see what you made!

Also, now that we have gotten through the first quarter of 2013 (shocking, I know!), we are going to open up the Pinterest board to more pinners. So if you want to make a pair of earrings each week using at least one quality hand crafted component, leave a link to your pinterest home page in the comments. If you are already on the Pinterest team and want to continue, do nothing.  

We will continue to feature a few pairs of earrings every other Sunday. The best way to get your earrings featured here is to make great earrings using handmade art components, and to take gorgeous photos. 

With today being Easter, I decided to showcase a few pairs of earrings from the Pinterest board that remind me of spring.

First up, Claire Lockwood used lampwork dahlias by Ciel Creations, and lampwork headpins by Earthshine beads:


Megan Martin created these darling hand forged silver and riveted earrings with her own two hands and maybe a tool or two:


Kumi Fisher used these adorable owls by Rebekah Payne (Tree Wings Studio) in her earrings:


Remember to link your earrings from the last couple weeks below. 

Our next reveal is in two weeks on Sunday April 14th. Keep creating!


-Jen Cameron


_________________________________________________________________________


Wednesday, January 23, 2013

Tutorial: Glass Headpin Earrings

Are you taking part in the AJE Earring challenge? The first bi-weekly blog reveal link-up was a few days ago, and the creativity was amazing!

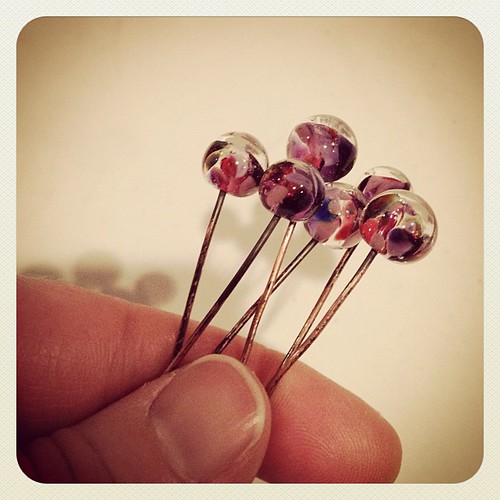
Just in case you are out of ideas, or maybe considering joining, but don't know what to make, I threw together a quick tutorial for how to use handmade artisan headpins. These were made by me (and maybe I will list a pair or two later in the day when I have good lighting), but this tutorial should work with just about any artisan created headpin.


Glass headpins tutorial glass addictions by jennifer cameron


Supplies: 
-Glass headpins x2
-Ear wires

Tools: 
-round nose pliers, bail pliers, or something round for making loop in the wire
-flat nose pliers
-wire cutters

Directions: 
These will take longer to read than to actually make the earrings....

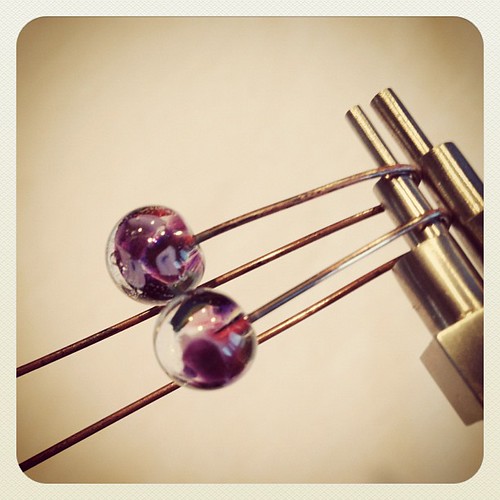
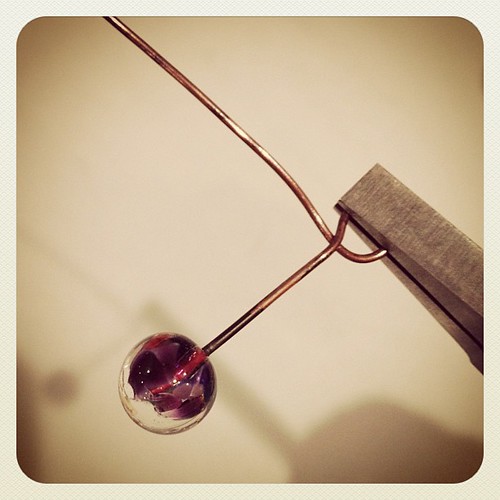
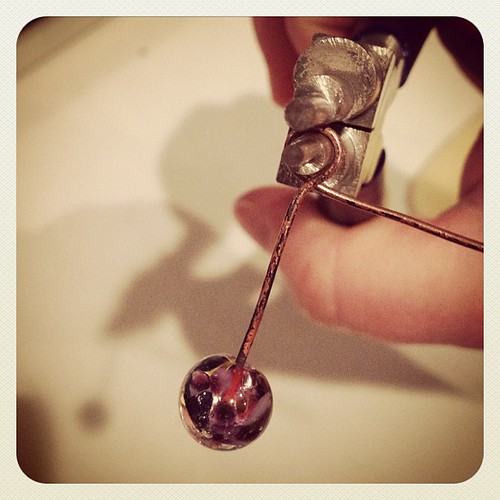
Using a mandrel or bail pliers, decide how long you want your earrings to dangle and line up the headpins next to each other. Bend the wire around the tool to create the first part of the loop.

Glass headpin earring tutorial

Put one headpin on the work surface for later. 

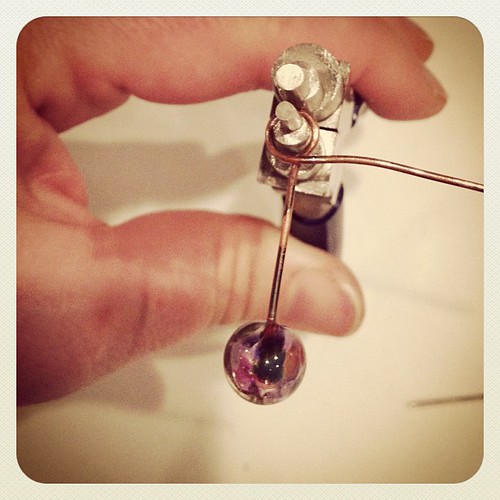
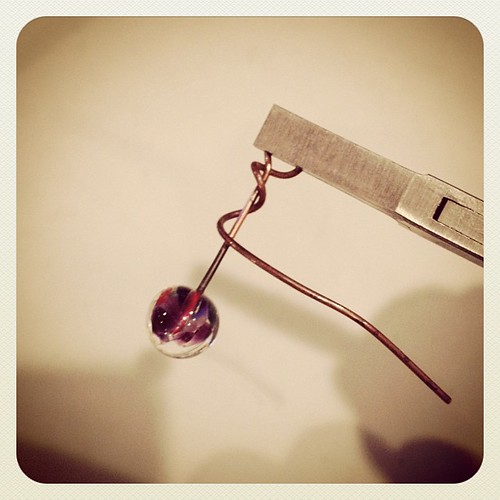
Put the same tool used to make your hook in the wire and finish bending the wire into a loop. Gently "crook" the loop back so that it resembles a lollipop on a stick rather than a lopsided circle. 


Glass headpins tutorial glass addictions by jennifer cameron


Grab the loop with flat nose pliers.


Glass headpins tutorial glass addictions by jennifer cameron

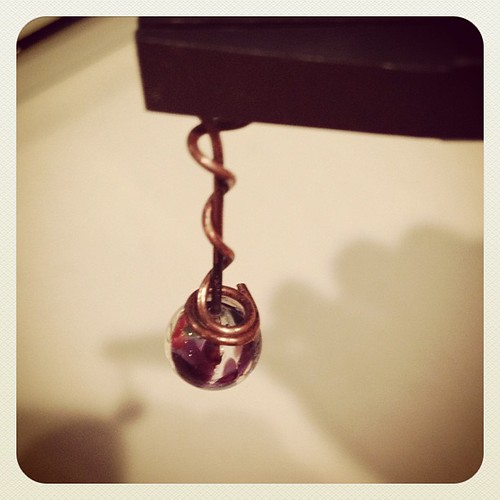
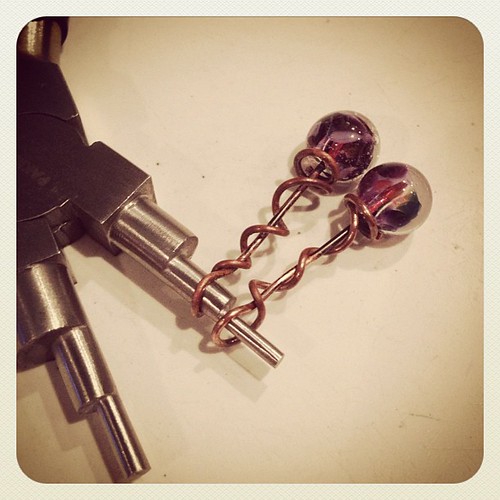
Begin wrapping wire around the stick of the lollipop without tweaking down on the "stick" or you will bend it out of shape. While this part is very loose...meaning it doesn't have to be done a specific way, it's a good idea to kind of have an idea in your head of what you want it to look like when you're finished. Then just let go and wrap. I prefer loosey goosey. But have done tight evenly spaced wrapping too. 

Glass headpins tutorial glass addictions by jennifer cameron

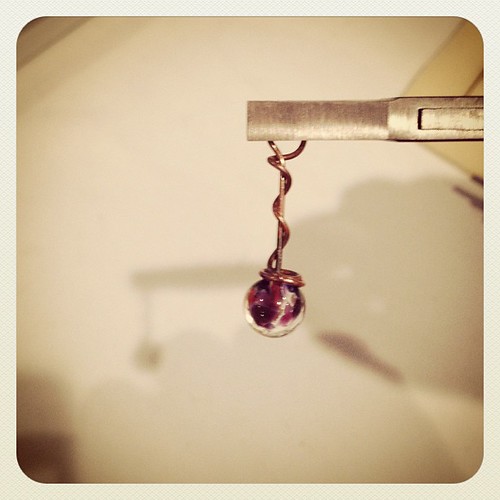
Once you get down to the end of the headpin, make a loose swirl around the top of the bead. It kind of looks like a bead cap. 

Glass headpins tutorial glass addictions by jennifer cameron

Snip the end of the wire and fiddle with the shape of the swirl until you're happy with it. 

Glass headpins tutorial glass addictions by jennifer cameron

Repeat for the 2nd headpin. However, if you want your earrings to be mirrors of each other, wrap the loop in the opposite direction. For the first one (picture close to the top of the post), the wire comes out on top of the loop. On the one below, the wire is under the loop. If you don't care about your earrings being mirror images, don't worry about it. I doubt anyone will notice one way or the other. 

Glass headpins tutorial glass addictions by jennifer cameron

Another little tidbit. Do NOT obsess about getting the wire wraps exactly the same. They are supposed to be loose and free flowing. 


Glass headpins tutorial glass addictions by jennifer cameron #AJEearring

Attach your dangles to ear wires. If you want to embellish further, go for it! I prefer simple myself. But that doesn't mean more isn't better. 

Please share your efforts if you use this tutorial by leaving a link in the comments. I would love to see! 

Is anyone interested in making their own simple ear wires, but don't know how? Would you like a tutorial for that? Leave a comment if you are. 

Have a great week!

-Jen Cameron