Hello! I'm Linda Landig and I'm a newbie to the team here at AJE. My posts will be written from the perspective of one who uses art jewelry elements in most of her designs, but who doesn't actually make art jewelry elements herself. I'm sure many of you love using handmade elements in your designs, like I do.
An online friend recently asked me what sources of inspiration drive my designs. The most important source of inspiration for me is color. When I first started designing jewelry I was afraid of color. I anguished about which colors would look good together and I made a lot of monochrome jewelry.
To get past the color inhibitions I started a color journal. Whenever I saw color combinations that appealed to me, I'd cut them out of magazines or catalogs and glue them into my journal. Although I have a lot of jewelry pictures in my color journal, you can see from this page that there are almost limitless sources of color inspiration; from blankets to dishes to quilts. I once designed a 2 strand bracelet after seeing a yellow and gray pillow in a home magazine.
Now days we have Pinterest and you can collect colors there as well. I have a color board on Pinterest, if you want to take a look at it to get started. But be sure to personalize your color board. It should be brim full of colors that make your heart sing with joy. A good online source for colors is the Design Seeds blog.
Another great source of color inspiration is the focal you are planning to use in your design. This pendant from Yolanda's Clay was one of my first handmade component purchases. Just look at the great colors in it!
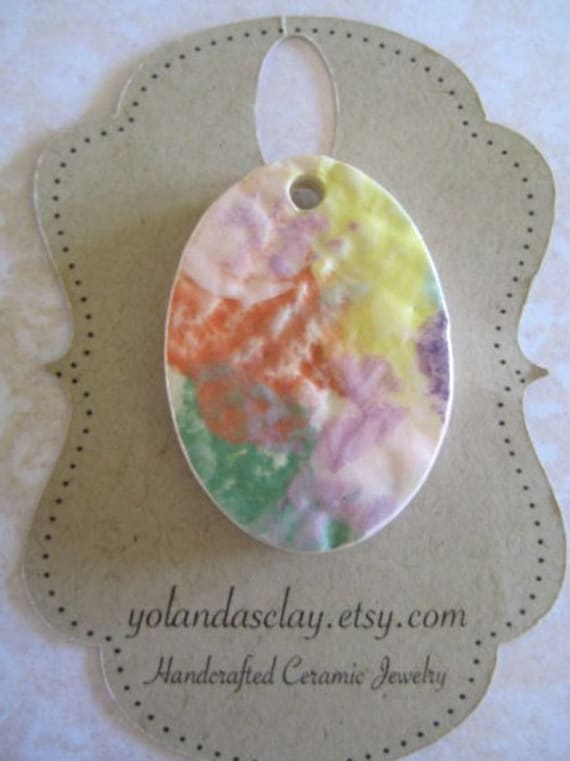
I selected gemstones inspired by the colors of the pendant, such as pink opal, aventurine and amethyst. Then I added some coordinating glass beads and Swarvoski crystals. The whole necklace came together from the inspiration of the colors in the pendant.
There are color inspirations all around you! Can you see the connection between this Native American drum that hangs on the wall in our living room and the necklace I designed for the AJE September Component of the Month Challenge?
With experience you'll begin developing your own favorite color combinations, but you'll also develop a keener eye for all the amazing colors that surround us every day.
~Linda Landig
Linda Landig Jewelry
Friday, October 12, 2012
Thursday, October 11, 2012
And in the beginning there were beads...
![]() |
| Kaz Baildon lampwork beads |
Wondering about what to write for this first post got me thinking back to those early days working with hobby store beads and how quickly things changed. Knowing there must surely be something more interesting out there I did a 'quick' Internet search and several hours later had to be surgically removed from both my laptop and my credit card and now I have a serious addiction to art beads and components. These days I buy them from all over the world but back then I shopped much closer to home so it was UK artists that set me on the journey which got me here today. There are of course many, many talented jewellery artisans in the UK but for now I'd just like to introduce a few that first piqued my interest. So, let's get to some eye candy shall we...
Lampwork was my first art bead discovery and with it the work of the Kaz Baildon of Cheeky Cherub Designs. Kaz has a wonderful eye for combining colour and is an absolute perfectionist in her work. I'm a real sucker for etched beads and earthy, saturated tones which she does brilliantly but her repertoire is immense.
![]() |
| Kaz Baildon lampwork beads |
![]() |
| Kaz Baildon lampwork beads, necklace by THEA jewellery |
Next up is Anna McDade, the jewellery designer whose work first had me reaching for the sheet metal and saws, not that I have ever come close to imitating her. She specialises in detailed pierced work and etched metal pieces, often with animal and bird motifs.
![]() |
| Anna McDade jewellery |
![]() | |
| Anna McDade components |
![]() | |||
| Caroline Dewison ceramic beads |
![]() |
| Diane Turton silk ribbons |
So there you are - just a few of my compatriots who helped me on my way before I'd even found a niche with metal clay. You can visit their shops using the links below. Oh and a little bird tells me Kaz is in need of a big new torch to put into practice some techniques she learnt in Australia recently so she's extending her mailing list sale to AJE readers with 30% off in her Etsy shops at the moment - coupon code OCTOBER30.
Anna McDade jewellery
Anna McDade components
Caroline Dewison ceramic beads
Diane Turton hand dyed silks
Anna McDade components
Caroline Dewison ceramic beads
Diane Turton hand dyed silks
And just in case you haven't had quite enough I've put together an Etsy treasury with lots more British talent - just click on the picture. Enjoy!
Lesley
The Gossiping Goddess
Labels:
art beads
,
ceramic bead
,
lampwork
,
metal
,
metal clay
,
UK
,
United Kingdom.
Wednesday, October 10, 2012
Why do I choose Seed Beads.
Well to be perfectly honest they choose me. A few years back my mother in law was destashing her craft room and gave me these tiny little beads and I thought "What am I going to do with these?" I had tried my hand at stringing but you will never see the results of that catastrophe! Walking through Walmart I spied a Beadwork magazine and there it was. Like a heavenly light! I was hooked. Then through Facebook I met and saw some of the most beautiful work I have ever seen and then the introduction of art beads and Yes there was another Heavenly light moment.
So that is the "Why" of how it began but I really want to show you the where the "Why" has taken me now with something that is currently on my tray.
It starts with inspiration
In this case it is a Marsha Neal pendant square. Look at the colors and the glazing.
The fun part about seeds is that there are so many colors and gradients that matching those together is so easy. You see the pendant. For me sometimes I am not confident in choosing a random color combination but with an inspiration piece like this there is that "I never would have thought to use peach and terracotta together but look how they totally work.
So now here is where I start choosing beads to match. I do not have a very substantial stash but I do have a diverse one so here are the beads I decided on.
Next I always like to add a different bead into the mix and the seed bead manufacturers have made that so easy with so many different shapes and sizes. Here is my surprise factor.
These are called either farfalle or peanut beads. Aren't they fun? So now I have to decide how best to showcase the beads and how to enhance that gorgeous pendant. Here is what I have so far.
This rope is called a Russian Spiral. I like this rope for it's flow and feel but also that I can morph it with beads of all shapes.
So that is the "Why" I continue to love playing with seed beads. So now tell me your "Why I choose..."
Kristen
Tuesday, October 9, 2012
Metal Etching - A Newbie Perspective
This is my inaugural post for Art Jewelry Elements, and I am so glad to be here! (You can read more about me and why hammers make me a little weak in the knees here if you're interested.) I am a nut for all things metal, and I recently took a class in metal etching to try and expand my toolbox of techniques a little bit, since I don't own a rolling mill to impress patterns into the metal I use in my studio. (Yet.)
Before we continue, a word about safety: metal etching involves working with chemicals that can do a lot of damage.
So this isn't a tutorial - I don't want your third degree chemical burns on my conscience! If you're interested in metal etching, I strongly encourage you to take a class from a qualified instructor who can walk you through the safe use of the chemicals and how to troubleshoot when you run into problems, which you inevitably will. (If you're in the San Antonio, Texas area, I highly recommend Wired Designs Studio - they offer classes in all things metal, wire, metal clay, and glass fusing.)
The lovely Gail Stouffer walked us through marking up our metal sheet with resist.
"Resist" can be any waterproof material that will resist the action of the etchant. Basically, the metal will stay unchanged under the resist while the metal around it will be etched away, resulting in a raised pattern. In our case, we used a waterproof stamping ink called Staz-on.
Once we'd played around with some designs and the ink on our sheets were dry, we headed outside to mix up some chemicals and start the etching process.
The etchant started out clear, but as it ate away the copper in the metal sheet, it began to turn green.
The first round of etching only took 30 minutes, and we got a nice deep etch with lots of detail.
When we cleaned up the panels and started cutting out the designs, it all started to come together. I was particularly fond of these two sections, which really popped when I lightly patina'd them.
Our second etch wasn't quite so successful. The etchant by this time was a bright green - like lime jello - but it should have had plenty of "oomph" to give us a good etch. After nearly an hour, the etch was still very shallow - more of a polished area. Even cleaned and with a patina on it, the pattern was hard to see and the metal felt nearly completely smooth.
If I were doing it over again, I would have left the second batch in the etchant a little longer and put them in face up. But since we were getting to the end of the day and had to clean and close up the studio, we went with what we had. Obviously I need to experiment more!
So while the process is a little involved and I don't love having all those chemicals around, the result is totally worth it. As a matter of process, I think it probably makes sense to mark up a bunch of metal sheet and spend an afternoon once or twice a month just etching it all. Then I'll have lots of custom-patterned metal to make components with when the mood strikes me. This is the first pair of earrings I made with the patterned brass (and also my first attempt at this stirrup-style bail, which kicked my butt).
All in all, if metal is your thing, I highly recommend adding an etching class to your class schedule sometime soon. It's a great, flexible, and customizable technique that will really expand your repertoire.
Until next time!
Before we continue, a word about safety: metal etching involves working with chemicals that can do a lot of damage.
| This is what a splash of etchant did to concrete. Now imagine what it could do to your skin! |
The lovely Gail Stouffer walked us through marking up our metal sheet with resist.
| The lovely Gail is not actually teaching in this photo. Use your imagination! |
| I loved the wood-grain stamp, but couldn't find on at my local stamp store |
Once we'd played around with some designs and the ink on our sheets were dry, we headed outside to mix up some chemicals and start the etching process.
| Note the gloves and safety glasses! |
The etchant started out clear, but as it ate away the copper in the metal sheet, it began to turn green.
| Not lime jello! |
| Before and after |
| Woodgrain etch (left) and music sheet etch (right) |
| Neutralized but uncleaned sand dollar etch (left); cleaned and patina'd sand dollar etch (right) |
So while the process is a little involved and I don't love having all those chemicals around, the result is totally worth it. As a matter of process, I think it probably makes sense to mark up a bunch of metal sheet and spend an afternoon once or twice a month just etching it all. Then I'll have lots of custom-patterned metal to make components with when the mood strikes me. This is the first pair of earrings I made with the patterned brass (and also my first attempt at this stirrup-style bail, which kicked my butt).
| The stirrup bail/tops on these earrings kicked my butt - I need more practice on that technique! |
Until next time!
Labels:
brass
,
classes
,
copper
,
Francesca Watson
,
Francesca Watson Designs
,
learning
,
metal
,
metal etching
,
metalwork
,
studio classes
,
techniques
Subscribe to:
Posts
(
Atom
)


