Showing posts with label textures. Show all posts

Sunday, February 22, 2015

Creating a Library of Textures and Forms

I hope you don't mind a little reprise of a former post... this one is about building a collection of forms and textures that can be used to make an endless variety of bead styles... enjoy!

Over the years I have been building a library of hand formed and hand carved texture plates, molds and stamps. I thought I would share a bit of my process and some of my latest designs...


Using Found Objects

Most of my stamps and texture plates are created by hand carving. But I sometimes create them from found objects found in nature or from among other sources.

Here is a collection from my beach combing finds in Jamaica several years ago, along a few other odds and ends. In the example at the bottom of the image below, I used a tiny pottery shard (shown in the upper right corner of the image), smoothed by the ocean, to create numerous flower and star fish designs on clay stamps.


Drawing and Carving Designs 

As someone who loves to draw, I especially like drawing my own designs directly onto clay. I make a lot of stamps using this carving technique. Some of the sources come from my journeys to the southwest and to the mounds of the midwest, in addition to studies with a Hopi teacher, other studies of native culture (primarily Ojibwe, Algonquin, and 6 nations), and my own sketch journals.


I will often make several impressions of my initial carved design, both "innies" and "outies"...


In the example below, I used a carved tree design, and a wood grain texture on the back from a texture plate (shown below in "Making Molds").


In the following example, I used a carved tree ring cookie bead to create a texture plate, then from that I made several stamps in various sizes.


Building Textures on Thrown Forms

To get a nice spiral base, I threw several forms on my pottery wheel, fired them, made reverse impressions, carved onto these, then over several more rounds of making impressions, carving, and firing, I evolved the spirals into multi-layered textures. These form the basis of my "Fossil Spiral Hoops" and other designs.


Making Molds

I often make molds of my own carved designs. Depending on what I am trying to achieve, in either silicon molding compound or porcelain. Porcelain gives me a more rigid mold - good for when I want a highly detailed and precise form.

The top part of the image below is also an example of a texture plate made into a mold. I form a textured slab from the plate, then carve a design on top of it.


Combining Textured and Sculpted Elements

The real fun happens when I get to combine several elements to create completely new designs. Here are a few examples...


Making Blank Forms

I sometimes make "clay blanks". Then I make molds and later add texture to them. This is a simple process of paddling,  pulling and smoothing clay.


Here are a few examples of added texture and sculpted details to clay blank forms to create my signature leaf and feather styles. I also made molds of some of the resulting textured / sculpted forms.


Building a Library

Though I haven't counted them, I probably have over a hundred hand formed / carved texture plates, stamps and molds, all of which reflect my own unique style. You can build your own library that reflects YOUR style. It does take time to develop, but start with simple impressions from found objects, then move own to layering and building complex forms of your own invention. I think you will find it a very rewarding experience.


Finished Beads and Components

Finally, here is a brief tour of a few beads and components made from the above techniques. Some of these are available in my shop at Starry Road Studio.


© 2014, Karen Totten. All rights reserved. All work in this post is copyright protected. 

Sunday, January 26, 2014

Table Cloth Texture and more!

It's been awhile since I've done a texture post and I have some fun new textures to share!

My recent surprise find was discovered when I went looking for a vinyl table cloth to put over our dining room table that I've recently oozed out on to.
 (You all know what I'm talking about right? When you just bring a few things to work on out of the studio, just temporarily and they never make it back in to the studio! I refer to that as oozing!)
 I'm using good sized teflon work surfaces but I felt better covering the whole table as well so there was no way I could ruin it. I found what I was looking for and I also found this awesome Lace looking vinyl cloth that I snatched up in a flash.


As you can see it's quite pretty with lots of leaves and swirly shapes and when I opened it up I was in heaven!! I couldn't wait to start rolling clay on to it.
I started to cut pieces out and found for a vinyl tablecloth it was very fragile.
It started ripping all over so I tried backing it with clear self adhesive backing.
I found that wasn't sticky enough so I tried packing tape which so far is much better.
I may end up changing to duct tape.

Here are some of my favorites!

https://www.etsy.com/listing/177151384/hand-made-copper-goddess-component-1?ref=listing-shop-header-3
Goddess

I think this one might be my absolute favorite, It reminds me of a Goddess!
Love the shape and the texture is so fine and intricate.

https://www.etsy.com/listing/177087073/copper-wagon-wheel-discs-1-pair-for?ref=shop_home_active_14
Wagon Wheels

These I call Wagon Wheels, can never have too many Discs!


Leaves

You also can't have too many Leaves!!
Since the table cloth itself is pretty fragile I've started to make 2 part molds of them as well.
It gives them a slightly different look that I really like and they will last forever so I can put away the table cloth pieces to protect them.

There are lots more textures from the Table cloth but I've played with
 scratch foam. <--- link to original scratch foam post!
Here are a couple of the newest textures I've made.

Hearts

Adore these little hearts. I poked a needle tool all the way through and it gives a very distinct look.
A much clearer dot than if you just use a stylus on the surface.
I'm going to use this technique more in the future.

https://www.etsy.com/shop/KristiBowmanDesign/search?search_query=fish&order=date_desc&view_type=gallery&ref=shop_search
Fish

Here are some little fishies, simple but cute!

This last one is a very random texture I created with 2 part mold and some sticks.


Striped Oak Leaves

I like the little stripes that resulted in this.

I know I'm going to be asked what kind of 2 part mold I use, I've been using the Amazing Mold Putty for years and I love it. I always love the results.

The Scratch Foam comes from DickBlick.com
I'm sure there are other sources as well but that's where I got mine.

Some of these components are already listed in my Etsy shop and I hope to have more of them listed soon.

I hope you've enjoyed my texture tour, I'd love to know what you think!


Kristi

Friday, January 11, 2013

Freeform Friday - Organic

... from Merriam Webster:  Organic 3 : of, relating to, or derived from living organisms...


...from Albert Einstein: "Look deep into nature and then you will understand everything better. "

Today's post is inspired by nature, and organic texture. I am focussing on texture this month; my friend Cooky Schock and I are doing a collaborative year long exchange on our shared blog at Coast 2 Coast Creative. And natural textures are my absolute favorite. Mother Nature was truly an  inspired artist when she created marvels like sea urchins, tree bark, and seed pods! Oh seed pods... 
Eucalyptus pods from San Diego.
I use these frequently, one of my fav motifs. And such different designs, such diversity! They remind me of Medieval quatrefoils. 
Ocean and sea themed found objects in my studio. 
Plant and pod pieces gathered in my studio.
SO for this Freeform Friday I decided to make some molds. Positive and negative; and share some of my organic inspirations. These type of elements have been used to make impressions since early man was texturing clay pots. (Makes the pots less slippery when wet...) No one can fuss about copying, since we are all inspired by similar items. You can't copyright a peach pit! The trick is using them in your own creative way...
Polymer texture plates pulled from the original objects. When cured these can be texture press plates as is - a "negative" of the original. I will use them in both earthenware clay and polymer.
 L to R: peach pit, acorn cap, star anise, magnolia pod, poppy pod.

Ocean pieces and their "negative" polymer pieces. The sea urchin had to be taped back together for the picture...

When I make molds of my hand carved ceramic pieces, I cast them in plaster. That process ruins the original, as it is forcibly taken from the mold when set. For more fragile objects I have started using various brands of RTV. This "room temperature vulcanizing" mold material is so fabulous! ( I have used Micro Mark's and Alley Goop) Simply mix equal parts, press, set aside. Fifteen minutes or so - there you are! I cast my cured polymer pieces to have a flexible version of my new texture vocabulary. 
With the brain coral and seed pod shown above - I used the RTV on the polymer "negative" - resulting in a RTV "positive" that replicated the item's direct texture. Pressed in design? Raised up design? I can do either... And for one more positive image... I used black polymer to make positive stamps from these three RTV molds. The ideas I am having of that star anise pod! ( far right) pressed into clay, glaze pooling in the design... yummy. And poppy pod earrings? Sweet!


Many of my fellow artists at AJE are also inspired by organic textures. Leaves, sea urchins, shells... in porcelain, stoneware, bronze and copper... Feel free to browse! 
L to R: Kristi BowmanLesley Watt, Karen Totten, Diana Ptaszynski, Kristi, Lesley, Diana.

Until next time...
Jenny
www.jdaviesreazor.com

Monday, November 5, 2012

Scratch Foam Original Textures

This scratch foam has been sitting in my studio waiting for me to play for a long time.
I've done some random patterns with it in the past but decided I wanted to do some more structured pieces.
I found it quite difficult to get good photos but I think you'll get the idea.


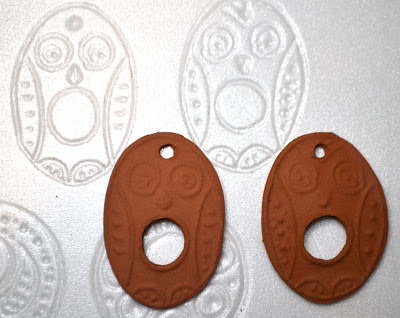
I used cutters to start the form of each piece and filled them in by drawing shapes and patterns
 with a set of assorted stylus.


Once the textures are complete I roll the Metal Clay directly on to them and then cut the shapes out.


Owl Toggles, oh ya!!!


Today I'll be cleaning all these pieces hoping to get them fired today or overnight.
I like the look so far and as always I'm excited to get them fired.

I got the scratch foam from Blick.com

Here are the

Kristi