Showing posts with label studio cleanup. Show all posts

Wednesday, September 14, 2016

When Your Muse Takes an Extended Vacation without your Permission

Big plans. That's what I had for the year. Except I've spent a good chunk of the year stuck. As in, my muse went on vacation without turning in a vacation request or bothering to return.  Except it's been worse than that. In the past, when I couldn't torch my way out of a wet paper bag, I could switch gears for a while: wire work, chainmaille, knitting, or SOMETHING. My hands were always busy while watching tv, in the car, etc. However, soon after the dawn of 2016, I lost the desire to do anything creative. I didn't have the drive to keep my hands busy, which is completely outside the norm. I was (still am) taking a yearlong online class in mixed media and didn't feel like trying any of the new techniques because once I got everything assembled, it was too much bother to actually MAKE something. 

This was all so far outside my norm, and I almost didn't even care that it was happening. Until I did. And then I knew I needed to make some changes. 

Maybe you have experienced something similar? The following are some of the steps I've taken to try to lure my muse home. 

"Art" journaling

Ok...there is absolutely nothing artistic or even mildly appealing for what I'm labeling as art journaling. However, I'm not exactly sure what one calls this...thing...I'm doing. Nearly one year ago I explained my planning and organization system, which includes a bullet journal. I still use this as my go to for to do lists, planning, tracking, and more. Over the summer I decided to start journaling in it too, even though I hate to journal. It's a super simple basic journaling. It may be a couple sentences, a word, or even a couple pages. It is whatever I need it to be so I don't forget every single thing that happens in my life, but also so it is a manageable task to accomplish each day. However, it's blah. And the daily calendar and to do lists are blah. Around the same time I was doing some reading about how important it is to just play without expectation and keep a super basic art supply in a location where you will journal and paint or draw. 

As you can probably guess by now, if something isn't easily accessible, I lose interest quickly. So I decided to accomplish two tasks and use the bullet journal as my "art" journal too. So now I use a waterproof Sakura Pigma Micron 05 marker to do all my writing. I keep a travel set of Winsor Newton watercolors and a couple water brushes pre-filled with water on my nightstand so it's easy to access last thing at night or first thing in the morning. 


Just so you understand, there is no thought involved. I pick a color that appeals to me and just start making marks. I have had zero contact with watercolor paints since I was in elementary school, so I mostly play with the colors and how they run together, intensity of color, etc. It isn't pretty. It doesn't make sense (usually). I just let go. If I were to try to sketch in this journal rather than just mess with color, I would feel too much pressure. This process I've adapted requires exactly 0% pressure on myself to make it look good. And I also don't worry whether all the words can be read afterwards. The fact is, my handwriting is atrocious anyway. 


Finish WIPs


There are so many unfinished projects in several different media laying around my studio and home. Sometimes I feel guilt about starting something new when I have so many others to finish. So I've started making my way through them. Interestingly I've discovered I love to do bead embroidery until it's time to finish the project. Then it just gets too tedious for words. This may explain why I finally just stopped doing bead embroidery altogether...I had about 6 projects in different stages of completion. 

For example, here's a cab by Caroline Dewison that I finished everything but a way to hang it as a pendant. It's gorgeous and I love it so much I don't know if I could sell it. However, until about two weeks ago, it was a very pretty dust collector because there was no way to wear it. 


This was the first WIP I tackled in an effort to restart my creativity. As you can see below, I created this copper bail contraption that I sewed to the back of the cab, and will attach to a weathered brown leather cord. 


The next project I decided to tackle is this gorgeous ammonite cab by Lesley Watt. Below you can see what it looked like January 31st when I took a photo of it for the Use Your Stash challenge. It continued to look like this until September 5th. 


I worked on several unfinished projects over the Labor Day weekend, and the ammonite now looks like the photo below. I didn't have additional beads or ultrasuede with me to progress any further, but I'm still happy with getting closer to being done. 


I think I've decided to add a row of the Czech glass beads in the photo below, then finish it off. 


I could show SO MANY unfinished projects, but thought I'd show this gorgeous donut by Kristie Roeder of Artisan Clay. I had this thing glued onto the stiff stuff fabric for MONTHS and never added a single bead to it until Labor Day weekend. I literally forced myself to sit and bead even though I didn't feel like it. However, as I worked, I could feel the excitement for the craft coming back. 


As I mentioned previously, I love to knit. It is definitely something I do in waves, often knitting obsessively for a while, then not knitting for months. Again, I have a ridiculous number of unfinished projects that feel like they are weighing me down. For example, the wrap in the photo below? I've picked it up off and on for the last SIX YEARS!!!! I finally finished it except for adding the buttons. To be fair, I had planned on using different Lisa Peters handmade buttons, but they didn't work. So I'm considering these instead, also made by Lisa Peters. 


These socks? They were completely finished except for grafting the toe of one sock and weaving in the ends. Why do I procrastinate the final details of a project? I drive myself nuts! And I also keep myself from the enjoyable process of digging into the next project. 
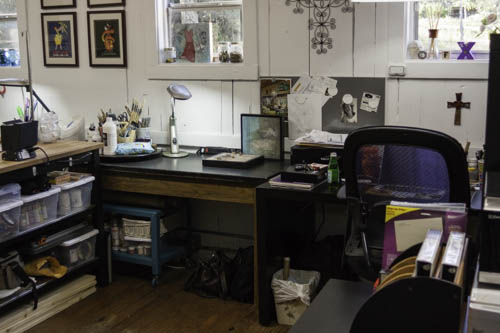
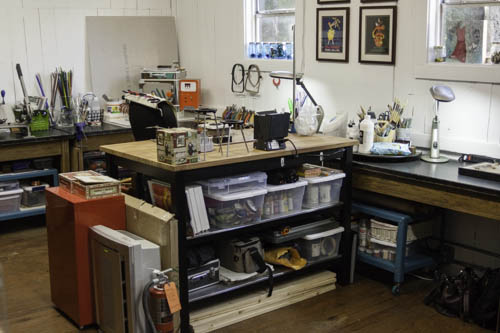
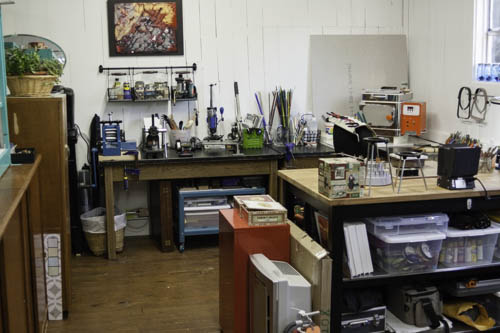
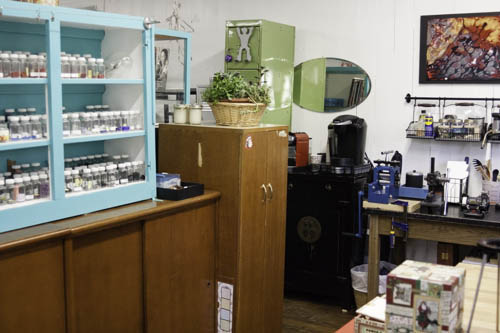
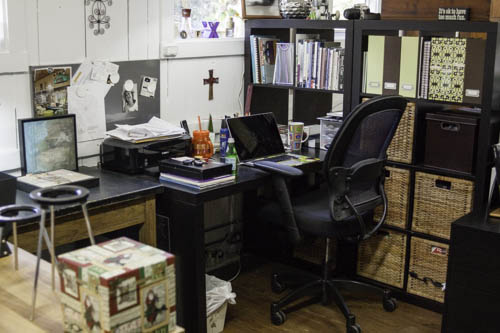
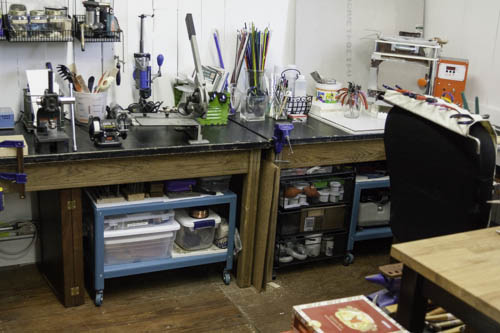
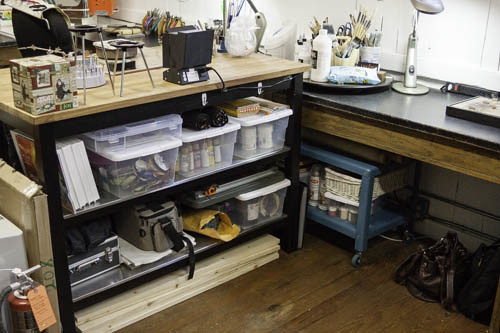
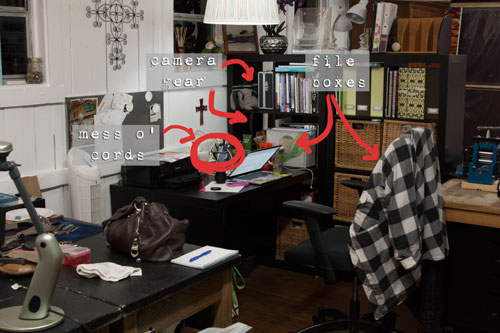
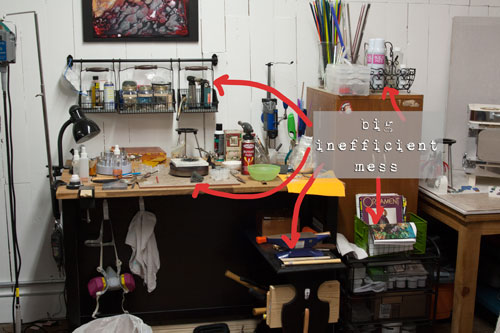
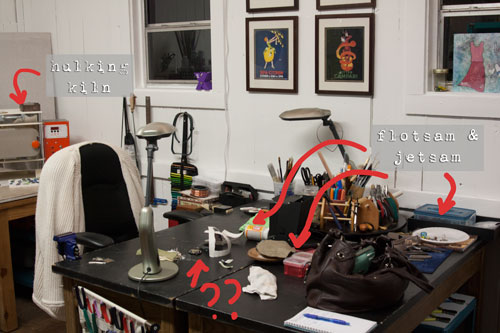
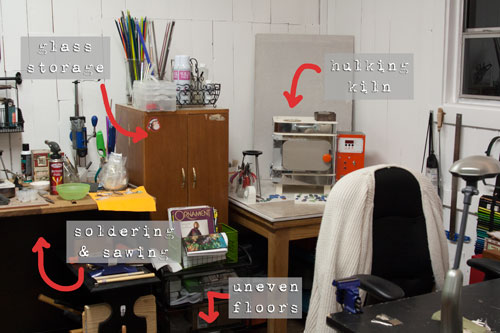


A Clean Studio

I totally should have taken a before photo. My jewelry making area was piled high with tools, supplies, findings, mangled wire, garbage, new art beads, etc. just a few days ago. When I find myself avoiding the studio because the idea of working in the mess is too much for me to bear, it's time to clean. Now you can see counter space AND the beading board thing that I mostly use to store small bits and pieces. Whenever there is a clear space, I want to make a creative mess again. 


Keep a Visual Record


This one might be a bit outside the box. Let's say you have 1 hour to create 5 days a week. That's it. Take a photo of what you made that day. Post it to Instagram or Facebook or wherever you want to share it. At the end of a week, a month, a year, you can see how much you have actually accomplished with what felt like very little time available. 

About a year ago I discovered Chatbooks, which is a super easy app to use. Basically you download it to your phone and it uploads photos from whichever source you choose, like your phone, Instagram, or Facebook. You select which photos, pay, then they print it. I've ordered two of these books so far and they are fantastic! 


I started the beginning of 2016 with the intention of doing a single photo each day. Except eh, I decided to break that rule because it's my Instagram account and my favorite method of journaling. Each chatbook can have up to 366 images. Because there are some days I post more than one photo to Instagram, I had the first half of 2016 printed as soon as June was over. I keep it out in the living room and just about everyone who comes over looks through it. 


Seeing my photos printed in this album got me thinking about how having a hard copy visual record of one's work could provide motivation and inspiration for those days when it feels like drudgery. 


Community

Do not underestimate the power of spending time with your people. If you haven't read Lesley's blog post about art camp yet, do yourself a favor and read it and also the one she wrote last year about her visit. I know when I am able to spend time with creative people, I leave with more energy and ideas and passion than before. I haven't taken the time to benefit from community in quite a while and that is next on my creativity reboot list.

What are some of your favorite tricks for pulling yourself out of a creative slump? 


Tuesday, May 20, 2014

At last, my love has come along!


Well, OK, maybe that's overstating it a little, but I finished rearranging my working space and I really did feel like breaking out in song at the end. I love it that much.


You may remember that in a recent post, I explained how my space wasn't really working and asked for suggestions about how to make it better. Thanks to everyone who weighed in - several of you in Facebook chats, asking great questions! I spent three full days moving furniture, sorting and tossing, and rearranging all my storage, and I could not be happier about how it turned out. There are a few small things that still need to be done, most of which require a trip to Home Depot or Lowes, but it looks good enough that I can give you a quick tour.

Studio Redo-1
At the entrance to my area. The chair is at my desk, and the table to the left is a new addition, where I'll be able to do mixed media work. To the left of the mixed media center, you can see the back side of my soldering station, which I moved to the middle of that long wall - and now I have access to all that great storage!

Studio Redo-2
Better view of the back side of the soldering station. I have my HEPA air filtration unit on the end (the silver box behind the fire extinguisher) and a fume extractor on top. Need to take good care of my lungs! The shelves underneath and on the cart (under the table) contain mixed media supplies - paints, paper, ephemera.

Studio Redo-3
Behind the soldering station is my metals area. That table under the painting is another new addition, which will hold all my large equipment. (It used to be behind my desk area, which was a serious pain in the butt to get to.)

Studio Redo-4
Continuing around the area, you can see the coffee station that Gail and I share (essential to the creative flow, I tell you!). I put that taller cabinet, which contains a lot of my glass, next to my bead storage and sliding door storage - I didn't dare move those!

Studio Redo-5
Standing in front of the glass storage, looking back at the desk area.

Studio Redo-6
And a little closer. It feels much roomier, I think because I removed the equipment table from behind my chair.

Studio Redo-7
My metals area. Sigh! I just love it - everything is within reach, and yet there's tons of room to lay things out. Underneath the soldering station, on the metal's side of things, I put up hooks and hung all my wire coils up where I could get to them easily. And you can see that the kiln is still there, but the huge table it was on is gone - this is much more accessible for enameling and small glass work.

Studio Redo-8
A better look at the equipment table. You can see that the rolling mill (left) has been bolted to a piece of wood which is clamped to the table. I have to do that with the arbor mill and the bench shear, but need to get the wood first.
Studio Redo-9
I have (from left to right) metals storage, enamels storage, and glass storage underneath this run of tables - it's all on casters and pulls out for easy access. Hanging over the back of my metals chair, you can see my bench apron - it's going to be mounted to the table under the vise, so it will cover the enamels and glass storage, but it swings out for easy access to whatever is behind it. It will keep all my hammers close at hand. (I broke the hinge trying to install it and need to get a replacement. Ugh.)
Studio Redo-10
Another look at all the awesome storage under the soldering station, on the mixed media/office side of things. I am so happy to have a dedicated space to work on non-jewelry things!

So there you have it: a completely reworked space that actually has more working surface area than when I started. I literally giggled when I took these pictures - it makes me that happy. Of course, it won't stay this clean for long. I have a zillion deadlines that slid last week while I was working on this so I have to buckle down and get to work... STAT!

I hope this studio tour inspires you to take a second look at your studio. How can you optimize the space and storage you have? Is there some one storage-related investment you can make now that would be a game-changer? (For me, it was moving that soldering station and adding two more tables around the perimeter of the area.) What would make your workflow better and your space more enjoyable to work in? What's stopping you from taking that step?

Looking forward to hearing about what changes you make in your spaces! 

Until next time -


Tuesday, April 22, 2014

Dysfunctional Studio Tour

I've been "living" in my new Roadhouse Arts studio space for almost four months now, and while there's a lot that I really love about it, there are also some things that aren't working for me.

My little admin area needs to be reworked. I spent a huge chunk of the day yesterday working through the paperwork that had accumulated, both for my own business and the Roadhouse side of things, and everything is caught up. While that makes me happy, I think the backlog started because the workflow wasn't well-organized to begin with.

Admin-Area

I have two file boxes now, and the segregation of things will help. The smaller one contains the stuff I get into more frequently; the larger one is longer-term. But I still don't have the right space to stash either of them - my camera bag and equipment is taking up two entire cubbies in my wall unit. And I don't like the nest of cables and power strips on top of the desk. I just ordered this remote switch and I'm hoping it will solve the problem while still allowing me to turn lights on and off without having to crawl under my desk.

My metals and fabrication area would benefit from a little tweaking. I have an Ikea kitchen island set up for sawing and soldering, so I can see things close up without having to bend over or wear my magnifiers.  The problem is that most of the great storage the unit includes (two metal shelves) is pushed up against the wall so I can't get to it.

Soldering

I also have two old science tables pushed back-to-back that are supposed to be for layout, design and fabrication work, but as you can see from the photo, they wind up being a collection area for all manner of flotsam and jetsam that have little to do with current projects.

Working-Table

I had convinced myself that rolling my chair between the two stations would be fine, but the truth is that the floors in this old building are so unlevel that "rolling" is an exercise in frustration. This also makes pulling the island unit out to get at the long-term storage a serious pain in the neck, because everything (and I mean every.single.thing) has to be shimmed to within an inch of its life in order to avoid punches, beads, wire and any other curved or roll-ey thing from just making a run for it the moment it gets set down.

Glass-and-Kiln

And then there's my kiln and glass area, which just sort of squat in the corner taking up a bunch of room. I don't think it's an efficient use of space, but I'm kind of stuck because that's where I had the dedicated plug installed for the kiln. And I don't think I'm making the best use of the space along the one main wall.

I'm considering a pretty significant reorganization that includes separating the two science tables and using one to create an "L" shape with the island sticking out into the space. This would put the storage shelves on the island facing my admin area, where I could use the extra storage. The other science table would go where the island was and be primarily for mixed media work. (That's a subject for another post. "Living" with mixed media artists is starting to mess with my head, I tell you!!) I could also use it for larger project layouts, when I have multiple or complex pieces going.

So... any suggestions? I'm really open to any and everything - the space just isn't working well, and it's not because I don't have enough to work with. Let me know what you think and I'll update you in a future post.

Until next time -


Saturday, April 12, 2014

A Vacation from Bead Sculpting

Okay, that's it—I'm going on a vacation!
Are you excited?! Me too!!

Okay, yeah… that was a bit of an exaggeration.
You didn't actually believe me, did you?

…now I've lost your trust forever…


Well, it wasn't a complete lie—I've been on a mini vacation of sorts—a vacation from bead sculpting. Due to poor planning and a head full of beads, I forgot I was nearly out of my critter-making polymer clay until as I finished up my latest pre-ordered batch and was prepping to start the new batch I suddenly realized I'd run out completely! That was a big change of plans!

Yes, it was a working vacation! Believe it or not I actually finished my recent studio cleanup and bead organizing—years of mixed up stuff has been sorted into little zip baggies and I'm going to be filling my new bead organizers tomorrow.


I wish I had a whole room lined with these organizers, but then I would need more beads to fill them. :-)

Sorting through wire trimmings and mixed up seed bead colors was more than slightly boring after several hours, so in between that (always multi-tasking!) I got busy clearing out my hoarded polymer clay beads. I had been keeping way too much for myself! Some of these are beads back from my early bead making days, some are new, and many were unfinished beads that for one reason or another had been laid aside. In the end, I was left with a only few favorite things for myself and the rest was ready for new homes.

Next I spent the better part of two days arranging them into sets (that was so much fun!), photographing, and finally listing them in my Etsy shop.
Right now all new sets are 20% off! Take a peek at what's up for grabs here.


Still no polymer had arrived in my mailbox, so painting was in order next…


And more painting! These guys are getting primed for color.


With all my jewelry making beads and polymer beads organized, I started to work on straightening up my bead making supplies…

You never know what you'll find during a studio cleanup! These are tiny baked bits of polymer from my carved and faceted beads.  Still not sure what I want to do with them, but they were just too pretty to throw out.

Lastly, I unearthed my carved molds and stamps. I'm definitely going to be using some of these again in the near future!


My new polymer order should be here later today or Monday and I'll be right back at sculpting beads again. It was so nice and invigorating to take this mini vacation—I always feel better when things are in their right place and now new ideas are starting to grow in my mind for my next creations.

I hope you've also had a creative last 2 weeks! What new creative things are happening for you? Do share!

http://www.treewingsstudio.com/

Saturday, March 15, 2014

Running Out of Space

I don't know about you, but I constantly find myself running out of workspace. If I'm working up against a deadline or with limited time, cleaning up is last on my list and I go from one table to the next, until all work surfaces have been covered. Being an organized person goes out the window and if I'm not careful I find myself working on the floor! I think you all know about that little open workspace that eventually closes down to about a 3 inch by 3 inch section—time to clean up!

Or pull out the little old rickety tv tray and keep right on working!

Yes, that's me right now! I'm loving this little table—it has become my little studio away from the (messy) studio. I've done almost everything on it so far, except leather burning, as I don't want to burn the house down if it tips over.


Notice the empty organizers on my jewelry table—at the moment they're serving no purpose other than taking up table space. They're brand new and intended to help me organize those boxes of stuff lying on the floor. Right now I'm thinking it would be so much easier to fill them with new beads that arrive already separated in their own baggies. ;-)

Tea dyed fabrics, molds, paint swatches, leather feathers… and this is actually a tiny bit neater than normal. I know I'm in trouble when I start stacking things on top of my pasta machine (top left)!

This weekend that will end and I'll finally clean up (and maybe possibly vacuum too) and hopefully be ready to start fresh on Monday (or Tuesday). I don't like to be distracted with cleanup when I'm working, but it does eventually get to a point where when I look around all the stuff lying around in various stages of completion really gets on my nerves. Not to mention all the paint dust and polymer crumbs, and little bits of wire that are all over the place.

Always after a good cleaning, I feel ready to take on new things. I feel inspired and invigorated… if that makes any sense. No? I'm not sure it does to me either, but hey, if it works… I say go for it!


So, what about you? Do you like a pristine work area, or are messes a minor issue to you? Do you love reorganizing or is it your worst enemy? Do you have a simple work area that's easy to tidy or does cleanup mean cleaning an entire room or studio for you? Do share!


http://www.treewingsstudio.com/


Wednesday, October 16, 2013

The Perfect Organizational Tool, Plus a Tutorial to make it more Attractive

Today we have a special treat for you! Tracee Dock recently emailed me (Jen Cameron) about a cool revolving organizational bin she found, then decorated. I asked her if she would be willing to share it with our AJE readers. As you can see, she agreed to. Enjoy!

----------------------------------------------

Last week I met with local Kansas City area bead artists and designers, Tanya Goodwin and Sharyl MacMillian Nelson for brunch to share creations. Then we were off to a crafty girl's favorite place to shop: Harbor Freight and Tool!  I did not get out of there without a couple of purchases AND amongst them a new organizational item to share.  Sharyl kindly lent me her 25% off coupon for this nifty organizational spinner.  

Here's a picture of the spinning organizer in the box.  $19.99 before the coupon.


Here's the pieces and parts!  


To line the trays, I took some 12" scrap book paper...paper clipped four pieces together and traced the bottom of one of the trays and cut just inside the lines for a perfect fit! 


I have to admit I was temped to spray paint it, but there were a lot of black shiny pieces to prep and since I had the paper and it was going in my basement to hold clay cutters I resisted and besides....I was really excited to put it together.  I like projects like this!

Next the assembly and yes there were over 70 little nuts and bolts to fasten on the dividers, but it went fast once I got the rhythm and it was a great day to sit on the screen porch with a project.


So here's the finished project!  


I really can't believe I waited so long to come up with something this good to organize tools I use ALL the time.  It holds all my cutters...divided by shape with a couple of sections left to spare.


I can't help but think I'd like to have another one for my studio upstairs.  There are certainly lots of things up there that could use homes too, and I might just pick up a can of turquoise spray paint for the next one. I've also got some more great papers I'd love to use for another!


Find me on Etsy:


Ceramic Bead Artist

Tracee Dock /  The Classic Bead


---------------------------------------------


If you have something you think our audience would enjoy reading, please email me at jennifer.glassaddictions@gmail.com.