Showing posts with label DIY Jewelry. Show all posts

Thursday, March 27, 2014

WoolyWire Pendant Tutorial

I've been having fun playing with WoolyWire, a wonderful fiber and copper wire product that is handmade by Nellie Thomas of WoolyWire Etc.  Nellie hand dyes fibers and spins them onto solid copper wire.  WoolyWire can be bent and twisted, just as you would do with any 24 gauge wire, and it brings with it so many possibilities for adding color and texture to your jewelry designs.

A couple of weeks ago I got the idea to try braiding three colors of WoolyWire and then wrapping the wire around a large channel bead to create a pendant.  I'm in love with the result!
This pedant is easy to make and the results are stunning.  Here's how.

Materials:
3 packages of WoolyWire in a pleasing color combination (you won't need it all, don't worry)
1 large or medium channel pendant (available at WoolyWire Etc.)
2, 7-8 mm bicones in coordinating colors
1 decorative headpin with a 3 inch long wire, (mine is from Sue Beads)
23 inches of 1.5 mm leather cording in a coordinating color (mine is from Classic Elements)
2, 1.5 mm end caps (all my findings are from Shipwreck Beads)
1 lobster claw clasp
4, 7.25 mm Vintaj jump rings
GS Hypo Cement

Tools:
Flat nose or half round pliers
Round nose pliers
Wire cutters
A clipboard
Binder clip or "bulldog" clip
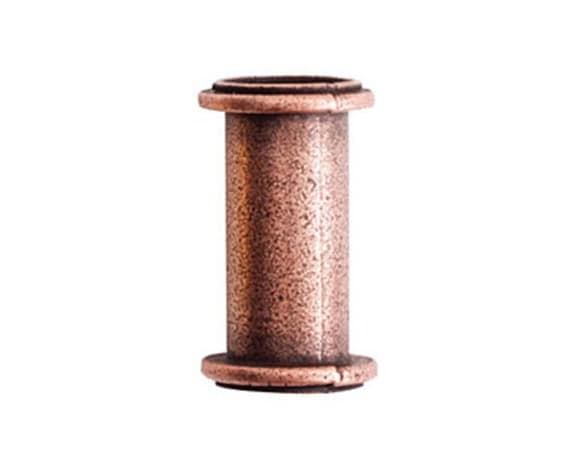
Large Channel Pendant

Directions:
1.  We are going to work with the full 3 foot lengths of the WoolyWire, so do not cut them yet.  Push the WoolyWire down about 1 inch on one of the wires, exposing the copper wire in the center.
 Bend the exposed copper wire at a right angle.
 
2. Fold a small portion of the other 2 wires down flat, so the wire end is not sticking up. (The picture below shows only one wire partially flattened.  You need to completely fold it over on both wires.)
 3.  Holding the three strands close together, wrap the exposed copper wire around all three strands, binding all 3 of them together.   Press the end of the copper wire down and tuck in, using the flat or half round pliers. I trimmed the extra fuzziness on the end, but that is a matter of personal preference.
4.  Place the three wires beneath the clip on the clipboard.  This will secure the wires while you are braiding.
 5.  Braid the wires, just as you would braid a child's hair.
6.  Stop braiding when you think you have enough braid to wrap around the channel pendant.  The length can be adjusted later, if needed.  Secure the loose ends with a binder clip.
 7.  Glue the the top ends of the WoolyWire just beneath the rim of the channel pendant. Set aside until the glue is dry. Unfortunately I don't have pictures for all of the steps, but the rest is really straight forward.

8.  Once the glue has dried, start winding the WoolyWire braid around the channel pendant.  You may like it wrapped loosely, or you may want to push the braid upward a bit so you can add a few extra wraps around the channel pendant. Adjust to your liking.  When you get to the bottom of the pendant, cut the WoolyWires about an inch or so longer than needed to wrap to the bottom of the pendant.  Push back the WoolyWire about one inch on one of the wires.  Fold over the other 2 wires, like you did on the top end of the braid.  Wrap the exposed copper wire around all three wires and glue the end of the braid at the bottom of the channel pendant.

9. Assembling the pendant:  Thread one bicone onto the headpin. Then add the channel pendant, fitting the open end neatly onto the top of the bicone.  Add another bicone on the top and make sure that both are seated firmly into the ends of the channel pendant.  The bicones serve to stabilize the pendant, by filling up the large holes on either side.  Using the wire from the headpin, create a double wrapped loop at the top of the pendant.  If you make a small loop, like I did, you can attach it to the leather cord with a jump ring.  If you make a larger loop, you can thread the pendant directly onto the leather cord.
10. After the pendant is threaded onto the leather cord, add a small drop of glue to one end of the leather and inside one of the end caps.  Place the leather end into the cap and hold in place till the glue sets. Repeat on the other side.

11.  Attach the lobster claw clasp to one end with a jump ring.  Make a short chain with the other 3 jumprings and attach them to the other end cap.  The clasp can be fastened to any of the 3 jumprings, making the length adjustable.

If you have questions about any of the steps, please feel free to ask.  I will be happy to answer your questions in the comments section.
Wear your WoolyWire necklace with pride!
Linda
Linda Landig Jewelry – ArtFire 
Linda Landig Jewelry – Etsy

Wednesday, December 11, 2013

Easy Earring Tutorial

I made these super easy earrings a few months ago and thought I would share how to make them.


Earrings using my headpins and Diana P (Suburban Girl) ceramic discs.

I adore these very rustic discs that Diana P makes (find some here and here, here and here.). After making these earrings, I bought a couple more pairs because I love them so much.

To make these, you will need:

-Glass headpins by moi (Jen Cameron) that look their best when viewed from the top down (some look better from the side). I have no headpins listed right now, but probably about 50 of them sitting in a box in my studio if you're interested.

-Ceramic Discs by Diana Ptaszynski (Suburban Girl Studio)

-Ear wires (I used Vintaj)

-plus basic pliers, hammer and bench block. Possibly wire cutters 


Earring tutorial #aje #artjewelryelements #glassaddictions #lampwork


Instructions:

Just a warning, it will take longer to read the directions than to make a single earring.

-If you are particular about length, measure about 3/4" to 1" length of wire from behind head. Otherwise, eyeball it. The length is determined by personal preference and also how far from the edge the hole of the disc is.


Measure twice bend once. #aje #artjewelryelements #lampwork #glassaddictions


-Bend wire at the length determined in the last step. Gently fold wire into a U with the disc at the bottom of the U and glass head on the short wire side in the front of the disc.


Earring tutorial #artjewelryelements #aje #lampwork #glassaddictions

-Bend the end of the wire containing the glass head and cross it over the other leg of the U. Decide where you would like the wrap would be. Grasp both legs with needle nose pliers and wrap the head around the other leg until it's facing the front again.


Earring tutorial #aje #artjewelryelements #glassaddictions #lampwork


-It should now look like this:

Earring tutorial

-Then you will make a loop to hang from the ear wire. Bend wire to one side.


Earring tutorial #aje #artjewelryelements #glassaddictions


-Make loop using round nose pliers.


Earring tutorial

-Once you've done that, you will make messy wraps above and below the glass head. This adds an interesting design element and locks the head into place.


Earring tutorial #aje #artjewelryelements #lampwork

-I hammered the loop holding the discs and the loop holding the ear wires for this pair.

-Repeat for the 2nd earring.

-Wear them. Or gift them, if you can stand to part with them...

Earrings
What do you think of the bark? It's my new photo prop. 

Have fun with this and show me what you make!

-Jen Cameron

Glass Addictions

Wednesday, December 12, 2012

Using Scrap Copper to Create your own Elements, a Tutorial

A girl needs to play sometimes, and I've spent a little bit of time this week using up scrap copper bits during my playtime.

If you use sheet metal in your designs, you may be like me and have a difficult time getting rid of it. If you're using precious metals, you can always send it in to places like Rio Grande for credit or money. But what about base metals like copper and brass? Don't throw it out, because you can do some really interesting things with it.

For example, I enameled scrap copper to accent the focal in the necklace I made for the Kalmbach bead soup party:

The good news about using scrap to play? If it turns out ugly or it gets messed up, there's nothing lost, except time. However, even time isn't wasted because it's a learning experience.

So let's start with this copper piece snippet. It came from a much larger sheet that I cut discs from. For this one I thought it might be fun to not cut a straight line to remove the holes from the rest of the sheet. Because I live life on the edge.

If you want your copper to have some texture, do it now. I did some hammering on my piece.

File all edges, corners, etc. you don't want sharp bits.

Next, anneal your piece of copper. I usually use my lampworking torch (a Mini CC) to anneal, but for this tutorial, I used a butane torch. My favorite is the Lenk 500 LPT. And yes, I have several varieties...about 5 or 6. It may or may not be excessive.

If this is your first time annealing copper, wear eye protection, tie hair back, make sure clothing is natural fiber (cotton) and doesn't flop around where it can get in the flame. Also, make sure you are working on and around fire proof surfaces, have a cup of water in a heat proof cup for quenching, and a pair of pliers to hold the metal.

You do not need to burn the crap out of the metal. Just heat it softly...the metal will change color.

Once your metal is annealed and quenched, use one of those multi-grit nail buffers to clean some of the fire scale off the piece.
Make a couple random folds. Using a chasing hammer, hammer along the fold. Unfold the metal. It will look like this:
Anneal the metal again, clean it, and make more folds.

Hammer the folds.

Unfold.

Repeat until you're happy with the results.

File any new sharp edges created by the folds.

You can also leave folds in place like in the final result below. And while torch-uring the metal is fun, now you get to start designing with the results. I'm thinking this one will make a great pendant and I will use some bronze wire (my new favorite wire...I LOVE that stuff) to trap the bead in the hole.
Here's another scrap copper pendant that will become a pendant.

This was a long strip of disc holes that I made into a cuff by folding it in half lengthwise then twisting the length of it then forming it onto a bracelet mandrel. I then enameled it in white and cobalt.

If you try this, please comment with a link to your results, or post it on the Art Jewelry Elements Facebook page.
Have a great week and hoping your holiday season is stress free.

-Jen Cameron

Glass Addictions