Sunday, December 7, 2014

Sharing Creativity – Inspiration Gift Exchange

The holidays are stressful times for all of us! Between all the parties and plans, food making and shopping, it's easy to loose your creative spirit.  I usually make at least some of the gifts every year, but I always have a hard time when I start thinking about what to make for my mom.

You might remember from my intro post that my mom is a fiber artist. She's very creative and into many different realms of creating with fiber - from processing and dying the raw fiber, spinning yarn, and weaving or knitting the yarn into finished goods. What I struggle with is that she doesn't wear jewelry! And at this point, I've beaded enough cutesy household stuff for her too, like the beadwork on this fireplace match basket.
Several years ago, she expressed the same sentiment to me - how many knitted hats does one need, after all. So we came up with a new way to approach the gifts we give to each other. Instead of sending a specific gift to the other person, we send items to inspire the other person's creativity.

 I'm pretty sure it all started when Mom mentioned to me that she had been making felt ball pin cushions to sell. Well, I wanted some felt balls! I remember making them as a child – wadding different colors of wool into a pair of pantyhose, tying knots between sections, and running them through a hot wash cycle. An easy fun fiber project for bored kids, they use up a lot of wool that isn't really yarn quality, and they don't break windows when thrown indoors. She makes them slightly differently now, to make larger more compacted balls, then cuts them in half for pin cushion use. But not every blob of wool felts properly. I mentioned that I might be able to use balls that weren't as dense in the middle for some creative project...and the exchange began.

Elementia was the first sculpture I made with a felt ball...well, this one was more like a felt rock! Flat on one side, and much larger than the other balls, I was very inspired to make something out of this hunk of wool. I sculpted a large polymer clay face, glued it down, and basically just used the felt ball as a base for large scale bead embroidery. The interior of some of these balls may be too loose to cut into, but the outside is perfect for stitching on.

Here is another example – my representation of Proginoskes from A Wind in the Door by Madeline L'Engle. Progo is a cherubim, so not only did I take inspiration from the description of the character in the book...but I also researched biblical and historical references to cherubim, and tried to incorporate all the different themes. Because the ball was round on the bottom this time, I hammered a few nails through a piece of wood in a grouping of three, and speared the ball to keep it in place. This also gave me a base to decorate.

I have two more felt ball sculptures in the works right now. One is going to be a circus monkey – the face is a molded fabric vintage doll mask. This is going to be my first attempt at joining multiple balls together...I suspect there will be some hot glue involved to hold everything in place for stitching. Occasionally the wool doesn't felt properly on the outside, and the ball ends up with pockets or strange crevices. You can see I've started a bit of beading on what will eventually be a marsupial animal sculpture. I've always been fascinated by marsupials of any kind, so creating my own will be fun.

She has also sent me weaving samples, flat pieces of pre-felt, and other fun things, that stretch my brain into the realm of mixed media beading.  I have an idea to use one of these woven samples as the flap on a leather bag, but haven't gone beyond the idea phase yet.  Still, anything that gets the brain scheming is what's important in our inspiration exchanges.

So what does a beader send a fiber artist for inspiration? Sometimes its as simple as a selection of artisan or antique buttons. Sometimes I make buttons or other large toggle style closures. This button is stitched around a polymer clay shank button that I made, in an attempt to make a marigold.

One year Mom mentioned that she had been looking through my doll making books, and that she might want to make an art doll with some of her handwoven fabric. So I made this polymer clay face that she can use as a mask on a cloth body.

This year Mom has a brand new, digitally programmed loom, and she's going to experiment with weaving iridescent fabric. Well, I am obsessed with iridescence in anything, so I am pulling some things from my stash that I think might inspire her. I went through my fabric, and cut swatches of all the iridescent fabrics I had. What makes a fabric look iridescent is when the warp and weft threads are different colors. If you look at the edges of the fabric swatches above, you will see that the color of the threads on each edge are different. I hope she can use these fabrics as palette inspiration!

I am also going to go through my beads and buttons, and send her a small stash of things that have an aurora borealis, iris, or otherwise multicolored finish. Perhaps these will inspire her as closures or embellishments for her finished pieces.

If you have creative people in your life, this type of gift exchange might work for you! Not only is it much less stressful than finding a traditional gift, but it is so rewarding to be able to contribute to someone's creative process. I love to feel that, even 2,300+ miles apart, I can be a part of Mom's creativity. And even if the items that we send to each other never get used in a finished piece, they still contribute to the process. Receiving and working with Mom's fiber pieces has pushed me outside of my comfort zone, and that just causes my artistry to grow – allowing me to see new materials differently, and use them in ways that other beaders might not have thought of. I hope this post gives you all some ideas for working with the other creative people in your lives!

Lindsay


Saturday, December 6, 2014

Reposting an old favorite… Easy Winter Tree Polymer Cane Tutorial

Hello again! And welcome back to another re-run post… yet again. I apologize to all you wonderful readers for not having something totally new and exciting to share with you today. I was working long hours to complete a big wholesale order (super exciting times!) and have just now recovered from my coffee overdose (who really needs sleep, right?!) and at the moment, I'm in the midst of the Christmas making craziness, creating as many beads as I possibly can (plus a few extras ;-) before I take my year-end break. So, for today, I hope you'll enjoy this old favorite post of mine…

Winter sunsets are my absolute favorite! There's something so magical about the vivid colors of the sky and clouds traced by the stark black of the leafless trees… it's like nature's own stained glass!


I don't do a whole lot of caning these days, but for today's post I wanted to share one of my own cane designs that I created a few years back inspired by the winter trees.

It starts with a log of translucent clay—you can of course use any color. I trim the ends so it stands straight.

Next I make an off center cut all the way through the log and cover one side with a sheet of black clay. And then I put the log back together—that forms the main part of the tree branch.

To make the twigs on the branch, I make several more cuts through the translucent log, each time inserting a sheet of black clay and putting it back together before the next cut.

Once I get all the twigs I want, I reduce the cane by rolling and stretching.

Here's the branch reduced.

Then I cut my reduced branch cane into six equal lengths.

And then using the black line from the base of the branch as a guide, I give each length a tear drop shape.

I place all the branches side by side and press them together, making sure that the base of each branch is against the table and straight. I then cut that arrangement in half.

The two halves side by side—it's starting to look like a tree!

To the base of each half I add three strips of translucent clay—they will outline the trunk.

I make the trunk with one sheet of black running to the base of the top branches and then on either side of that I add another sheet about 2/3rds of the height to give it some taper.

I add a bit more translucent clay to the base of the trunk. And from there I just pinch and stretch the cane until I get it reduced to the size I want.

The finished cane! I hope you'll give it a try!

And one last thing… when I first posted this tutorial, you all had asked me to show what I made with it… so, today I went digging through my photo archives… and I found it!

"Flight of Autumn"

No beads with this cane, believe it or not! This was back in 2009 when I was still in my decor making phase. This little box was one of my very first polymer decor pieces—I'll admit it didn't quite turn out as I had originally imagined it, but it is fun to look back on the early days and see how far I've come! And looking back now, I really want to revisit this design with my beads!

I hope you enjoyed today's re-run post!

Rebekah Payne

Friday, December 5, 2014

White Snow On Green Boughs

One of the prettiest sights of winter is fresh fallen snow piling up on boughs of evergreens.  Walking through the woods behind our house, in the hush of snowy afternoon, is about as magical as it gets.
 As I was thinking about snowy evergreens last night, I was inspired to highlight some snowy white and woodsy green jewelry and art beads for today's post. I hope the following artisan pieces will leave you feeling inspired, too.

First up are these wonderful polymer clay headpins from Melismatic. The back side shown in the upper right reminds me of the needles on a fir tree.  I love designing with decorative headpins. 
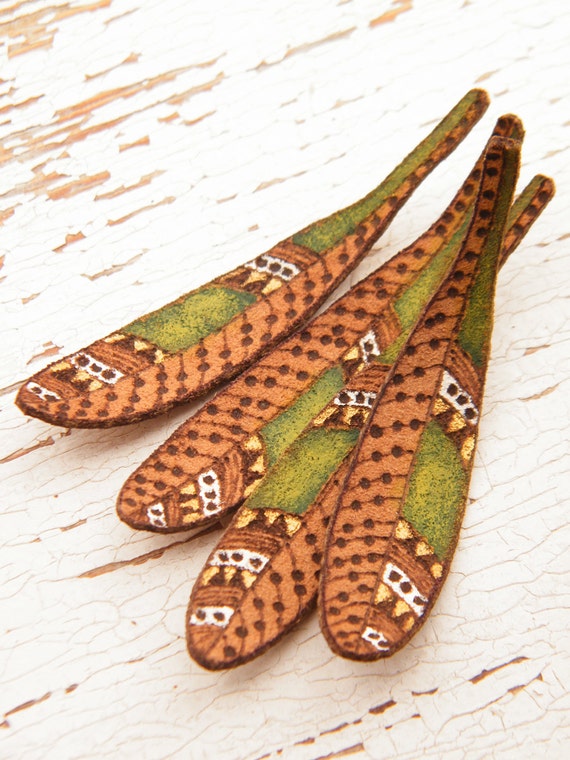
This fabulous pair of hand painted leather feathers, by Tree Wings Studio, brings to mind great winged raptors gliding on wind currents above the forest.
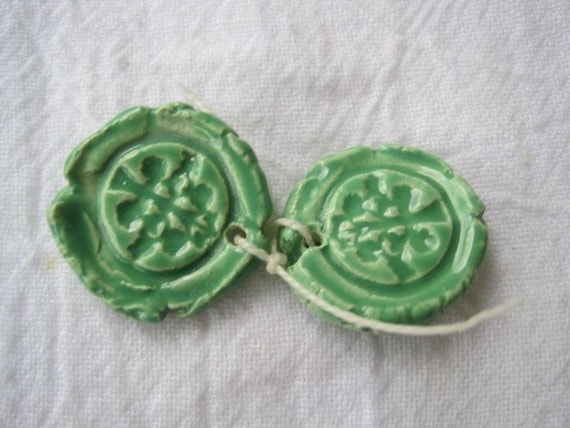
Continuing the woodsy them, we have trees from Jenny Davies-Reazor, but not just any trees, these ceramic charms picture the Tree of Life.  Love this shade of green!
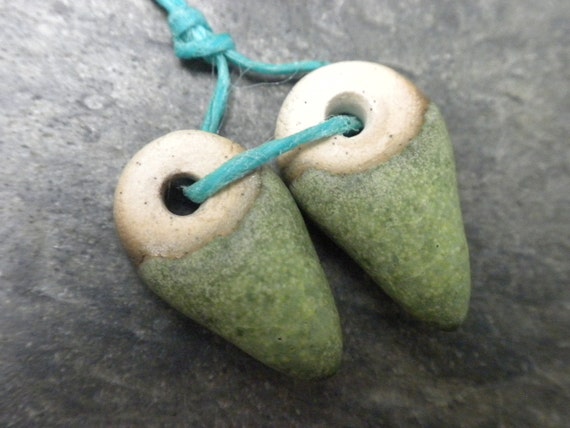
These uniquely shaped rustic drops from Slate Studios Supply pick up the green and white theme with style!
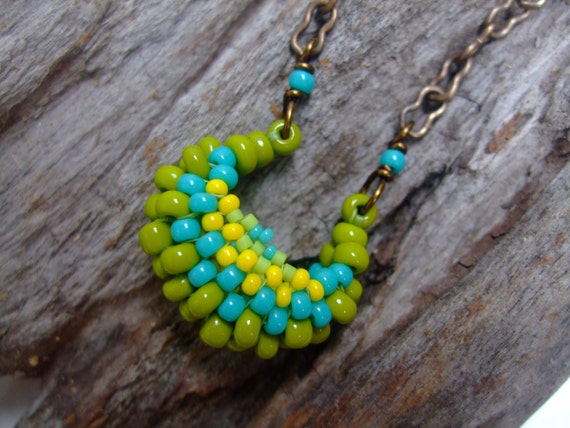
Our newest AJE team member, Lindsay Starr wove seed beads into this delightful basket pendant necklace.  Cool, huh?
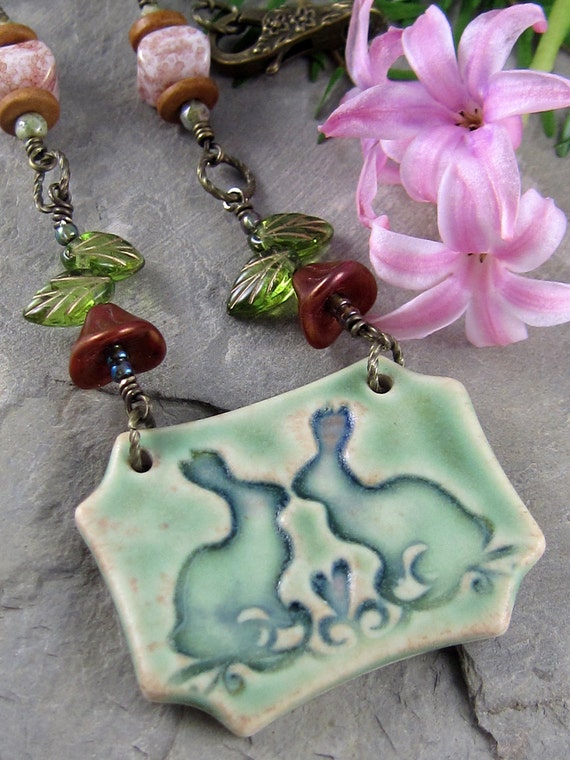
We have loads of bunnies in the woods here, however ours are brown with white tails, not green. Nevertheless, here are some green bunnies from my shop.
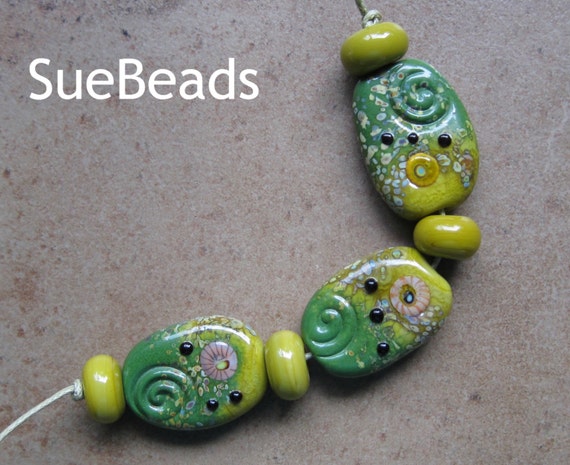
 I love all the shades of green with white flecks in these lampwork glass beads by Sue Beads. 
I found so many awesome green and white art beads and jewelry that I couldn't include them all here.  I didn't want to leave any of my other favorites out, so I made a green and white Treasury collection on Etsy.  You can check it out here: Green and White Delights.

-Linda


Thursday, December 4, 2014

Beads at the beach: a bead retreat

Two weeks ago I headed to the beach. Rehoboth Beach, Delaware to be exact. We were having the coldest temperatures of the year to date - It was like 16 degrees F in the morning! But I was headed to a wonderful three day retreat,  doing bead embroidery.  What did I care about the weather?

I took about 10 minutes on the beach one morning. Until my ears froze. Had the place all to myself - heaven!
Many of you might know Meg and Moggie of BEAD My Love. They are regulars of the bead show circuit, from Beadfest to Tucson. Their company sells everything a seed beader could need: Ultra suede, stiff stuff, needles, cabs... and beads! (And so much more!) This charming and talented mother/daughter duo also host retreats.

I signed up after Beadfest August, if I remember correctly. Their retreats happen a few times a year, and fill up fast. The November retreat I attended was Tuesday - Thursday; perfect for my teaching schedule. I have been doing bead embroidery for approximately a year - and was ready to challenge myself, learn new stitches, go bigger?
Starting out: my kit, some beads from home... my orderly Virgo approved workspace. 
We arrived at 4 pm - a very welcoming group who adopted me and made me feel right at home. Many attendees were there for a second, or third time! Upon arrival we selected our kit for the weekend. Returnees arrived early and lined up at the door to get first pick! Meg makes up stellar kits with everything you need start to finish - in such fabulous color palettes! My kit included: 2 agate cabs, a face cab from Melanie/Earthenwood Studio, needles, thread, and beads ranging from 15s/11s/hex/drops... (More beads than I used up - I am excited to continue to design with the palette I chose. )

Once settled, and introduced around the room - we opened up kits and started to dream up designs. The room is set up to shop - I quickly decided the ammonite  (above) HAD to go with one of the agates... And we started beading. And chatting. And shopping. Designing, discussing, sharing. Meg and Moggie gave one on one instruction to any and all; beginners were started of with the basics of peyote stitch for a bezel. More advanced students planned larger, layered pieces, and composite pieces made from components beaded and joined together.
My neighbor Diane working on her piece with a Marsha Neal Studio button. A gorgeous palette of sages and copper; finished piece on the right. 
A forest of Ott lights: the room seen from the far corner. Thats my empty chair at top right... 
It was exciting to see things from the other side of the table... as a beader, not as a ceramic artist. BEAD My Love has carried my cabs for a few years. ( I'm still honored, and excited by that...) Watching people select their kits - Lisa Peters cabs, Earthenwood Studio , Marsha Neal, and my own "Mythic Nature" cabs... knowing these artists, their clay, their glazes... It was great fun, and inspirational to see the women at the retreat work their own creative magic with the ceramic cabochons. It presented my own work to me in a new light, and for that I am grateful.
My fellow attendees work in progress. Yes - thats my lunar raven in purple! 
Still orderly... All the bags on the left were my "kit". Tubes and labeled bags in the center were my additional beads. 
The three day weekend (I know it was during the week! It FELT like a weekend) was phenomenal. I would highly recommend a BEAD My Love retreat to anyone that is into bead embroidery - or wants to learn. There were break out groups throughout the 'weekend' to demo brick stitch, soutache embroidery... We worked all day and socialized over lunch/dinner. We came away with new friends, and new skills.  The structure was relaxed and informal. The people I met were interesting, creative, and funny! with diverse careers, interests and experience. I left the 'weekend' sad that it was ending/invigorated with new ideas/inspired to try new things/and happy tired. 
From my weekend: two completed pieces and one work in progress. The WIP piece is an enameled focal from Anne of Gardanne Beads. 
There is even a newly created Facebook group for BML retreat alumni to keep in touch and share pictures of new creations. All in all a fab weekend. When can I go again?

For now - you know I am bead embroidering Holiday gifts... off to the studio!
Jenny
Goodbye Rehoboth! Until next time... 


The retreat included your project kit, and additional supplies, one dinner, 2 lunches. Snacks and beverages were also provided. Lodging was not included. 

I received no loot, favors or free stuff from BEAD My Love in exchange for this review.