Showing posts with label show. Show all posts

Friday, October 30, 2015

Steampunk Carnivale - an Experiment in Show Vending

I don't do shows.  Well, at least not in several years - the few I've done in the past have been less than successful.  While I am always happy to sell my work, finding the right demographic for beadwork is difficult...and frankly, I'd rather be beading than just about anything else.  That being said, awhile back I had decided that the next show I would have a table at needed to fit a few requirements -

  • be within a few hours drive of home
  • relatively inexpensive fees
  • be a show I've attended in the past
  • have friends also vending, preferably sharing a table
  • time to make non-beadwork jewelry - something able to sell in the $10-$50 price point
SO...this year my friend Mel, a couple of her artist friends, and I decided to split a 10x20 space at the Knoxville Steampunk Carnivale.  I actually (briefly) met Mel at last year's show while she was vending her leather and ceramic wares.  We didn't become friends until earlier this year, and shortly after that we were talking about some sort of joint table at this year's show.  

This show seemed to meet all of my above criteria, and also had the bonus of being an event I would have attended anyway.  It is so much fun to get all decked out in steampunk regalia...and have a scruffy little town like Knoxville turn out so many other awesome steampunkers.  Since we lived in Knoxville for 3 years, we have many friends in the cosplay/arts/crafts/lLARP/maker communities - a homecoming and reunion all in one!
Alice in Wonderland theme necklaces
Circus acrobat necklaces
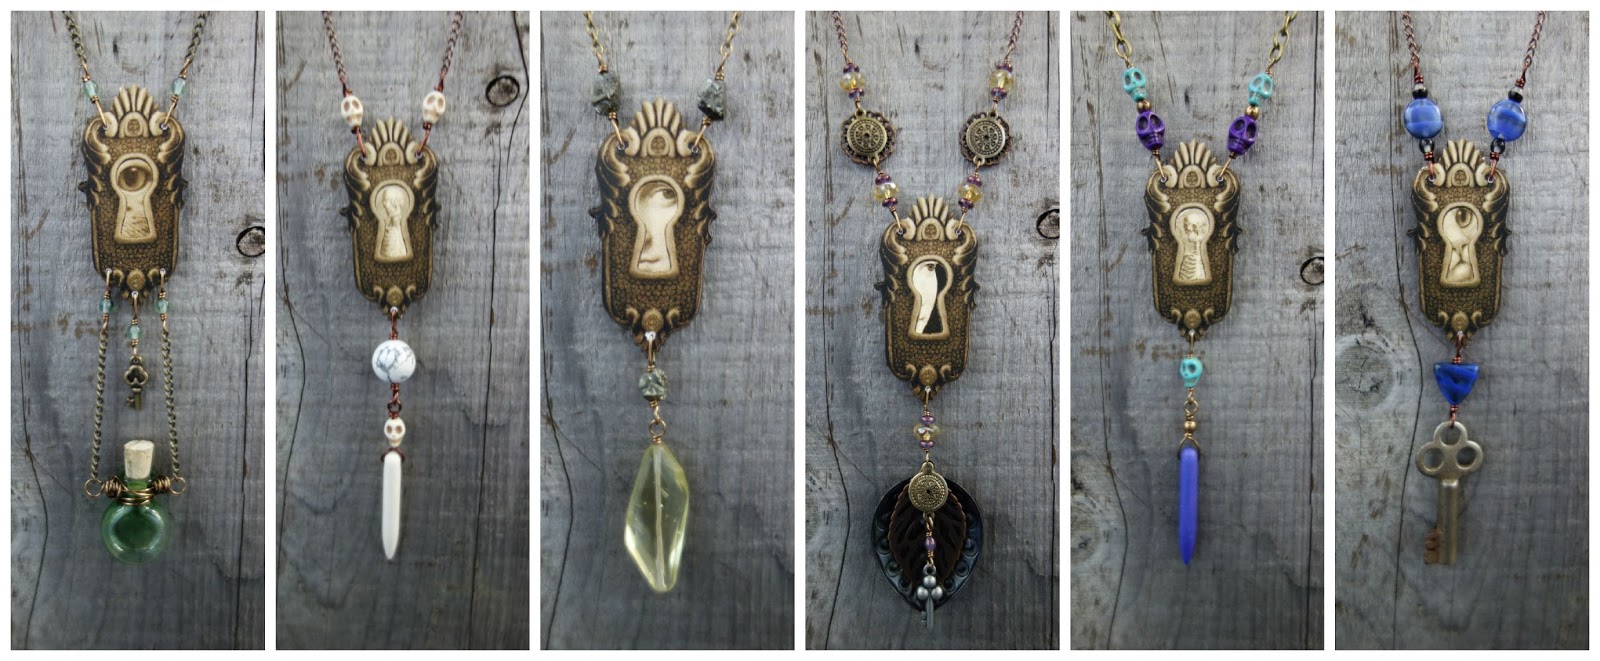
Escutcheon necklaces
I had fun coming up with some new merchandise for this show, especially these necklaces - incorporating laser cut wood and paper components from PorkChopShow.  I've had these for several years, waiting for the opportunity to make a bunch jewelry with them.  It was also nice to break out my under-used dremel, and do some drilling.  
I also made a slew of leather and silk cuff bracelets, embellished with metal, mica, lace, and a few other random things.  I discovered while making these, not only can my little domestic machine tackle more leather than I had expected...but also that my metal hole punch works on multiple layers of leather and fabric...and on mica!!!
For the new work, I had to come up with some new displays.  I used my trusty wire crate shelving panels to make two flat stands that I covered in fabric - I used these for the wood necklaces. Driftwood from my friend Steve became the perfect thing to drape and wrap the leather bracelets around. 
For my beadwork, I used a mixture of white ceramic decor, and driftwood necklace busts (also made by my friend Steve).  I like the mixture of refined/organic/architectural/human - it seems to fit my work well.  Also, my pieces have a tendency to not only overwhelm the normal cardboard necklace display busts...but also topple them.  With displays like this, I know that my work will stay safely where it's placed.  
I displayed earrings on little cardstock mason jars - hanging from a weird metal drum-shaped side table.  The slots in the sides were the perfect width for lining up lots of earrings.  Next time though...I need to affix a lazy susan to the bottom...everyone wanted to rotate the earring rack!  
An almost panoramic shot of our whole set up - with Mel and her leatherwork on the left, my jewelry on the far right.  The room in the middle was for the last member of our group, Constance, who brought her prints and paintings.  At first I was worried that we wouldn't look cohesive, because our table coverings were all different colors and materials.  But between Mel's leather merchandise, Constance and I working in similar colors, and the leather covering the rest of the tables, some how it managed to work!  ***unexpected bonus of leather table covers...being able to tape your breakable displays down***
How could you not enjoy a show with these characters meandering around, enjoying the music, and fondling your work?  I had so much fun all day long - chatting with old friends, making new ones, hanging out, talking about my work, walking around and talking with other artists and vendors about their work.  I still need to work on my introversion...but overall, I managed ok.  
Our 4th booth-mate Jamie and I, having a good ol' time!
So, by now you're wondering how I did, right?  We will just say, I made more $ than I have at any other show to date.  I was not expecting to sell any of the beadwork pieces, but I did alright with the wood necklaces, and also sold a pair of earrings and a cuff bracelet.  The event was hugely under attended from last year, with fewer vendors, food trucks, and one of the major attractions pulling out.  The show was very poorly managed and under advertised...that alone would dissuade me from vending again.  But from a "fun" standpoint?  I had a blast - 100% success!

Friday, May 2, 2014

Freeform Friday: Cigar box displays


There are as many different ways to display jewelry as there are variations of jewelry itself. From hand made to professional, from rustic to sleek... Pinterest boards exist solely to categorize and save brilliant ideas. I wanted to share with you something that I do, it works for me, and my style... 

First, a few comments on style. (stepping up on soap box...) You are doing a show. Look over the inventory you have amassed. You have a personal style, and its showing. Is it sleek lines, and glossy finished, and a modern aesthetic? Is it detailed, highly decorative, lots going on? Is it earthy, rustic, organic? I think its important that you display "fit" your style. By its very nature it needs to present your work in the best light, safely, and with style, yet without distraction. Display is the supporting actor role, not the star, but the two have to relate well in camera. 

I like to use plain wood, and solid colors in my display. Muted, earthy tones, very "woodland". I also have space constraints. Sometimes I see complex fancy displays and  wonder if  the artist has a trailer, or a van. (Confession: I have an irrational dislike of mini vans.) I have a small car/SUV and I have to pack tent, tables, chairs, ceramic tiles, display, office, packaging, clothes... you see my dilemma. So no mannequins, no drapes and chandeliers, ( Yup, I've seen it). I need compact, sturdy, versatile, easy to pack pieces. 

Enter the cigar box: 

Here is a brief photo essay of what I did for mine. I have used cigar boxes for a few years, setting them open with pin-able space in the lid. I decided to turn them sideways and make a freestanding display piece with pin-able areas on both sides. 
Two wooden cigar boxes and one raw pine folding tray thing from the craft store.  Wooden cigar boxes are available at a Tobacconist's or some liquor stores for a few dollars. 
Oops. Blurry. (Reread Jen's post regarding iPhone pix.)
On left: the original flange inside. On right: Flange removed. It pulls out. 
Measure twice. Cut once. This is 1/4" foam core. Use a very sharp blade  to cut  a clean line. 
Make sure they fit! For these standing displays, I measured pieces for top and bottom- that will become L and R. 
I use ultra suede fabric in jewel tones as that works for me and my style. Fabric is cut with ample margins, maybe 1.5-2". Glueing corners first, I use an archival PVA glue as thats what I have for other work. After corners are glued, I glue the sides like I was wrapping a present. And I use tape to hold it all down while glue dries. Shh, don't tell. 
Weight pieces down while drying. Interesting trivia: those rocks are from the  beach in Newlyn, Cornwall, UK from my honeymoon. Yes, I have carried them around for 17+ years.  Hang on - you will see the finished one at the end... 

Who's gonna see the inside? 
For the smaller hinged frame of raw pine - cost $1 at the craft store... I mixed up a wood tone of acrylic paint. (Yellow ochre and burnt umber) Brushed on a watered down layer, watching for drips. It dries intently as the wood is thirsty. I don't seal or varnish these. I could, but I am usually too impatient.  

Now lets see these boxes in action: 

This box was the first of its kind. It has division I created to keep my ceramic pendants separated.  I like displaying  one of each style up top, and other color options of the designs in the bottom. The fabric at bottom is draped in and adhered with double sided tape. I can leave these in the box, close it and be done! 
The foam core is a pin able surface, if you pin at an angle. The fabric is forgiving and hides marks. 
I tend to do a mock-up of my display as I prepare for a show.These boxes are very versatile and easily reconfigured as space allows. There! On the right - the deep red fabric. That the new standing cigar box. I will display necklaces there.
Here is a booth picture from last fall, where you can get a sense of the wood tones and colors I use, as well as the boxes in use. As I write this its raining like crazy! I have a show this weekend, outdoors... and the location is currently very, very wet. I will try to post some pictures on the AJE Facebook page of my real display once we are dry, set up, and happy on Friday. So please stay tuned! 

I would love to hear what you think! Have a weekend filled with sunshine! 

Jenny 

www.jdaviesreazor.com