Showing posts with label glass headpins. Show all posts

Wednesday, August 17, 2016

Art Headpins Challenge Inspiration...Are You Up For It?

In case you missed it or it's slipped your mind our design challenge for this month is all about Art Headpins and we'd love you to join in. You can find full details here but all you need to do is design something using art headpins (or make the headpins themselves) and be able to join in out blog hop on August 30th.

Art headpins have been around for a good while now but they seem to be gaining in popularity which is not really surprising considering their versatility and the wide variety of mediums they are now made in. I started working on my challenge pieces this week but before I did I decided to do a little review of some of my past pieces to see if they provided inspiration.

For me earrings are usually the first things that come to mind, partly because they're often sold in pairs but I also think ear (or eye) level can be the best place to show off these pretty pieces.

The design can be very simple but still very striking like this pair which matches head pins by Suebeads with beaded beads by Kristen Stevens.


With this pair the headpins are by Humblebeads with beaded beads by Suebeads and here I use the wire of the headpins to create loops and then passed them back down through the bead and formed little tendrils as an added embellishment. If the wire of your pins is particularly long its worth considering working them into your design.


Here I used headpins by Jen Cameron purely as embellishment, wrapping them around a copper hoop and adding my own ceramic drops to finish the look.


But Art Headpins are not just for earrings and I've used them in a number of necklace designs. Here I've used one of my own fine silver headpins to create a pin bail for a gorgeous lampwork tube bead by Magdalena Ruiz...

And again, this time with one of my bronze clay headpins.


Another design with a bronze headpin using one of Caroline's cute little bird beads sitting on a lovely Mookite bead...again, simple but effective.

  
This last necklace was made for a design challenge several years ago and was probably the first time I'd worked with Art Headpins (unfortunately I can't remember who made these). I called this necklace Shiraz and the idea was to give the impression of vineyards with the deep purples, buds and curling tendrils of the headpins. A tiny bronze headpin also features in the capped bead dangle.


Looking back over these pieces had the desired effect and I've already managed to make a few pieces for the challenge...very organised for me I can tell you! I hope you're feeling inspired too but just in case you still need an extra nudge then how about doing a little window or hard cash shopping..? There is an abundance of headpins out there in all sorts of materials just waiting for someone to show them some love and here are just a few of my favourites...


Ceramic from Latirus


Mixed media from Pip n Molly  


Glass by Anneli Beads


Ceramic by Marsha Neal Studio (available at Bead Fest Philadelphia this week).


Polymer clay by Studio St James


Glass by Beadfairy


Glass by Sabrina Koebel


If you would like to be included in the challenge please refer to the original post which you can find via the link at the top of this page and then e mail Jennifer Stout Cameron.

Be creative and enjoy yourselves!

Monday, July 18, 2016

Flower Headpin Earring Tutorial

I've been making these cute flower headpins for a while now, and while I love to make beads and components, I rarely make jewelry anymore.  I decided I wanted to write a tutorial for something you could make with these!

So of course it took me a while to come up with something, but I really like what I made!  Here is your supply list:

  •  pliers
  • chainnose pliers
  • roundnose pliers
  • cutters 
You'll also need the following components:
 
  • glass flower headpin
  • glass lampwork spacer bead
  • czech picasso bead in blue
  • copper round
  • copper or brass filigree beadcap
First, add the filigree beadcap onto the headpin.  The beadcap is round and this headpin is not, so you'll need to manipulate the beadcap to fit onto the glass part of the headpin.  It's rather simple to do - just use your pliers to gently bend the beadcap onto the glass flower, and then when you've got it going, use your fingers to finish the job! Don't bend too hard with the pliers or you'll mar the beadcap.

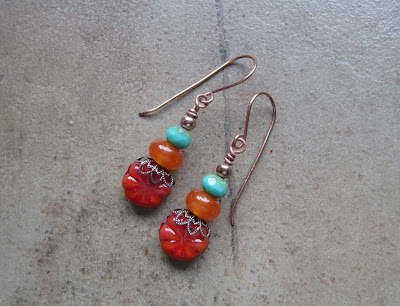
Here's what it looks like bent over.  Then the rest is simple - string the beads onto the copper headpin with the lampwork spacer first, then the czech bead, and then the copper round.

Finally, make a wrapped look and add your ear wires and you're done!  I quite like these earrings, they are very summery and nice and solid without being too weighty.

You can find the flower headpins in my etsy store, SueBeads.  I hope you enjoyed this tutorial!

Susan Kennedy


Tuesday, May 26, 2015

Glass Headpin Earrings!

Glass Headpins are so much fun, and can be awesome stash busters to make quick, easy and inexpensive earrings!  I have been making glass headpins on 20 gauge copper wire so you can use the length of the wire as ear wire, too, making them even more economical! I typically make the copper wire part on my headpins 4 inches long for lots of versatility. Today I thought I'd show you a few earring designs to spark your creativity!


These are the glass heapins I decided to work with.  First, I pulled out my czech glass bead bin, my copper bead bin and my brass bead bin.  But then, as you can well imagine, I had to pull my blue stone bead bin, my seed bead bins, etc. etc! So here's what I made with the glass headpins!


For this first set, I used two titanium hematite rounds that I had purchased at Bead Fest in Philadelphia and two czech glass rondelles - the glass rondelles really match well with the colors in the headpins.

For this second pair, I used two copper beads I had leftover from a previous project, as well as two faceted beads leftover from Andrew Thornton's Amethyst Aether challenge, and two size 11 matte turquoise seed beads.

Finally, for the third pair, I used size 8 matte mustard green seed beads, copper heishe beads leftover from a Bead Soup swap, and two gorgeous rounds I purchased from a bead show here in Pittsburgh,  I'm not really sure which are my favorite, but these might be!

You can always make the ear wire integral to the design, but since I'm allergic to copper in my ears, I will use either sterling silver or gold filled.

You can also make mis-matched earrings using some of the trio headpins I have available.


So, that's just one way to use glass headpins!  Thanks for checking out my designs!

Susan Kennedy
SueBeads Etsy Store
SueBeads Web Site
SueBeads Blog

Thursday, September 18, 2014

Things to do with headpins - 2 for 1 Tutorial

You may of heard on the blog… Beadfest happened recently! My friend, and AJE team member Lesley, kindly offered to take some of my beads across for swaps so I could share in the beady goodness! I got some amazing swaps back, some of which were headpins. 

I’ve been curious about glass headpins ever since I saw them while scrolling through Facebook, so I was thrilled to get some beautiful millefiori pins from Jen, and pretty green drop pins from Sue (which make me think of little jester’s hats!)


As with a lot of things I covet, once I got my hands on them, I had no clue what to do with them. I just wanted some as they were pretty. So they sat in my box of special things while I pondered. I’ve come up with a couple of ideas which I am going to share today. The demo’s are using Jen’s headpins as I think their shape works really well for these ideas.

The domed clear glass on Jen’s headpins give them such a wonderful depth that I thought they would make a pretty ring. 

Start by taking a headpin and holding it a couple of mm from the glass, bend the glass up so it sits at 90 degrees to the wire.


I used one of my existing rings to get the size. Put it on to your ring mandrel and mark with a felt tip where you need to wrap.


Hold the headpin on the mark with your thumb and wrap the wire around the mandrel, and loop it around the glass.


Keep looping until all the wire is around the head, tuck in the end of the wire and straighten the shank.


Put it on... cute!


Afterwards, I did think about adding seed beads around the shank and was going to make a second, but I couldn’t find anything that I liked that had a large enough hole… time for more bead shopping! If you do want to use beads, you would need put them on to the wire before sizing your ring on the mandrel.


Secondly, I decided to make a clasp. For such tiny heads, they make great focals, so my next design features the pin right in the middle. 

As with the ring design, hold the pin and bend the head to 90 degrees.


With bail making pliers wrap a wide loop on one side of the head.


Fold it round the top of the pin to hold it securely.


Do the same on the opposite side.


Wrap the remaining wire around either side of the head, tucking the end in neatly so it doesn’t catch.


Left as it is, it would make a great connector


Or you could do as I did and make a hook to turn the piece into a clasp.


With both designs, due to the heat needed to make the pins, the wire is quite soft, so it's nice and easy to use. But you may find that you need to harden your work when it's complete!

I hope I've inspired you to get wrapping with those headpins! To get some for yourself, visit Jen or Sue!


Thanks for reading!

Caroline