This year I’ve decided that I will be concentrating on Raku firing for my ceramics, and I’m starting out with something I haven’t tried before… Naked Raku. When I told my husband what I’d be doing, he showed much more interest than he usually does, but the naked refers to the clay. The technique results in an unglazed piece… not quite as daring as it sounds, but still pretty exciting!
 |
| Naked Raku Pendants |
So while I’ve been totally obsessed and not doing much else for the past few weeks, I thought I’d share how they are made… I hope you find it interesting!
I have been researching this technique for a couple of years and there are some amazing ceramic artists who have been kind enough to share their processes to help others. A couple of my favourites are Ashraf Hanna, and Kate & Will Jacobson. Their work is really something to aspire to and they give regular classes demonstrating their techniques.
 |
| Ashraf Hanna |
 |
| Kate & Will Jacobson |
Unfortunately, I’ve never had the opportunity to take a Raku class so everything I have learned has come from what other clay artists have been kind enough to share in their books, and just trying it out.
Here’s how I’ve taken the techniques and adapted them to work on a smaller scale for my work…
To begin, raku clay is formed in to shapes for pendants, beads and other components.
Just before they are bone dry, they are burnished with a smooth pebble. This compresses the clay, removes any dints and polishes it.
 |
| Burnishing |
You can see here the difference between the pieces. One is the rough clay as it’s first formed, the other is smooth and shiny where it has been polished. My burnishing technique isn’t quite as good as others, I’m very impatient and would lose interest going over the same piece 3 times, so I’ve found that burnishing just before the piece is totally dry gives a nice enough sheen for the finished item.
The reason for burnishing is to help the slip/glaze release in the firing process. It also gives the final piece a beautiful finish.
The pieces are bisque fired and once cooled, a layer of slip is applied. Slip is liquid clay. Mine is made from the same clay as I use for making the pendants, by mixing it with water until it becomes a thin liquid and straining out the grog.
 |
| Coating with slip |
Once the slip is dried, the pieces are then coated with a sacrificial glaze. This is made using basic materials, frit and china clay. It doesn’t have to be fancy as it will all be destroyed in the firing, it's job is just to hold the slip in place during the firing process. Without the glaze the slip would pop off when removed from the kiln and your design would be lost.
 |
| Coating with glaze |
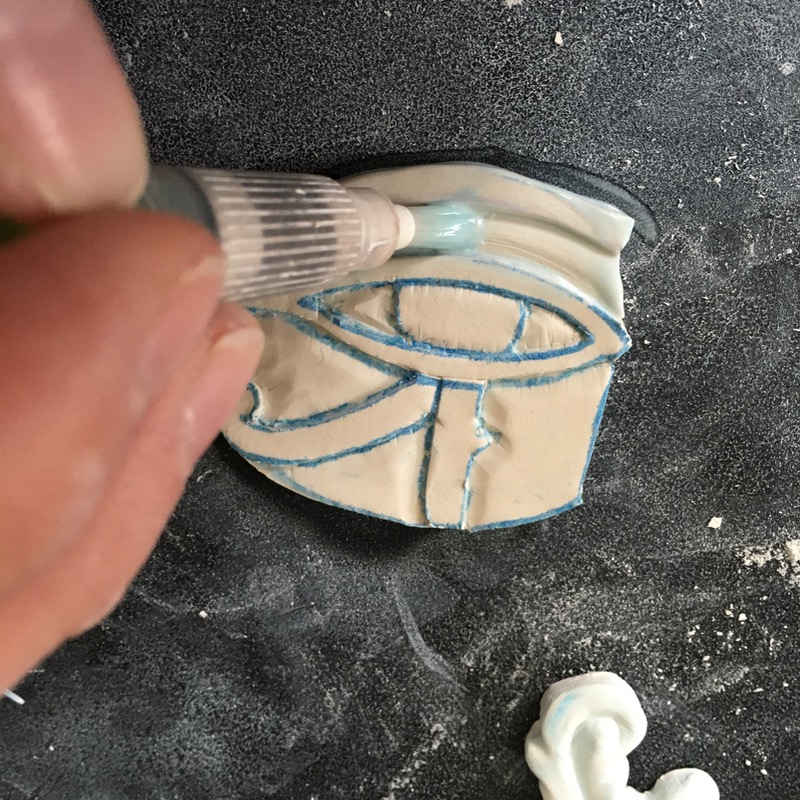
Again, the pieces are dried and a rough outline of a design is sketched on to the piece. Using a sharp skewer the design is etched on to the piece scratching through the layers of slip and glaze down to the bare clay. It is better to use a wooden tool to draw the design so that the smooth finish of the clay underneath isn’t scratched.
 |
| Etching the design |
Now the pieces are ready to go into the kiln. They are fired up to 850oC, taken out and put in to the reduction bin. The bin is filled with sawdust and straw which ignites on contact with the hot pieces and the smoke from the fire colours the pieces where the bare clay has been exposed.
 |
| Fire! |
After 15 minutes, they are removed from the reduction bin and they look pretty awful.
 |
| Hopefully beautiful on the inside. |
They are put in to cold water and as they’re still hot, the shock pops off the slip/glaze coating revealing the design on the bare clay.
 |
| Naked raku Mackintosh style roses |
 |
| Cleaning up the pieces |
 |
| Revealing the design |
Once they’re all cleaned up they go in to the oven for half an hour to dry them and remove the smoky smell. For a monochrome finish, they can be waxed for protection and to give them a satin shine.
 |
| Naked raku pendant |
To add a little bit of colour, I used acrylic paint to wash over some of the white areas in the designs, and then they were sealed with wax to protect them.
 |
| Adding colour |
You can tell the difference in pieces from the first attempt and the second. The second batch turned out much darker, I think because I used more sawdust in the reduction bin for my second firing, but it could be due to different thicknesses of slip and glaze between the batches, ultimately the whole process of Raku comes down to doing what you can then leaving it up to chance. I love that aspect of the process, you can only control so much, the rest of it is down to the kiln gods!
And when they’re in a good mood, you can get some brilliant results!
 |
| The finished pieces |
Thanks for reading, and I'd love to hear what new things you're planning to try out in 2016!