
Some times simple really is best, so I thought I would show you how to make a pair of simple prong set earrings.
 |
| Tiny Prong Set Moonstones |
You will need:
Something to prong set (I have used rough tourmaline)
Sterling silver wire 20 gauge
Sterling silver ready made earring posts
Sterling silver butterfly earring backs
Wire cutters
Hammer and anvil
Safety glasses and apron
Solder block
Easy solder paste
Pickle
Brass brush
Reverse action tweezers
Gas torch
Flat nose pliers
Flat file
4 way nail buffer
Choose what you wish to set, here I have used rough tourmaline, but you can use what ever you please, but you do need to make sure that what you use is strong enough. Measure and cut your wire so that it is about 3 times the length of what you wish to set. You will need 4 pieces per pair of earrings.
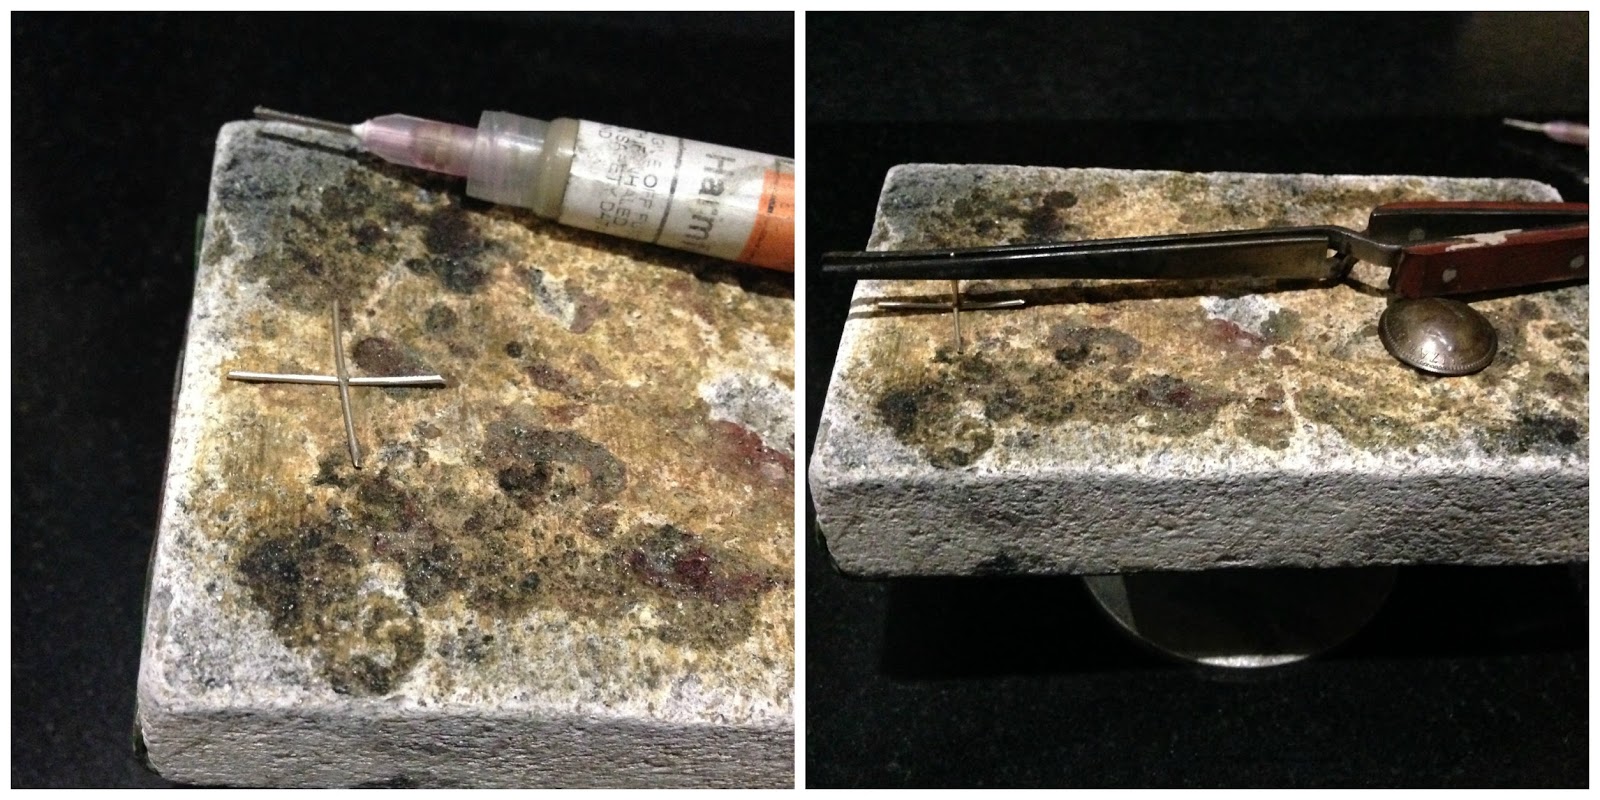
Lay two wires on your anvil so that they cross in the middle, then give them a tap with the hammer. The idea is to form little groves in the wire so they lay flat while you solder them together. It is important that they stay clean so that the solder flows so I normally give them a little rub on the ridge file on a nail buffer and then place them on the soldering block.
Once on the soldering block, make sure you are all dressed up in your wonderful safety goggles and apron, then add a small blob of easy solder onto the hammered area. Using your reverse action tweezers grip the ready made earring post and prop it on the area you just applied the solder to. Take time to make sure that it is all positioned correctly (I use a coin to hold the tweezers in place). Solder carefully so that you don't melt the thin wires!
After soldering quench and pickle and then repeat to make the other earring. When both are made rinse and brush over with a brass brush. Using you stone as a guide and the pliers to do so, bend up the prongs so that the stone fits snugly into the prongs (not too tight you don't want to put too much pressure on the stone and risk breaking it).
Something to prong set (I have used rough tourmaline)
Sterling silver wire 20 gauge
Sterling silver ready made earring posts
Sterling silver butterfly earring backs
Wire cutters
Hammer and anvil
Safety glasses and apron
Solder block
Easy solder paste
Pickle
Brass brush
Reverse action tweezers
Gas torch
Flat nose pliers
Flat file
4 way nail buffer
 |
| Materials needed |
 |
| Hammer flat |
 |
| preparing to solder |
 |
| Prongs made |
 |
| Measuring the prongs |
With your stone in place trim your wires so that are just long enough to curve over the top of your stone. Take your time to do this is is better to leave them a little long and have to re-trim them then cut off to much and not be able to set the stone! When you are confident you have the right amount of wire left, using your flat file, file the ends flat so that they will be nice and neat.
Use the flat nose pliers to squeeze the prongs over your stone, do this very slowly and very gently, a little at a time, until you are sure that the stone is held firm and will not come out. Then I use my nail buffer to buff over the earrings and give them a beautiful shine. Simple as that!
Niky Sayers
Silver NikNats

 |
| Prong set tourmaline earrings |
Niky Sayers
Silver NikNats
thanks for a great tutorial
ReplyDeleteYour welcome Divya
DeleteSimple and gorgeous. Nice post!
ReplyDeleteThank you Jenny
DeleteBeautiful earrings Niky! Thanks for the fabulous tutorial—I'd love to give this a go one day!
ReplyDeleteThank you Rebekah, you really should, they are very quick and easy!
ReplyDeleteThanks so much for this tutorial...will have to give it a try!!
ReplyDeleteThanx for sharing Niky. I enjoyed seeing your process.
ReplyDeleteGreat tutorial! Would this also be the same for a ring? Instead of holding the post just put the ring in place?
ReplyDeletethank you ever so much cant wait to see more
ReplyDelete