
A few months ago, I bought a great little kit from my lamp work suppliers for sandblasting. It was sold for working with glass, but I wanted to try it with ceramic. I’ve had an idea in mind for a range of relic beads. Beads that look like they’ve been lying in the ground for years and been recently discovered by archaeologists. Beads like these!

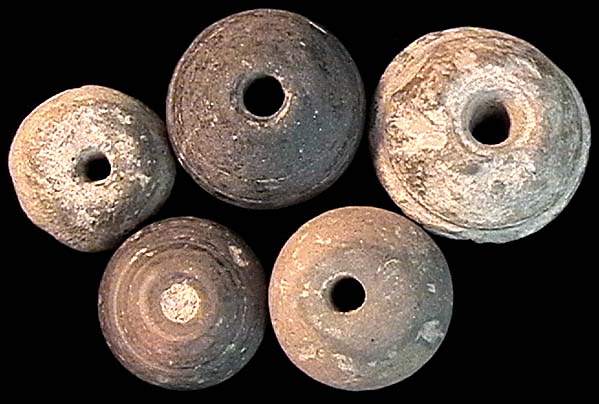
GREEK-SCYTHIAN, c. 300-100 BC, lot of 1 stone & 4 clay beads, 18-24mm dia., from Bazera
This is the kit. You get a blow up sandblasting booth, a compressor and hosing, and an airbrush type gun. To create the weathered look, you use the abrasive powder, (also supplied in the kit) to blast the glaze from your work.
For safety, you also get a dust mask. This is a messy process with the abrasive powder ending up everywhere, so it’s an outside job!

I’m still at the experimenting stage with all this, but so far, I’m loving the effects I can get.
This Goddess bead was made from earthenware clay and fired with a variegated green glaze. She was the refired with 24 carat gold lustre before going in to the booth for blasting. The majority of the gold was removed during the process, but you can see hints of it in the deep crevices giving her a worn appearance.

I really like that with the softer earthenware clay, you can blast right through the surface to the clay below exposing the bare material. You can half imagine that these scuffs have appeared from years of being worn as an amulet around an ancient warrior queens neck as she went in to battle! I’m looking forward to making more of these and trying out some different designs!

These next beads were glazed in matt turquoise and shades of blue before being blasted in the booth. Again, you can see the porous clay beneath. These could have been lost at sea, being tumbled by the waves over centuries before finally washing up on the beach!

For my next experiment, I tried working with porcelain clay. This is much harder to blast, just getting through the glaze takes a good 10 minutes of work, so I decided to try a more etched effect. I made some hollow porcelain lentils and created a digital design of a dreamcatcher, which I then cut in vinyl to create a resist for the sandblasting. The vinyl stickers were placed on the glazed bead and then went in to the booth. The blasting created a much softer effect and etched where the glaze was exposed, leaving the design shiny. The lentils were teamed up with some porcelain feathers to make dreamcatcher sets.

With orders and preparing for shows, I haven’t had as much time as I’d like to explore more of the effects I can get with this technique, but I’m really enjoying experimenting, and am excited to see where this takes my work! I hope you enjoyed reading along!
Caroline