Showing posts with label reuse. Show all posts

Wednesday, August 31, 2016

Scrap Metal Rustic Bead Cap/Spacers

Scrap silver, I don't know about you but I have a whole tub of the stuff! I know that you can send it back to be recycled but it always seems like a lot of fuss for not a lot of return, so I challenged my self to try and use some of it.

Piles of Scrap
The first thing I did was sort through it to see what I was dealing with, I left all of the sheet metal, large silver blobs (from when I get over enthusiastic with the soldering torch) and failed soldered pieces in the tub and then piled up tiny pieces (less then 5mm), coils (from my chainmail days), eye pins, cut jump rings, lengths and wrapped wire. 
I'm not going to lie this was mind numbingly boring and I did not get half way through before I decided that I had plenty, now on to the fun part!

Coils
I started with the coils and cut any that were longer then 8mm in half, they were then placed onto the charcoal block and heated slowly until the outer surface fused together forming one piece. I did play around with the heat and found that if you turn the torch up really hot and pull away just before the whole thing melts into a blob (timing can be difficult) you can get them to look less coiled and a lot more rustic/ancient looking!
Once melted I put them into the pickling pot and moved onto forming bead caps.

Forming Bead Caps
The eye pins, cut jump rings, lengths and wrapped wire pieces were all arranged on the charcoal block into small piles making sure that there was a hole in the middle and then again slowly heated until they fused together making sure that all sharp edges were either tucked in or melted.

Soldering Balls
I then melted the tiny pieces of silver to form balls and soldered them onto the larger soon to be bead caps (you could possibly fuse them together but I really liked the shape and did not want to risk melting the whole lot into yet another blob) and then into the pickle pot with the others.

Finishing Up
Once removed from the pickle pot everything was rinsed/neutralised and cleaned up with a brass brush the spacers were hammered slightly on the anvil to make the ends more even and the larger bead caps were domed in a doming block and then all was thrown into the tumbler for half an hour while I sorted through beads to put with them!

Spacers and Bead Caps

Over all I rather like how they turned out, and the first thing I made with them....

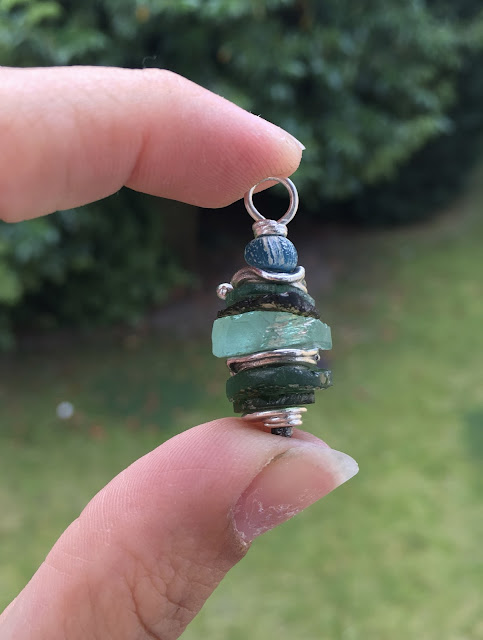
Ancient Pendent
A simple pendent made of Roman glass discs topped with an ancient dig bead, now to patina or not to patina that is the question!!!


Wednesday, July 20, 2016

Thrift Shop Find Turned Fab

When it comes to art beads I am some what of a bead snob! I like to support the handmade artisans that put time and effort into their beautiful creations, But when it comes to what I class as secondary beads, the pearls and semi precious beads as long as they are of good quality I'm always on the look out for a good deal and surprisingly I seem to have hit the honey pot with my local charily/thrift shops.

My Local Charity Shops and the Jewellery Cabinet
Normally I would head straight to the book section with my youngest daughter as this has proved by far the cheapest way to fund her book addiction, but recently I have been paying more and more attention to what is in the jewellery cabinet.

More often then not there is a string of some kind of beads going at a really good price, todays cabinet has a lovely string of 5mm flourite beads, a mixed string of button pearls and 4mm goldstone beads or the really nice chunky Potato pearls with a lovely luster (that might possibly have come home with me). But also there is always a piece of jewellery that I think Wow, I could not make that for that price, which on this occasion lead me to buying these earrings....

Thrift Shop Earrings

While these are lovely, they are so not my style! For a start there are no art beads!
But, look at what there is.... 3 pairs of sterling silver set stones!
So, I know that the cost of those stones (the triangles and drops appear to be amethyst and the tiny stones look like iolite) would be way more then I paid for the earrings, then add in the cost of the silver and the time taken to set them and they are surly a steal at £6.99, so they had to come home with me!
Then came the challenge how to make them into some thing I could wear.

Broken into Part
I'm not going to lie, cutting them into pieces felt good and oh my look at the potential! Beautiful little treasures wrapped in silver just looking to be paired up with some wonderful handmade art beads!
With a rummage around my bead hoard/stash/collection these parts were soon turned into some thing much more my style....

Glass Sparkles

Handmade fancy earwires with amethyst drops and lamp work headpins by the wonderful Bead fairy. I love these but after looking at the photos I will change out the upper jump ring for a copper one so the mixed metals are more cohesive! And then there are these....

Amethyst Studs

I don't normally make these kind of dangly stud earrings, but I really like this pair! Lamp work by Lesley Mclver and mushroom head pins by moi! Much shorted and with glass way more my style!
So my question to you, do you use thrift store finds in your jewellery or is there some where unconventional that you buy your beads from? I would love to know!


Friday, October 3, 2014

Book review: "Create Three Dimensional Jewelry"

For this freeform Friday - I bring you my first ever book review.
"Create Three Dimensional Jewelry" by Heather DeSimone
Front cover, and my dutiful ever present notebook. 
back cover description
Many of you may recognize the name Heather DeSimone as she and her mother Jan Parker are the women behind "The Beadin' Path". (The retail store has closed but there is an active Facebook page with sales and destash. Heather can also be found on Pinterest and Etsy  although the shop is currently empty.) I mention  this - because I knew of the Beadin' Path as THE place to go for vintage pieces, especially Lucite. It makes great sense to me that Heather's book focuses on utilizing many vintage and costume pieces in new designs. 


Miriam Haskell jewelry

She is greatly inspired by Miriam Haskell, a "costume" jewelry designer. Her work, from the 20's on was known for its hand wired seed pearls hand set Austrian crystals... and helped define the genre of "Costume jewelry". 


The  book is a must for someone who is interested in repurposing vintage pieces. There is good information on preparing a piece, removing old settings... 

I was especially intrigued by "lashing" - stitching/wrapping seed beads over an existing structure.

Many of the projects in the book employ the riveting tool.


Let me share a few thoughts, and opinions:
  • Good for someone starting out in mixed media and/or cold connections. Also - great for someone interested in repurposing vintage pieces. 
  • Many projects layer and stack elements. ( This isn't my style per se. I prefer to integrate and juxtapose in more elaborate ways. ) 
  • Projects use fine gauge wire and use hybrid methods - part wire wrap and part stitching. ( I hesitate to use such fine wire as I do not trust its strength and longevity over time.)
  • A few sets of instructions seemed a bit too sparse for me. Specifically peyote stitch and drilling shell. I do not think a first timer could comfortably achieve either with the directions given. 
  • Overall design/layout of the book was a bit chaotic. The first sections regarding techniques were hectic visually and not always clear. The projects portion was much more cohesive. 
  • I personally am not a fan of the riveting tool. I have one, but find it more fuss than its worth. I prefer to rivet by hand, to me its faster and i have more control. 


All in all - it was informative and creative, if not really my style. I was happy to learn more about Miriam Haskell as Heather's book sparked my interest. And I definitely could see adapting vintage pieces to use... I have a stash that belonged to my Grandma, and my lawyer sister always wants a funky statement piece. Holidays are coming... 

Thanks for reading. Would love to hear what you have to say if you have read this book, or think its for you! 


Resources: 


Winners of the October Component of the Month Challenge!


Lindsay Starr
Staci Smith
Sherii Stokey

I'm very excited that you will be participating. 
I will message / email you images to select a color from.
I can't wait to see what you create!