Showing posts with label handmade lampwork beads. Show all posts

Friday, April 15, 2016

Lampwork Buyer Beware

Note: I originally wrote and published this blog post in October 2014. However, I've recently noticed a large quantity of structurally unsound lampwork beads being offered up for sale in Facebook groups, and I just cringe when people buy them. As much as I secretly might want to call out a beadmaker for selling beads whose dots will probably not survive any kind of jostling, I am not the lampwork police. My goal is to educate those who buy lampwork so they know what to look at when considering purchasing a bead.

------------------------------------------------------------

I did something that I am SUPER uncomfortable with, and I'm about to share it with the world....all because I am looking out for those of you who purchase lampwork beads. What is this shameful thing? I made a bad quality lampwork bead. On purpose. Let's start off with a side-by side of the bead with bad technique (left side) next to the "same" bead using good technique I've developed over the last 9 years of lampworking experience. (as an aside, I wasn't going for good design, just an easy to see example)

Sample beads

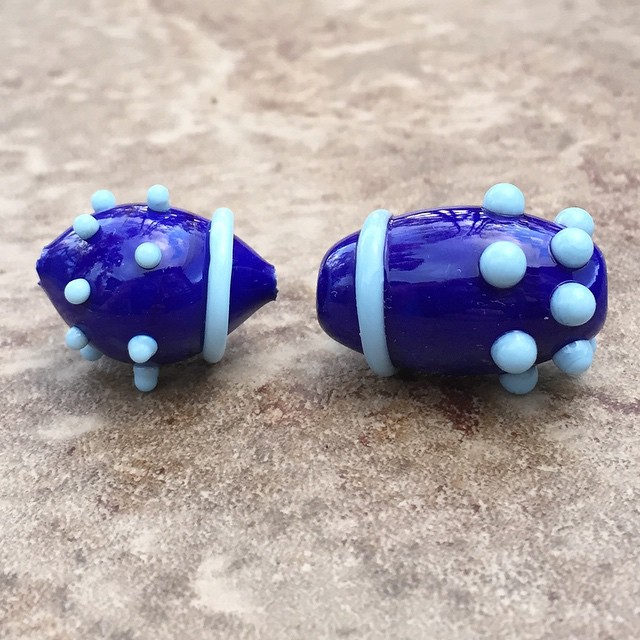
Why is the bead on the left bad technique? Let me count the ways! I tried to cram as many as possible onto a single bead in the hopes it could be inducted into the Fugly Bead Hall of Shame (I'm pretty sure that's a thing). 

First of all. Raised dots that aren't sufficiently attached to the bead. These WILL break off. In fact, you can see the dot that fell off as I tried to remove the bead from the mandrel. 

Example of horrible quality lampwork bead.

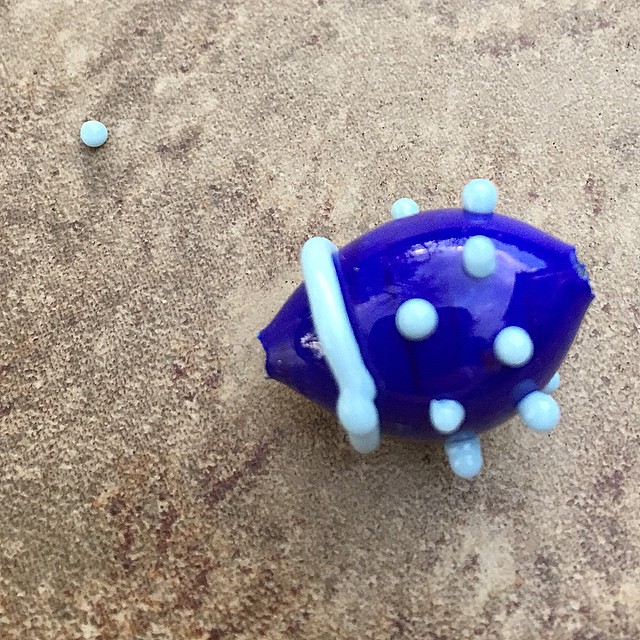
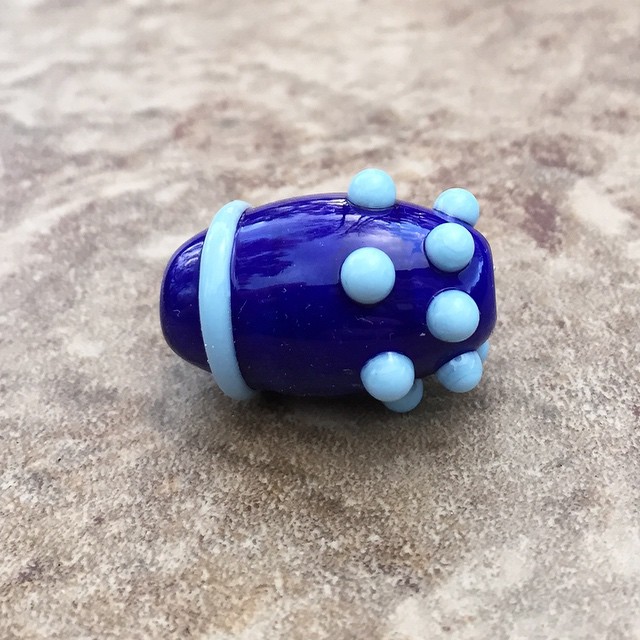
How can you tell if the dots are well anchored to the base bead? The base of the dot that meets the bead, will not have undercuts....meaning, the base will not be narrower than the body of the dot. See the dots in the "good" bead below. They are firmly attached to the bead.


Sample bead

Same with raised stringer designs. If the stringer work has undercuts where the stringer meets the bead, it will break off. See how the stringer below looks like it's just sitting on top of the bead? 


Example of horrible quality bead

The "good" bead below has stringer that is securely attached to the base bead. You can see how it is melted into it rather than still looking fully round in shape. 


Sample bead

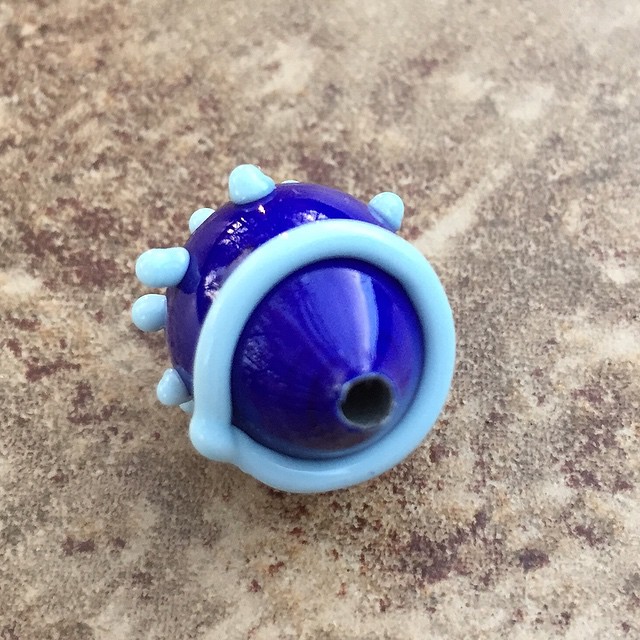
I would like to point out that a HUGE no no is when bead makers leave bead release in the bead holes. Properly cleaning the bead release involves diamond drill bits and a tool to use the drill bits. I personally like my battery powered Dremel for that. Not too powerful, but gets the job done. Unfortunately, the battery was dead and the light was fading. So, yeah, my good example still has bead release. However, beads you buy should have the release already cleaned out for you. So check the holes. If it isn't cleaned out, it will flake FOREVER. Fyi: craft store lampwork beads still have the bead release in the holes. 

The next thing you want to avoid when buying lampwork, is bead holes with sharp pointy edges. Let's take a look at the comparison photo again. 

Sample beads

Those sharp pointy bead holes: #1-are not structurally sound. They WILL crumble, chip, and break. #2-will rip beading wire and cord. #3-sharp and dangerous for skin. #4-ugly #5-proof that the lampworker hasn't learned how and/or hasn't taken the time to properly shape the bead. 

The bead holes should be puckered or at the very least, flat. If they are pointy, they should not be offered up for sale. 

Another thing you can see in the photo above, the bead on the left is VERY off center and looks "pregnant." While an off-center bead can be an aesthetic preference, it should be noted when considering your designs and preferences.

The one thing I couldn't reproduce without possibly causing a total explosion, is the crack that results from improper annealing technique. You have the right to ask the lampworker how they anneal their beads. The proper method is annealing each bead as it's made in a digitally controlled kiln. Some will batch anneal, which means to make all the beads, and cool them in a fiber blanket then place all of them in a kiln at once and anneal them. All I have to say is no. This is NOT good annealing technique and has a failure rate high enough that I would never do it. 


The lake house studio is finally set up and functional! #thisartistslife #glassaddictions

As you can see in the photo above, in my lake cottage studio set-up, my kiln is to the left and held (soaked) at 950F during my entire torch session. As soon as I finish a bead, it gets popped into the kiln and held at that 950 degrees until I force it into the cooling (annealing) cycle. This cycle SLOWLY brings down the temperature, allowing all the molecules in the glass to line up properly. A glass bead properly annealed will not shatter, but rather bounce on concrete (it WILL chip though! So don't try it. It IS glass after all). 

Part of the reason I decided to write this post is that I've noticed a huge influx of lampwork being sold that shouldn't be offered up for sale and I prefer people who are spending their hard earned money on lampwork are able to spot quality beads. Because if they buy beads they are ultimately unhappy with, it poisons them against buying lampwork in the future. 

Some of the sellers of these beads are new beadmakers and super excited to be making their own beads. They should be! But selling them is maybe not the best thing. Here are some of my VERY early beads from 2005. Ugly ugly ugly. 


When I started making beads in 2005, my daughter was only 4 years old and loved every bead I made like it was treasure more precious than gemstones and gold. She is now 13 and was cleaning her disaster area (bedroom) a few weeks ago and unearthed this bracelet she made with some of my first beads. Her tastes have changed (thank goodness!) and she gave them back to me. LOL! I am so glad to have these early beads so I can see how far I've come. And I'm so glad no one BOUGHT these beads...


Thursday, June 18, 2015

Design Retrospective

Over the past few weeks I've been having a clear out of my photographic files. I love that the digital age makes it so easy to take and store photographs but that ease also means I tend to hang on to too much for too long so a cull was necessary. Needless to say this has taken longer than planned because the photographs are in themselves a distraction and much time was spent reminiscing.
Obviously I have many, many photographs of the jewellery I've designed and whilst going through these I realised that they charted a clear path in the development of my relationship with Art beads and hand made design elements.

I've not been making jewellery that long in the scheme of things - just seven years or so and I originally took it up as an antidote to s stressful job and something to do on winter evenings. My first bead purchases were commercial hobby store and online bead shop buys which and the resulting jewellery utilised very basic techniques.


Always one to search out something more with whatever I'm doing I spent hours trawling the Internet and before very long I had discovered the wonders of lampwork beads... I was completely Smitten and my art bead stash was born.  Sterling silver accents and finding also made their first appearance at this point as I felt the art beads deserved some better and silver had yet to go through the roof in price!

Lampwork implosion beads by Sally Carver
Lampwork beads by Kaz Baildon
Lampwork beads by Julie Fountain
Again these techniques involved with these pieces were fairly  basic stringing and wiring and I really wanted my designs to have more of me in them. I started playing with wire to add another dimension and a new love affair began that still continues...
 
Lampwork beads by Kaz Baildon and Sally Carver


Further down the line leather leather began to work it's way into my designs. I loved the casual, colourful, boho feel you could get with  this very versatile medium and it very much suited my own personal taste in jewellery.
Lampwork beads by Julie Cannon


Lampwork beads by Lori Lochner
Whilst developing these techniques for myself I also attended workshops in silversmithing and metal clay and that saw me combining my own metal pieces with my beloved beads.


Lampwork beads by Pinocean


Lampwork bead by Sally Carver
Later a further workshop added enameling into the mix....


One of the last elements I added to my design repertoire was ceramic beads and little did I know at the time that I would end up making these myself and love them above all others. I continued to mix and match with other mediums to develop what I hope is my own style.


Ceramic elements by Karen Totten and Diana Ptaszynski

When I started making jewellery I had no idea than I would ever make jewellery components to sell to other people or that that aspect would takeoff and become the bigger part of my business. This inevitably means that these days I make a lot less jewellery but when I do you can still see these earlier design elements and techniques making an appearance and forming the foundation of my design ethic. 

Ceramic cabachon by Lesley Watt - Polymer clay mixed media technique by Jenny Davies-Reazor
Polymer clay roses by Leah Curtis
Pendant by Lesley Watt
Lampwork bead by Julie Cannon
Etched copper focal by Lesley Watt - Polymer clay mixed media technique by Jenny Davies-Reazor
So what do you see when you see when you look back on your old designs is there an identifiable trend or have you taken yourself of in a completely new or surprising direction...That's the beauty of jewellery design...so many things to try! Happy designing.

Note: Apologies for beads that have not been credited but I no longer have the details for some of them and my memory is not what it was..

Tuesday, February 17, 2015

New Work!

When you read this post, I will have just gotten back from a week long trip to St. Maarten with my boyfriend, celebrating our 50th birthdays - his was just after Christmas, mine is in May!  Since I won't have time to show you what my new beady inspiration will be from photos of that trip, I thought I'd just show you what I've been working on lately!

 First, I've been working on some round beads, and playing with frit reactions with silver foil! 
 Some sold immediately on FaceBook, which was really nice. Others are now listed in my etsy store.
I'll be working on more of these when I get back from my trip!

I've also been working on perfecting my beads using the bicone bead roller.  I love this shape!
I did some in the same colorways as the round beads, and then some with color wrapped around the middle.
I think my favorites, though, are the last two on this mandrel - the tribal looking ones and the softened bicones on the bottom.  There are many possibilities I'll also be revisiting!

I've also been doing a lot of work on my house, so I've been relaxing doing some bead weaving.  It's a new obsession, I think.  I made this one for me, with one of my favorite beads of all time!

It's hard to see, but these seed beads (Jonquil Rainbow Jet Lined size 11 from Toho) have the most amazing rainbow look and go perfectly with this black metallic heart I made.
I knew I wanted to use the bronze Saki Silver clasp, it goes perfectly with the imprinted swirl design on the heart.  But I had a hard time visualizing how I wanted to connect the heart to the necklace.  I thought about many things, but finally decided on this bronze bail.
I'm really happy with how it came out.

I made this necklace for my mom, with a ceramic flower pendant from White Clover Kiln.  It took me a really long time to decide one, find and finally receive the seed beads, but I'm happy I waited.
I made a spiral rope with size 11s as the base rose, and then the loops are size 15s and size 8s.  The contrast gives the spiral rope some nice texture.
I had the perfect clasp in my stash - a Swarovski box clasp I purchased from A Grain of Sand a very long time ago!
My mom loved her necklace!

Currently, I'm working on finishing this beaded bezel ammonite cab I made - I was in the mood for some color and I'm excited to finish this - maybe while I'm on my trip.
And I'm already planning my next project - deciding which pendant to use to make a spiral rope for myself; I love these colors, and this will most definitely be with my on my trip - if I have enough time in between laying on the beach, drinking fruity drinks and eating, I may just get to it!
When your schedule gets tight, what do you work on?  Have you tried anything new lately?

Susan Kennedy
SueBeads Etsy
SueBeads Web Site
SueBeads Blog