Showing posts with label happy new year. Show all posts

Thursday, December 31, 2015

HAPPY NEW YEAR!


As another year draws to a close we would like to thank all of our friends and followers for joining us on our journey over the past year and wish you all a very Happy New Year wherever you may be. May 2016 be filled with health and happiness not to mention a very large dose of creativity!

Don't forget you can get those creative juices flowing again with our two January challenges. The 'Rebirth of the Sun' winter solstice reveal is on Sunday 10th January so there's still plenty of time and then the 'Buried Treasure' (use your stash) challenge reveals on Sunday 31st January. We're looking forward so seeing what the new year brings with your designs.


Enjoy your celebrations!

The Art Jewelry Elements Team

Wednesday, January 1, 2014

Happy New Year!!!!!! And winners!

Welcome 2014!!!!!


I know I speak for the whole AJE team when I say that we have been blessed to have you follow us in the last year and hope it continues throughout an exciting new year.  Thank you!

So I am making this post short and sweet so you all can get to New Years' festivities or recoveries whichever the case may be.

I will be watching this.....

While drinking a few of these....

And trying to see what to do on this.....

That's right it will me my annual Tipsy Beading party!!!!

Oh I did mention winners didn't I.  
The winners of the January Comonent of the Month are...
 
Sarajo, Ema K, and Hope

I hope for you all a fabulous New Year!!!!

Kristen

Saturday, December 28, 2013

This Post is Brought to you by...

the letter "S"! For me the past month, it stood for "stressed"...today it stands for "sick". I have had a nasty head cold since Christmas Eve and all I want to do is sleep. See, that starts with "S" too! I decided today that I would recycle one of my most popular "Saturday Share" posts. I has definitely been one of my favorite techniques for 2013 and I'm sure I will be using it a lot in the coming year...maybe with some new twists!  Thanks to all that have pinned and re-pinned it on Pinterest! I hope it has been a helpful technique and will inspire someone new today, that perhaps didn't see it the 1st go round! I'd also like to say Happy New Year to all of you, our wonderfully supportive readers...I wish you the most creative, happy, productive, peaceful year ever!

*~*~*~*~*~*~*~*~*~*~*~*~*~*~*~*~*~*~*~*~*~*~*~*~*~*~*~*~*~*~*~*~*~*~*~*~*~*~*
Happy Saturday, everyone!  For today's installment of Saturday Share, I decided to write up a quick and easy tutorial for the double headpins (for lack of a better name) that I use in connecting components, such as layered pieces or discs.  I have had several folks ask how certain pieces are connected and I thought this would be a good forum to share!


After struggling with balled headpins in connecting layered pieces and discs, I had a brainstorm one day.  What if, instead of balling up the end of 1 piece of wire, I somehow melted/fused 2 pieces so that I could use both "tails" to better stabilize my components to the base?  Imagine my surprise, that after twisting the wire together and sticking it in the torch, just like normal torched headpins, it worked!

Here is my method...start with a piece of copper wire.  I like 22 or 20 gauge.  Fold it in half, press together and twist until you have about an inch twisted.  Torch until you have the size ball you  want, quench, and untwist! Simple, huh!


It really is!  Things to watch for...make sure the wire is touching throughout your twist. Any segments that do not fully come into contact with the other wire will melt through, leaving you with a single pin, or worse, will cause the balled-end to fall off.  If you are using scrap wire, you don't have to loop at the end, just twist the 2 together, but make sure the very tips are touching. 

If you want to enamel the ball, do so as you would with regular torched pins, before you quench.

I thought this would only work with copper or fine silver, due to their fusing capabilities, but decided to try sterling silver and it works!  It also works with brass/bronze.

Layer your components in your desired configuration...thread double headpin through the holes and make sure you have a good fit.


With these 1-holed components, I wrapped the tails around my base form...usually in the opposite direction for a stronger and closer connection.


When I use a flat base to connect to, like these earrings, I like to punch 2 holes, like a button, and thread each tail through their respective holes, then on the back, flatten them and tightly coil them.  Since the ends are exposed with this method, you have to make sure any sharp edges or burs are filed.  I squeeze with my nylon-jawed pliers to work harden, then I usually tumble to strengthen as well.


There you have it!! I am sure that I am not the 1st one to figure this out!!  It is a really versatile technique and can be used in all sorts of ways!  I want to try fusing several strands together and do some wire weaving, but that's another day!

Thanks for stopping by...If you have any questions, let me know!

Melissa Meman
Melismatic Art Jewelry
Art. Life. Love

Tuesday, December 24, 2013

In With The New!

Happy Christmas Eve!  In keeping with the theme of reviewing my work in 2013 and looking forward to 2014, I give you the following!

Lots of preparation goes into Bead Fest and then it's over like that!  This past Bead Fest, I offered several new options for my customers.

I had many sets of embossed beads - beads using brass presses to make an impression in the glass.


I offered cabochons this year as well; they can either be bezel set or stitched around.


I offered large focal beads; these ones are over an inch and a quarter.

 I made a lot of glass headpins on copper and steel wire.

 I made ruffle beads - if you purchased any, I'd love to see what you made with them!

 I made some buttons (although they did not sell).


And finally, I made ruffle discs, which were used as the May Component of the Month piece - you ladies did an awesome job with these!

What I'm looking toward in 2014 is to work with more mediums than just glass.  Taking a break from glass may make me realize that I want to get back to it (I'm already dreaming of a Carlisle Mini CC torch to get with my work bonus this year!). 

I got a start on my new goals a few months ago.  I purchased a tutorial from DatzKatz on etsy and got busy making beaded beads.  I love these, they are so much fun to make.  I had made the ones around a solid wood bead core before, and have a few tutorials for those as well, but these are quite fun!


I also did Sally Russick's Beading around a Cabochon challenge which I really loved!

At ArtBLISS, I took a Christine Damm class in polymer (my second class with her) and Stacy Florer's class in thin gauge metal and would like to continue working in these mediums as well.


What are your creative goals for the new year?  Do you want to work in new mediums?  Do you want to improve yourself in your current medium?  I hope that whatever goals you set for yourself, you see success and happiness in what you do!  Happy 2014!

Susan
SueBeads

Tuesday, January 1, 2013

Top Posts of 2012

Well, happy new year! It's officially 2013 and we are still putting our heads together to come up with some new and fun ways to bring you more (and more!) Art Jewelry Elements - you'll be hearing about them over the next few weeks.

In the meantime, we thought it would be fun to take a look at Art Jewelry Elements' first year, and see what you guys found most interesting. In reverse order, the top five posts of 2012 were...

#5: Book Review and Giveaway-Irina's Inspirations for Jewelry


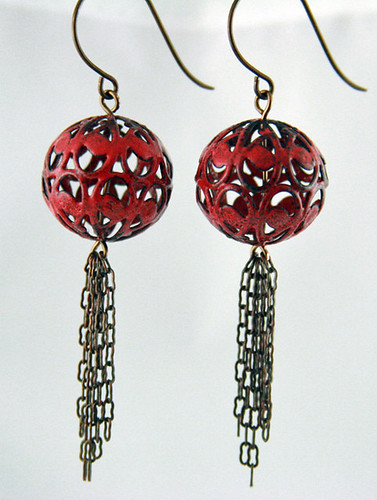
Jen Cameron reviews Kalmback Books' Irina's Inspirations for Jewelry and shows off earrings she made using some of the principles in the book.


Lantern Tassel Earrings

#4: The Price of Lampwork


Jen Cameron writes a thought-provoking post about pricing handmade work - in this case, lampwork beads.


#3: FiberWire and a Fiber Studio Tour


Karen Totten introduces us to FiberWire, an innovative wire and fiber product, and gives us a tour of her daughter's studi, where FiberWire is created.


#2: Polymer Clay Silverware Textured Beads


Rebecca Payne shares a fun and easy technique for texturing polymer clay beads using old silverware handles.


And the #1 post of 2012 was......

Art Jewelry Elements Debut


A quick introduction to the original AJE team when the blog launched last April. While some of the team members have changed in the eight months since we launched, the vision remains the same:
Our goal is to build a community of people who love art jewelry, love making art jewelry, who aspire to make art jewelry, and to those who just like looking at pretty pictures. We will focus on building your art jewelry business, getting published, challenging you to stretch yourself and flex that creative muscle, lots of tutorials, tool and product reviews, studio organization, giveaways, news, trends, and so much more.


We have so many exciting things planned for this year! We hope you'll come along for the ride - and on behalf of the entire AJE team, we wish you a very happy new year!

Until next time -