Showing posts with label bead tutorial. Show all posts

Monday, July 4, 2016

Mixed Media Bumblebee

Firstly, I'd like to wish all of our US Readers a Happy 4th July. Hope you have a wonderful day!

For today's post, I'd like to share how I made my bumblebee connectors for last months AJE Theme Challenge. The theme was summer and I decided I wanted my design to portray a summer's garden, so I came up with these mixed media connectors to design around.


My version is made in ceramic clay, but it would work equally well in polymer or air drying clays.

To begin, you will need clay, and decorating colours (either glaze or paints), wire, and metal sheet, plus tools.

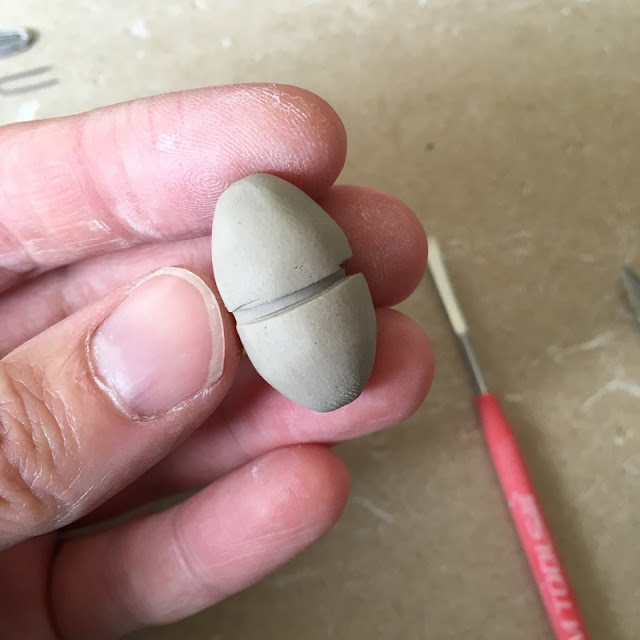
Take a small lump of clay and roll in to a long egg shape.


Divide the shape in half by pressing a line around the centre.


Using a flat tool, smooth each side of the line to remove the sharp edge.


Choose which end you want to be the head and divide that section in half as before, by carving a line around the centre.


Smooth the edges again.


Draw an eye shape on either side of the head, pressing around the edge of the line to make the eye stand out.


Clean up the carved areas with a damp paintbrush.


Using a knife or other thin sharp tool, start at the rear of the bee and scratch lines in a circle to start adding the texture of the fur.


Continue adding the fur texture in rings around the body of the bee stopping at the head.


On either side add a slot through the middle section of the body. This needs to be wide enough to add the wings so check the thickness of your metal. If working in ceramic clay, make sure you allow for shrinkage.


And finally, add high temperature or other wire to turn the bee in to a link.


Originally I was going to glaze these in black, but decided that wasn't very summery, so I went for a rusty matt brown.


To make the wings, I drew the shape on to a sticker and put this on to copper sheet for cutting. I used temporary stickers so I could peel the original off and use it again for the others to make sure that each wing would be the same shape. Each wing has a tab where it can be inserted and glued in to the body.


To add texture on to the wings, I decided to etch them. Stop out fluid was painted on and they were etched for about an hour and a half.


I don't always like the wobbliness that is created with the etching fluid, but it gives the wings a brilliant texture.


After treating with Liver of Sulphur and tumbling, the bees were ready for assembly.

Using a toothpick, I put two part epoxy resin in to the slots on the bodies and added the wings, holding them in place with a rubber band while the glue set.


And here's one of them in the finished necklace.


I think copper and clay work really well together and my brain is buzzing with ideas for other ways to incorporate metal into new work.


Wednesday, February 10, 2016

Painting with smoke

This year I’ve decided that I will be concentrating on Raku firing for my ceramics, and I’m starting out with something I haven’t tried before… Naked Raku. When I told my husband what I’d be doing, he showed much more interest than he usually does, but the naked refers to the clay. The technique results in an unglazed piece… not quite as daring as it sounds, but still pretty exciting!

Naked Raku Pendants


So while I’ve been totally obsessed and not doing much else for the past few weeks, I thought I’d share how they are made… I hope you find it interesting! 

I have been researching this technique for a couple of years and there are some amazing ceramic artists who have been kind enough to share their processes to help others. A couple of my favourites are Ashraf Hanna, and Kate & Will Jacobson. Their work is really something to aspire to and they give regular classes demonstrating their techniques. 

Ashraf Hanna

Kate & Will Jacobson


Unfortunately, I’ve never had the opportunity to take a Raku class so everything I have learned has come from what other clay artists have been kind enough to share in their books, and just trying it out. 

Here’s how I’ve taken the techniques and adapted them to work on a smaller scale for my work…

To begin, raku clay is formed in to shapes for pendants, beads and other components. 

Just before they are bone dry, they are burnished with a smooth pebble. This compresses the clay, removes any dints and polishes it.

Burnishing

You can see here the difference between the pieces. One is the rough clay as it’s first formed, the other is smooth and shiny where it has been polished. My burnishing technique isn’t quite as good as others, I’m very impatient and would lose interest going over the same piece 3 times, so I’ve found that burnishing just before the piece is totally dry gives a nice enough sheen for the finished item.

The reason for burnishing is to help the slip/glaze release in the firing process. It also gives the final piece a beautiful finish.

The pieces are bisque fired and once cooled, a layer of slip is applied. Slip is liquid clay. Mine is made from the same clay as I use for making the pendants, by mixing it with water until it becomes a thin liquid and straining out the grog.

Coating with slip

Once the slip is dried, the pieces are then coated with a sacrificial glaze. This is made using basic materials, frit and china clay. It doesn’t have to be fancy as it will all be destroyed in the firing, it's job is just to hold the slip in place during the firing process. Without the glaze the slip would pop off when removed from the kiln and your design would be lost. 

Coating with glaze

Again, the pieces are dried and a rough outline of a design is sketched on to the piece. Using a sharp skewer the design is etched on to the piece scratching through the layers of slip and glaze down to the bare clay. It is better to use a wooden tool to draw the design so that the smooth finish of the clay underneath isn’t scratched.

Etching the design

Now the pieces are ready to go into the kiln. They are fired up to 850oC, taken out and put in to the reduction bin. The bin is filled with sawdust and straw which ignites on contact with the hot pieces and the smoke from the fire colours the pieces where the bare clay has been exposed.

Fire!

After 15 minutes, they are removed from the reduction bin and they look pretty awful.

Hopefully beautiful on the inside.

They are put in to cold water and as they’re still hot, the shock pops off the slip/glaze coating revealing the design on the bare clay.

Naked raku Mackintosh style roses

Cleaning up the pieces


Revealing the design

Once they’re all cleaned up they go in to the oven for half an hour to dry them and remove the smoky smell. For a monochrome finish, they can be waxed for protection and to give them a satin shine.

Naked raku pendant

To add a little bit of colour, I used acrylic paint to wash over some of the white areas in the designs, and then they were sealed with wax to protect them.

Adding colour

You can tell the difference in pieces from the first attempt and the second. The second batch turned out much darker, I think because I used more sawdust in the reduction bin for my second firing, but it could be due to different thicknesses of slip and glaze between the batches, ultimately the whole process of Raku comes down to doing what you can then leaving it up to chance. I love that aspect of the process, you can only control so much, the rest of it is down to the kiln gods!

And when they’re in a good mood, you can get some brilliant results!


The finished pieces


Thanks for reading, and I'd love to hear what new things you're planning to try out in 2016!


Friday, November 20, 2015

Crescent Flower Tutorial

I had so much fun creating this piece I just had to share it.  And for those of you who read through to the bottom there is a surprise announcement.  So without further ado I present you all with my Crescent Flower Tutorial.


Materials list:

  • Czechmate Crescent beads 
  • Rounduo beads - Potomac Beads 
  • 15/0 seed beads 
  • 11/0 seed beads

1) Pick up 8 11/0 seed beads.  Form a circle by passing though only the first bead added.  You will be making several passes through.
2) Pick up 1 11/0 seed bead and pass through the next 11/0.  Continue all the way around for a total of 8 beads and exit through the first bead added in this step.
3) Pick up 11/0, 15/0, 11/0 and pass through the next up bead creating a picot.  Pass through the next three beads and repeat all the way around.
4) Exit the next three beads in base circle.  Repeat step 3 adding picots on top of first picots. 
5) Weave through beads to exit top 11/0 in top picot.
6) Pick up 15/0, Crescent and 15/0.  Depending on which way you are stitching will determine how the crescent sits you want the points facing inwards.  Go through the 11/0 in the bottom picot.
7) Pick up 15/0, go up through crescent
8) Pick up 15/0 and pass through top 11/0 at the beginning of step
9) Go through all the beads just added to reinforce. Weave through beads to exit top 11/0 in next picot set.
10) Weave through to exit bottom 15/0 of picot.
11) Pick up 2 11/0 and pass through 15/0, 11/0, 15/0 of next picot.
12) Repeat step 11 and exit first 2 11/0 added.
13) Pick up Rounduo pass through 2 11/0 on opposite side
14) Pass through second hole of rounduo and through first 2 11/0 beads.  Repeat to reinforce.
15) With thread exiting rounduo pass through 2 11/0 beads on the side and repeat to reinforce.
16) Weave through to exit second hole of round duo and repeat step 15 on opposite side.


The next steps are for attaching the flowers.


17) Weave through beads to exit back side of crescent 15/0.  Pick up 3 11/0 creating a picot, weave through to exit middle 11/0
18)  Pick up 8 11/0 and pass through starting 11/0 and next two 11/0
19) Pick up 11/0 and pass through next 2 11/0
20) Repeat step 19 adding 3 new 11/0 as "points" pass through the last 2 11/0 skipping the "point beads" weave through to the top 11/0
21) Pick up 11/0 pass through the 15/0, 11/0, 15/0 in next flower.
22) Pick up 11/0 and pass through "point" 11/0 in first flower.  Reinforce and knot as desired.
I hope you enjoy this tutorial.  I have decided that I love playing with beads so much that I will be making and sharing more of my original designs with you all.  Let me know what you think of this design and if you would like to see more.  I would like to get you as addicted as I am to weaving with cool beads.

So I promised a surprise.  I was approached by the folks over at Potomac Bead Company and they will be making a YouTube video of this design.  I can not wait for that and as soon as it is up I will let you know or you can click the link to subscribe.