Showing posts with label Francesca Watson Designs. Show all posts

Monday, September 14, 2015

Dressing your hammers!


Some time back, I promised to show you how to dress your hammers…. and then I never got around to it. Today, I’m trying something a little different by showing you the process in a video instead of trying to explain it in writing. I hope you like it!


A few notes:
  • This is my first full-length process video. I see this as something I’d like to do more of, so help me make it as effective and beneficial for you as possible! We’ll get better at sound and camera angles, but in the meantime I’d love your constructive feedback and comments.
  • A huge thank you to Letty Wilde of Silver Leaf Artisan Jewelry – Letty is one of my students, a dear friend, and my assistant in my studio one day a week. She operated the camera and warned me about “resting bitch face” more than once!
  • Please excuse the horrific state of my working space – the entire Roadhouse Arts studio and classroom area is in transition right now, and we had just gotten back from BeadFest when we shot this, so everything looks like a bomb went off.


Thanks for watching!


Until next time –


Friday, August 14, 2015

Sharpening the saw...

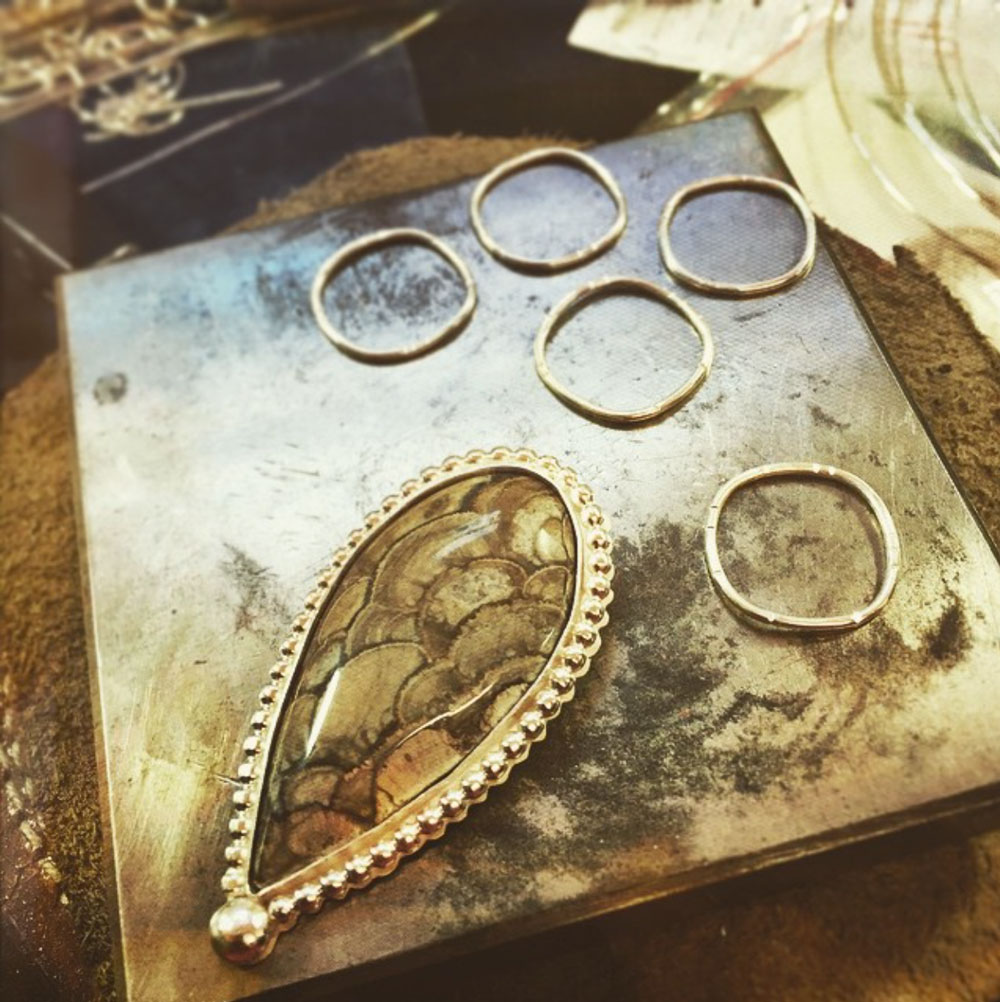
Nope, not my jeweler's saw, although it's been getting a workout.

Sawing, sawing, sawing and more sawing.
One of my goals for this year was to take a drawing class. I've always believed I'm talentless in the drawing arena, but some of my AJE team members convinced me that drawing - which includes the process of learning to see things differently - is really a learned skill. So with their encouragement, I decided to take the plunge. Sort of.

Instead of a drawing class, I decided to take a beginning painting class with our Roadhouse Arts acrylics instructor, the very talented Stephanie Davis. Best of all, my husband Nick is taking it with me too, so we get some creative time in the midst of of a very busy season of our lives.

It's been an interesting process over several weeks. As has been the case for centuries, beginning painters learn by copying work done by other, more experienced painters.

One of my favorite artists, JMW Turner, started out copying old masters before he found his own style.
(photo source)
But before we could get to the "good" stuff, we spent an entire class (and in my case a number of hours of homework afterwards) creating color charts. The idea was to introduce us to the basic concepts of color theory and then give us a chance to experiment with some of them. It was also a crash course in color mixing, learning all about the colors in our respective palettes. I honestly found this exercise fascinating.


Among other things, I learned that a little bit of Phthalo Blue (with Green Shade) goes a very, very long way.


With that under our belts, we set out to find still lifes that appealed to us. I chose this pretty mixed media piece by Maria Pace-Wynters.

Blue Poppy Garden 2, a mixed media piece by Maria Pace-Wynters
(photo source)
Stephanie told us that for our versions, we were only allowed to use two analogous colors and whatever secondary colors they create. And she also told me to simplify the background, which was a relief, because this gorgeous background is far beyond my ability to duplicate.


It doesn't come close to the original - and as you can see, it's also not finished. I am in awe of the other students in the class, most of whom are able to finish their pieces in less than three hours. I am not one of them. Hopefully I'll get to finish it once my BeadFest adventure is over - I want to do a little more with the background, and I can't get the color right for the little chysanthemum in the corner. But it was a fascinating exercise into how to "see" differently and how to establish an effective communication between my brain and my hands so that I can recreate what I'm seeing.

I did much better with my second project, although it is also not finished. The assignment was to take a simple two-subject still life and recreate it in different colorways to evoke four different emotions: happy, somber, calm, and sweet. I picked this simple, cheerful still life by Pam Van London:

[photo source]
In some ways, this project was more successful - I started with "happy" because the original was so bright and cheerful, and I think my pears actually look like pears. But in other ways, this project was extremely stressful - making color choices for the other moods was very hard, and you can see how far I've gotten with it.


Learning to create "volume" was eye-opening. I've very proud of the fact that my pears actually look a little like fat, round pears!!
Again, other students in the room whipped through the assignment and left with mostly completed pieces. I ended the evening feeling half proud (round pears for the win!) and half disgusted (they're only colors, for heaven's sake!) which probably means I was overthinking the whole thing.

Because of the work I'm having to do to get ready for BeadFest, I'm going to miss the rest of the classes this time around - but I'm planning to take the workshop when it's offered again in the fall. The introduction to color theory has been fascinating, even though I'm at the place where it's still more mystery than edifcation at the moment, and I am very encouraged by the (admittedly intermittent) ability to look at something and evaluate it with an eye towards replicating it. As someone without a formal art education, this has been kind of a big deal. (Plus: according to my bio, I have "an emerging interest in mixed media" and I am loving playing around with color combinations. I might even revive a bead colorway project I dreamed up a few years ago!)

Already, I've been able to put some of that newfound sensitivity to color to good use. I resolved a couple of layout issues for recent advertising pieces that was heavily influenced by incompatible colors, and I solved a design issue on a recent jewelry piece that turned out to be related to the color of an accent stone I was trying to use. I may have eventually gotten to the same place without knowing why or how, but being able to be more intentional in that process was a win.

So I'm sharpening my "creative saw" with pursuits that have nothing to do with my main focus of metalsmithing and jewelry-making, and already I'm liking how it's sparking new thoughts and new ways of looking at what I do. How about you? What are you doing to keep your creative saw sharp?

Until next time -


Tuesday, July 28, 2015

BeadFest 2015!

It's that time of year again when the AJE team swings into final preparations for BeadFest in Philadelphia... except that this year, it appears we've changed things up a little. I'm the only one teaching (for the first time) and Jenny Davies-Reazor is the only one vending. The others are just coming to play, which is a refreshing change (for them) from the annual craziness that usually accompanies BeadFest prep (you can read a bit about last year's preparations here, here, here and here).

Susan Kennedy's prep from last year

Or at least I hear it's a refreshing change. Because since this is my first time teaching at BeadFest Philly, I'm obsessing a little about making sure I'm completely ready.

My bullet journal overfloweth
The good news is that I'm excited about the workshops I'm teaching - they're fun and two of them are a really good fit for people who just want to get started with metals. While I was discussing all this with the other AJE team members, they thought it might be a good blog post so... here you go!

Friday, August 21 - Roll Printing and Keum Boo

I've written before about my love of roll printing and especially the patterns that are available from Rolling Mill Resource. Tracy was kind enough to help me put kits together for this workshop, which is going to incorporate roll printed designs with keum boo - one of my other favorite techniques.


The addition of 24k gold to sterling silver makes such a statement - and it's surprisingly simple, too. I'm looking forward to introducing folks to the process, which will really just scratch the surface of the possibilities it offers. It's a great workshop for people who want to get an introduction to some of the characteristics of sterling silver and two simple processes for embellishing it.

Saturday, August 22 - Welcome Home Jewelry

My friend Gail and I designed this jewelry set for our very first Roadhouse metals retreat last year - and if I'm being honest, it sort of kicked our butts! I've reworked the design a bit to make it a little less intimidating and now I think it's a fun project for either a confident beginner or someone with a little bit of soldering experience under their belts.


We'll also be making earrings to go with this pendant, so students will learn a cool method for creating embellished earwires and will also have the opportunity to set small stones in bezel cups. It's a good multi-technique project for anyone wanting to up their metals game.

Sunday, August 23 - Chain, Chain, Chain!

I adore this project - so simple and easy, and such an elegant result! We'll be introducing fusing principles with an easy pair of earrings, just to get everyone started, but the star of the show will be this embellished loop-in-loop chain bracelet.


I've heard this called by all sorts of other names, but I just call it embellished loop-in-loop - and since I'm a sucker for handmade chain, I make this one a lot because of its ease of construction and elegant profile. And the little balls... well, you all know I love balls. This is a perfect project for someone with absolutely no experience, and students will leave with two finished projects!

So are you planning to come to BeadFest this year? If so, I'd love to meet you and say hi - and since there are still spots open in these workshops, we could even have a little playdate if you'd like! Don't forget to stop by Jenny's booth and ogle all her gorgeous work - I'm sure she can even arrange for you to take some of it home with you as your very own.


Hope to see you in Philly! Until next time....


Tuesday, June 16, 2015

Product Review: Eurotool Handy Flame Torch


A year and a half ago, I wrote a post here on the Art Jewelry Elements blog about the Sterno Culinary Torch and why I liked it for jewelry making. Since then, I'm sorry to say I've fallen a little out of love with the Sterno model - maybe it's because we use the heck out of these in the studio, but I found I was having to replace them every six months or so when the strikers just stopped sparking.


Our insurance carrier is happier when we don't have tanks around and therefore charges us less on our liability insurance, so I was still sold on the idea of using a larger culinary torch. Unfortunately, I was having a heck of a time finding a sturdy, reliable replacement for the Sterno. I visited local kitchen supply stores and ordered likely candidates from Amazon, but they were either very flimsy or had flamethrower-like qualities that made them unsuitable for jewelry work. (Seriously: check out the keywords on this torch from Amazon. Flamethrower.)

Then Eurotool announced they were introducing their own version of these torches. I ordered one immediately, keeping my fingers crossed it was going to be what I'd been looking for, and when it arrived I wasted no time putting it through its paces.


I've used this torch for all my work for the last month, and have done everything from large work to chain links to fine 20 gauge prongs. I'm pleased to say it has handled every bit of it with ease. Here are some of the things I really like about it:


The flame on the Eurotool version (front in both pics) is longer, tighter and crisper than the Sterno version. This makes it a little easier to manage the heat control issues.


The Sterno screws onto the butane canister - and to be honest, this always gives students a bit of a fit in class. You have to hold the collar and twist the top of the torch more than a full revolution to tighten it down, and there's a moment where the gas starts hissing. For brand new, never-done-this-before students, that can sometimes freak them out a little bit, and fitting the collar onto the can takes a bit of practice.


By contrast, the Eurotool torch has a simple tab fitting that fits cleanly and intuitively into the slot on top of the canister. Locking it in place can be done with one hand, and requires less than a quarter turn with no gas release. This is a minor design issue, of course, but for a teaching studio the simpler the better.

The biggest consideration, though, is consistency. This torch sparks every single time and the trigger pull is crisp and short. It's also much, much lighter in weight than the Sterno - though still solidly made - and combined with the shorter trigger pull makes for less hand fatigue over a full day of working with it. I did every bit of soldering on this piece with the Eurotool torch, right down to the fine link soldering.


So: I'm a fan. If you're looking for a culinary torch to add to your bench, you might want to consider this one. It's priced to be competitive with the Sterno and although I may be proven wrong in the long run, I think it will outlast them in a studio environment.

Until next time -

Full disclosure: I am a Eurotool dealer. I was not compensated in any way to test, review or recommend this product, and none of the links in this post are affiliate or commission-paid links.


Tuesday, June 2, 2015

Stick a ball on it!

I have a mixed media friend who has a simple go-to whenever she can't figure out what comes next in one of her designs: she says, "Stick a bird on it!" The first time I heard her say it, I realized I have a similar go-to in my arsenal: "Stick a ball on it!"

Balls in a nest
Balls on rings
Balls everywhere! (I cheated - everything except the big one was pre-formed)
Hidden balls (in 18k gold)
I realized, as part of the design intensive retreat we did with Connie Fox earlier this year, that I really - REALLY - like using balls in my designs. The "why's" of it are complicated, but the "how's" aren't, so I thought today I'd share how to make sterling silver balls so you can use them your own work. It's a super simple way to use up scrap and add some dimension without a lot of effort.

You'll need:
  • Sterling silver scrap
  • Charcoal block or solderite board
  • Butane torch (any size works)
  • Small gram scale (completely optional)
Start by laying out a small pile of sterling silver scrap on your charcoal block. If you want all the balls to be the same size, weigh your scrap on the gram scale. (Usually, I just eyeball it.) Light your butane torch and start warming up the first pile of scrap. Do this by circling around and over it, making sure to keep the block warm immediately around the scrap. The block will glow and the silver will start to melt, pulling together into a ball. Watch the silver closely - there's a "skin" of impurities that will form around the ball, when it's still a dull orange, and then burn off as the silver turns glossy and shiny. As soon as you see the ball turn shiny, start pulling the torch away.... slowly! The goal is to let the ball cool down very gradually so that the surface of the ball doesn't wrinkle up.

Wait. Let me just show you.


(As an aside, I had fun making that video. Sorry about the sound quality and editing - we'll get better at it!)

A charcoal block works best for this, though you can use a solderite board if that's what you have. The charcoal helps to retain the heat, which helps with slower cooling. And you can see that I've used this block a lot, so the center of the top has been slightly burned out. This is actually a good thing, because as the silver balls up it has a tendency to roll off the edge of the block if you aren't careful. (Ask me how I know!) That little dip helps keep it from happening.

Once you've made the ball, you need to make the bottom flat enough to solder onto your piece. Here's how I do it (thanks Melissa Muir for showing me this technique!):


(Yeah, yeah... I'm a goofball.)

One of the things I like about this technique is that once you've sanded the bottom of the ball, you can solder it in place without having to pickle or clean it further, since sanding the bottom takes off any impurities that might keep it from soldering. This means you can pickle it later with the whole piece, making cleanup much easier and reducing the number of steps in your fabrication process.
 That's a win for me. The other win - and this is a big one - is that I am using and repurposing every single bit of sterling silver scrap and "waste" on my bench.

So that's how I make the balls I use in my designs - and I do it a lot! I hope this inspires you to hang onto all those little bits and pieces left over from your larger projects. And I hope you like the videos - they're kind of an experiment, so I'd love to know what you think!

Until next time -