Saturday, March 5, 2016

Giveaway Winner - March Theme Challenge


Thank you for the comments on our March "Eye Love Beads" theme challenge!  I'm delighted to announce that the winner of my Nazar eye pendant is none other than:

Kelly of Beadin' Black & Blue


Congratulations!  I will be emailing you shortly, and I look forward to seeing what you create for our challenge this month!

The challenge is still open to anyone that wants to take part by designing with their own, or with other artist's beads - please check out the original post for full details!  

Friday, March 4, 2016

Finding and Breaking Down Patterns for Inspiration

At the end of last year, I signed up for a year-long mixed media class called Wanderlust. One of the techniques taught so far is Zentangle. The same weekend I was practicing my first tangles, we went to the Royal Ontario Museum in Toronto (during the COLDEST weekend of the winter thus far. BRRR!). 

dinosaur skeleton royal ontario museum

Because I had been practicing Zentangles during down time in the hotel room, I was particularly tuned into patterns while we were at the museum. We spent the majority of our time in the Made in China: Cultural Encounters in Export Art exhibit. Other than the dinosaur photo above, every picture I took was mostly about pattern. These are just a few examples:


pattern selections Made in China Exhibit Royal Ontario Museum

The plan was to draw them into a pattern of some kind to keep for future reference and inspiration. I decided to play with the photo below first.

pattern selection Made in China Exhibit Royal Ontario Museum

On my first attempt, I tried keeping the branches, but it just looked blah. So then I just focused on the flowers. I did practice these a few times in a few different ways before doing my final pattern stepped out for you below to use if you want to try it. 

pattern drawing for use and inspiration

Step 1- Top Left: Draw a few random circles spread out. These circles will remain on top of the stack of circles. Add the pattern to the interior of the circles.

Step 2 - Top Right: Draw partial circles peeking out from behind the full circles you drew first. 

Step 3 - Bottom Left: Continue drawing more partial circles, add more full circles (that are top of the stack) as needed and fill in. Draw the interior circle patterns. You can leave it like this if you want. 

Optional Step 4 - Bottom Right: Start shading. The pattern is lovely on its own, but shading gives it so much more depth and interest in the sketchbook format. You can use a regular #2 pencil or if you have graphite drawing pencils, this is a good time to play with those. You will also want to use a tortillon. For this pattern, I start by shading a shadow cast down from all the top circles onto the bottom circles. In this photo, I've started shading the last half, leaving the right half alone. 


pattern drawing for use and inspiration

Option Step 5: After creating a shadow under all the top circles, I decided it needed more. So I imagined a light coming from the top left side, and shaded the bottom right of the circles. 

pattern drawing for use and inspiration

This is my final product. I have a Pogo printer (similar to this) that I will print out a photo of the original inspiration. It's a sticker, so then I will just stick it to the top of the page where there is a blank space.

I use a small 5.5" x 8" sketchbook to play with markers for tangling or for watercolor markers, etc. It isn't really meant for water, but this book isn't precious, so it isn't a big deal if I destroy a few pages playing with marker techniques and patterns, etc.

sketchbook


Here are a couple tangles I've tried from a book I have. You can see where it's hardly professional quality. I'm just playing with it to see how it feels and how it works:

practice zentangles


You can try this technique with any pattern you find that you think is interesting. You can find pattern in so many places if you pay attention. It can be in nature, fabrics, buildings, art, jewelry, and so much more.

jen cameron glass addictions bio

Wednesday, March 2, 2016

Waking a Sleeping Muse...


Do you ever have times when your muse seems to abandon you? Many creative people suffer from these droughts and I'm no exception. I've had no inspiration or motivation since well before Christmas which is a long time for me. Usually I can kick start things just by swapping activities for a while to get a new perspective but this time nothing seems to have clicked. Sometimes we just need to take a break for a while - last year was pretty busy and I did dive into and get engrossed in quite a few new activities but it's been rather frustrating to find myself staring into the distance whenever I've tried to start something.

I've been trying to improve my fitness levels of late by walking more so this week I decided to see if I could kill two birds with one stone and use my walks to go in search of inspiration and try and wake up my sleeping muse. Camera in hand I headed out to Hengistbury Head - a beautiful coastal nature reserve that never fails to lift my spirits and this visit was no exception. I had plenty to play with by the time I got home

Anyone who follows me on facebook will know I have something of a passion for the beach huts that are plentiful in my region - they've inspired me to create beads and jewellery in the past and this photo certainly rekindled that passion. I just love the soft winter sunlight in this picture that creates a lovely muted tone to these huts compared to the bright harsh light of summer when they're usually photographed.


The great thing about taking photographs of things that catch your eye is that they can inspire you in more than one way. You can take the subject matter of the image as your inspiration and I certainly think I might be revisiting beach hut beads this year. Or you can use them for colour inspiration by using them to create a design palette. There is plenty of free software available for turning your images into colour palettes and you'll find some in a previous post I wrote here. I particularly like Adobe Colour CC as it allows you create specific mood palettes.


Once I'd created palettes with my favourite pictures I decided to go through by stash and pull out some beads that relate to the images through colour, texture and maybe the broad subject matter. Purely random choices they're not intended to work together for a specific piece but just working through this process definitely got me thing creatively.

Beads by Caroline DewisonHelen ChalmersGenea BeadsJenny Davies-Reazor and Karen Totten

These abandoned lobster pots provided another great image - I just love the weathered colours and textures. Although I've only pulled beads for these so far they definitely make me think of fibres and wires - there you go, inspired already!


Beads by Staci-Louise Smith, Silke Grober, Outwest and Tracey Seder-Donoughe
This image is taken across a wild fowl reserve and I really like the way the stream wends it's way through the salt marsh and draws the eye to the Priory in the distance. It's a very tranquil scene and appeals to my love of anything earthy and natural which I tried to match in my bead selection.


Beads by Analyse Taylor, Rebekah Payne, Kaz Baildon, Jan Onipenco, Pippa Chandler and Elaine Ray
Of course, you don't always have to make special trips to find some inspiration - I took this image while out shopping and I am totally besotted with it. It's a wall of the church of Wimborne Minster which is 1300 years old and features Saxon and Norman architecture. I've no idea how old this particular section is or how long it's taken to weather the Dorset limestone to these glorious colours and textures but it stopped me in my tracks when I was walking by.

I was particularly interested in textures when I was choosing beads for this one but to be honest, I think this image may be more of an inspiration for my own clay work  - if I could get glazes or finishes like this...wow!


Beads By Kaz Baildon, Caroline Dewison, Julie Fountain, Karen Totten, Marsha Neal-Minutella, Kristen Stevens and Rebekah Payne
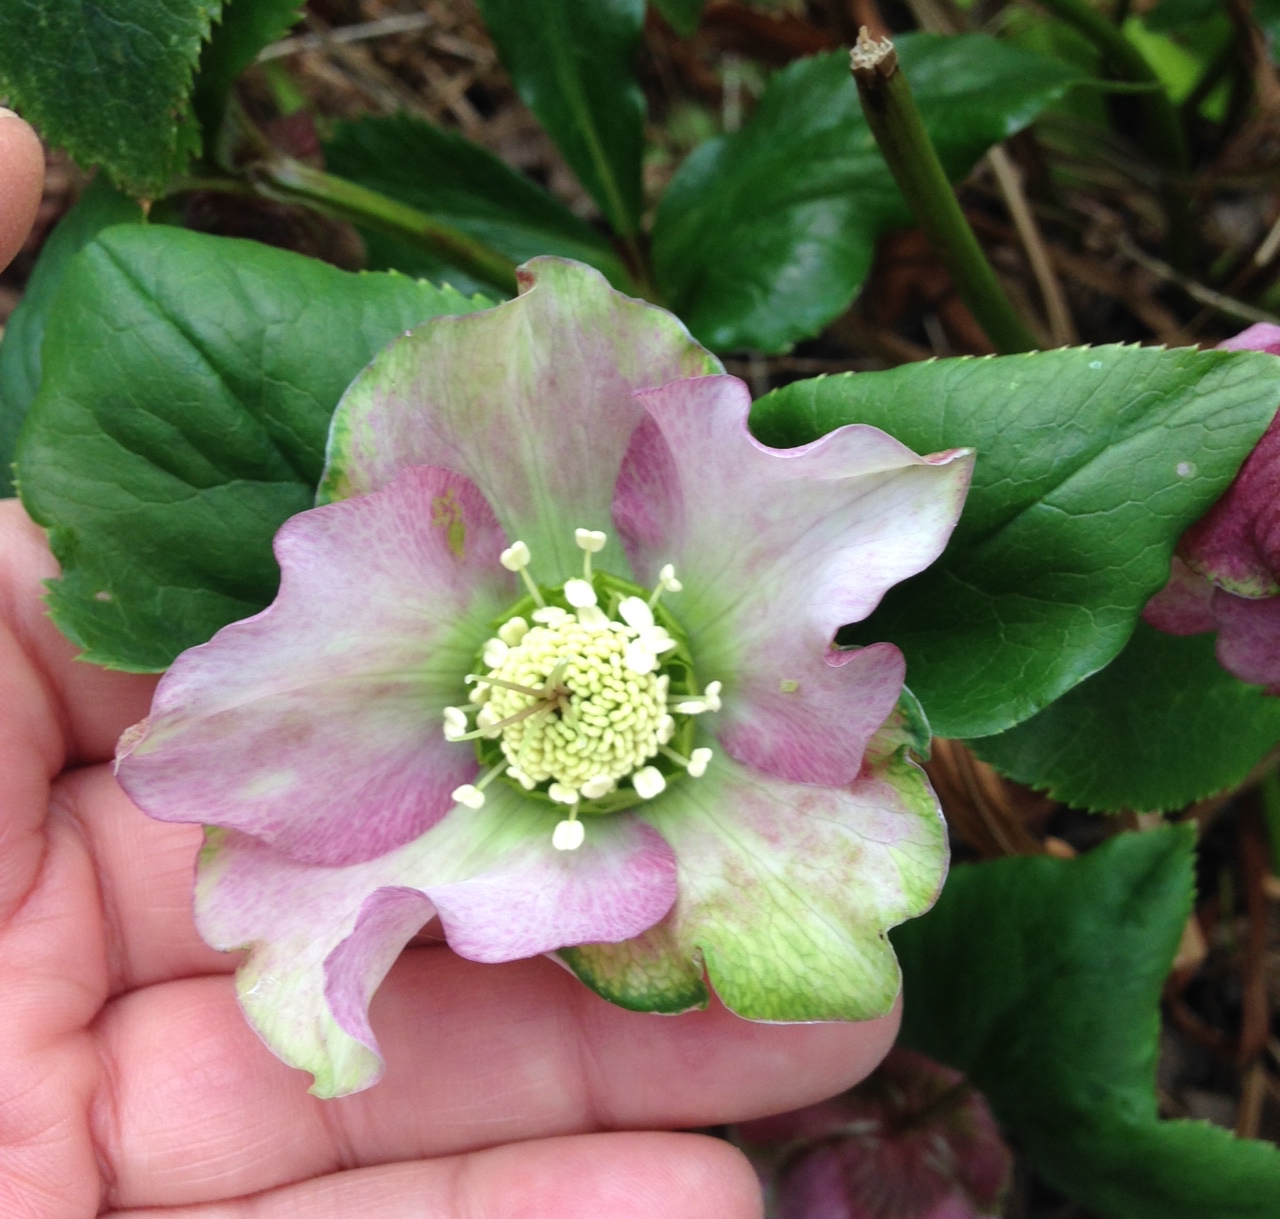
Don't forget what's on your doorstep either. This Hellebore is one of my all time favourite flowers with it's understated beauty and shy habit of hanging it's head. It graces my garden in the winter months when little else is awake and stays to welcome the brighter brasher blooms that arrive with the onset of spring. I'm not really one for pastels and rarely 'do' pink but this dusky hue with green is pretty sublime.


Beads by Mari-Carmen Rodriguez Martinez, Ciel Creations, Sally Carver, Lesley Jane and Anne Gardanne
So did this technique work in terms of motivating me? Well, apart from having the beads as a starting point my brain is also thinking ahead to possible clay and textile projects and I've been scribbling in my note book again the past couple of days. Put that together with the fresh air and exercise and I think you can say it was a success so, if you're suffering from a creative block grab your camera and walking boots and give it a go!

Tuesday, March 1, 2016

AJE COM Theme Challenge: Eye Love Beads

The eyes have it
Eyes are the window to the soul
Keep your weather-eye open

For eons, eyes have been important symbols in human culture, spirituality and religion and beads have played an important role in this symbolism.  I have always been drawn to eye beads and components, doll and taxidermy eyes, and incorporating these items in my work.  For the March theme challenge, I thought it would be interesting to investigate Eyes as our challenge inspiration.  

Yes, I know eyes can be creepy...  But they are also our amazing organs of sight, masterpieces of engineering that refract light in such a way that images are transmitted into our brains.  Please join me on a brief inspiration trip - I hope these cultural examples of eye symbolism intrigue you to explore this challenge with me!

The Nazar, or Nazar Boncugu is a protective amulet and remnant of the Turkish Ottoman empire.  Still commonly seen in parts of the Mediterranean, middle East, and Eastern Europe, this blue within blue eye is meant to protect from the "evil eye", ill wishes and ward off evil in general.  They can be found in shops, worn on the body, or placed in dwellings and shared spaces such as hospitals.   
Early use of a hand shaped amulet called the Hamsa traces back to Mesopotamia, but can still be seen today across the middle East and North Africa.  The Hamsa usually depicts an open right hand, which in itself is a powerful symbol of blessings, power and strength, along with a potent deflector of the "evil eye".  The "evil eye" can be considered a malicious stare, believed to cause illness, death, or general unluckiness, which is why the Hamsa is often depicted with an eye in the palm.  
The Eye of Providence or the All Seeing Eye is going to look familiar to you...after all, it looks back at you every time you spend an American dollar bill.  With origins stemming back to Renaissance Europe, this eye symbolizes the eye of God or the Creator, watching over humanity (divine providence).  The symbol usually contains an open eye surrounded by clouds or rays of light, contained within a triangle.  The Eye of Providence is also used by the Freemasons, as a reminder that the thoughts and deeds of the Freemasons are always observed by God, the Great Architect of the Universe.
Milagros are used across Latin America, with roots tracing back to the Iberian Peninsula.  The Milagros can be all shapes and sizes, and many different materials can be used depending on local custom.  As part of an act of religious devotion, the Milagros will be placed at the icon of a Saint, either as a reminder of the petitioner's specific need, or in thanks for a prayer granted. Because Milagros are formed in shapes representing all different types of needs, eye shaped Milagros can have several different meanings.  Besides various eye conditions, eye Milagros can bring vision, both spiritual and actual, along with insight, intuition, and vigilance.  When depicting an eye with a tear, the Milagros might be warding off depression or seeking help with grief.  
Eye miniatures, now commonly called Lover's Eye, are believed to have originated in the 18th century with the unsanctioned love affair between the Prince of Wales (later George IV) and Maria Fitzherbert.  Originally crafted from watercolor on ivory, these miniature reminders of affection were often worn as bracelets, brooches, pendants and rings, serving the same emotional need as lockets hiding portraits or locks of hair.  The Lover's Eye could be displayed publicly on clothing though, as the depiction of the eye only preserved the anonymity and decorum of the subject.
The Eyes Have It by Laura McCabe, Bronze Protection Eye by Cynthia Thornton, and Starfish Eye by Betsy Youngquist.
The eye is still used as a subject and symbol by today's artists, in all types of arts and crafts.  Above I've collected a few of my favorites.  "The Eyes Have It" is one of the first pieces that my favorite beadwork artist Laura McCabe created using real human prosthetic eyes.  Cynthia Thornton, one of the creative minds behind Green Girl Studios (incidentally, Green Girl has some great eye pieces too), makes these Bronze Protection Eye coin pendants out of bronze clay, set with a twinkly stone cabochon.  Betsy Youngquist creates fantastic beaded sculpture and wearable art, weaving together human and animal spirit through a surrealistic lens.  I find her use of eyes just fascinating, like in this "Starfish Eye" sculpture.  Can't you just envision coming across this creature in an alien tide pool some day?  Our own Jenny Davies-Reazor even has some Milagros eye pendants for sale in her shop...you should check them out!  Are you intrigued and inspired?  I hope you will join us for this challenge!

1. Giveaway - This theme challenge DOES include a giveaway!

I will be giving away one Bead and Mother of Pearl Nazar pendant that I crafted for this challenge!  The winner will be selected randomly from comments on this post. 
  • Winners selected Sunday March 5th.
  • You must have an active blog. 
  • Email and blog address required in comments.  You will NOT be eligible if you do not include this information!

2. Goal - Have fun! Try something different! Be inspired by the Eye in any way you feel! 


Make something that fits within this theme. This can be an artist bead, a component, or a finished piece of jewelry.    
       *You are free to use any artist bead/component in your design -
  • from an AJE team member 
  • of your own creation
  • from another artisan bead maker... 

3. Share/Reveal - Reveal date March 31st! 

If you would like to be included in the blog reveal at month's end, please email Lindsay at phantasmcreations (at) gmail.com. Since this is open to all, this is the most efficient way to be included. Emails need to be received by March 29th  to be included.