Wednesday, April 23, 2014

Spiral Play - Part 2

I know it has been a while since I posted part 1 of playing with spiral rope with seed beads.  I have been trying to find the inspiration piece with my new organization while still getting ready for my daughter to move back home and taking care of the normal day to day stuff.  Throw in some sickness and a holiday and here we are almost 2 months later.  If you missed part 1 you can find it here.

So one of the things that the girls on the team wanted to know is how to add art beads to a spiral rope.  I do not claim that this is THE way only that it is my way and seems to work best for me. 

First I have to tell you when I found this gorgeous set of stoneware beads by Diana of Suburban Girl Beads.  I just love Diana's stoneware beads they remind me of sand.  I know that may sound strange to some but I love beach sand.  I love the texture, warmth and the colors of it when the sun shines down.  I do not get to the beach often enough so these take me there.

Second I took the information that Jennifer shared on this post and used my phone to take all these pictures.  I would really like your opinion on how they show for you.
I started with this gorgeous set of Diana's beads and the colors of seeds that matched. Now some art beads have larger holes that seedies can sometimes slip through so for the core I choose size 8/0 seeds.  If the hole is really large choose either a 6/0 seed or use a bead spacer to keep the beads from slipping through.

Start your spiral rope and when you want to add the bead do so and add the next section of seeds like you were starting the rope from the beginning.

After you loop the beads and come back out of your core instead of starting the next round you will go back down through the spiral beads and through the art bead.  This is to reinforce the thread path because one thread through the art bead could lead to a breakage.

When you added the art bead you came out of the core.  When I am going back through the art bead I go through the spiral beads to center the art bead better.

And then of course now you will go through all the core beads, through the art bead and then the core beads on the opposite side then continue your spiral. 

This is how mine looks.  I will get a better picture after I clasp it.


So that is how it works for me.  If you give it a try please show me I would love to see what you do with it.

Kristen

Tuesday, April 22, 2014

Dysfunctional Studio Tour

I've been "living" in my new Roadhouse Arts studio space for almost four months now, and while there's a lot that I really love about it, there are also some things that aren't working for me.

My little admin area needs to be reworked. I spent a huge chunk of the day yesterday working through the paperwork that had accumulated, both for my own business and the Roadhouse side of things, and everything is caught up. While that makes me happy, I think the backlog started because the workflow wasn't well-organized to begin with.

Admin-Area

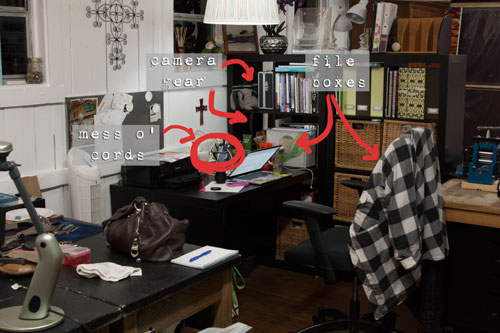
I have two file boxes now, and the segregation of things will help. The smaller one contains the stuff I get into more frequently; the larger one is longer-term. But I still don't have the right space to stash either of them - my camera bag and equipment is taking up two entire cubbies in my wall unit. And I don't like the nest of cables and power strips on top of the desk. I just ordered this remote switch and I'm hoping it will solve the problem while still allowing me to turn lights on and off without having to crawl under my desk.

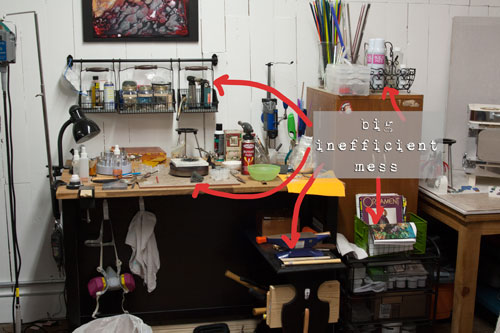
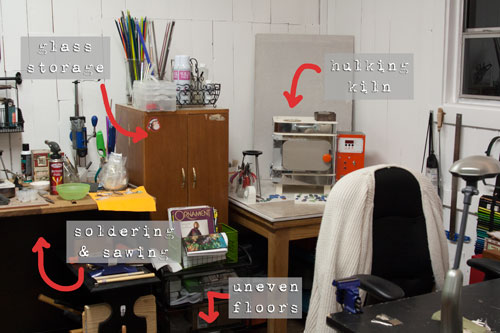
My metals and fabrication area would benefit from a little tweaking. I have an Ikea kitchen island set up for sawing and soldering, so I can see things close up without having to bend over or wear my magnifiers.  The problem is that most of the great storage the unit includes (two metal shelves) is pushed up against the wall so I can't get to it.

Soldering

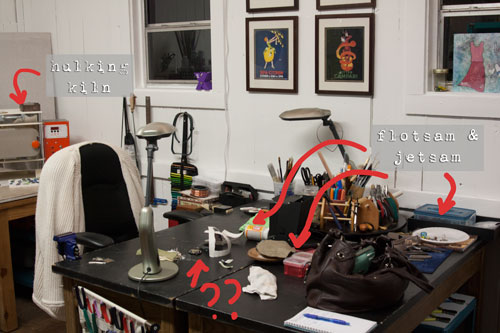
I also have two old science tables pushed back-to-back that are supposed to be for layout, design and fabrication work, but as you can see from the photo, they wind up being a collection area for all manner of flotsam and jetsam that have little to do with current projects.

Working-Table

I had convinced myself that rolling my chair between the two stations would be fine, but the truth is that the floors in this old building are so unlevel that "rolling" is an exercise in frustration. This also makes pulling the island unit out to get at the long-term storage a serious pain in the neck, because everything (and I mean every.single.thing) has to be shimmed to within an inch of its life in order to avoid punches, beads, wire and any other curved or roll-ey thing from just making a run for it the moment it gets set down.

Glass-and-Kiln

And then there's my kiln and glass area, which just sort of squat in the corner taking up a bunch of room. I don't think it's an efficient use of space, but I'm kind of stuck because that's where I had the dedicated plug installed for the kiln. And I don't think I'm making the best use of the space along the one main wall.

I'm considering a pretty significant reorganization that includes separating the two science tables and using one to create an "L" shape with the island sticking out into the space. This would put the storage shelves on the island facing my admin area, where I could use the extra storage. The other science table would go where the island was and be primarily for mixed media work. (That's a subject for another post. "Living" with mixed media artists is starting to mess with my head, I tell you!!) I could also use it for larger project layouts, when I have multiple or complex pieces going.

So... any suggestions? I'm really open to any and everything - the space just isn't working well, and it's not because I don't have enough to work with. Let me know what you think and I'll update you in a future post.

Until next time -


Monday, April 21, 2014

One of the Deadly Sins

Maybe the title is a bit overdramatic. This particular sin isn't deadly. Unless there's some kind of a freak accident thing. Technically it isn't a sin either. Except maybe to glassworkers. And the jewelry maker who commits this particular sin.

I know you're probably yelling at your computer (because maybe I'll hear it?) to just spill it already. What IS this "deadly sin"?

The answer: using a flame on or near your lampwork glass beads. In particular, I was thinking about designers wanting to heat patina lampwork glass headpins. However, this rule applies to any glass on any metal. Your beautiful glass headpin or bead WILL crack. Guaranteed.

This photo is an example of a thermal crack from allowing the bead to cool too much while working on it, then putting it back into the flame:


I really love all our readers. But I'm not sacrificing one of my headpins to show you what happens if you take a perfectly annealed headpin/bead and try to heat patina the wire it's seated on. You will have to take my word for it. Or I suppose you could try to prove to yourself that it's true. I just don't recommend it. 

Newest headpins. Really love the pop of bright color during this really cold snowy winter. #lampwork #glassaddictions #thisartistslife
Perfectly annealed and un-cracked glass headpins.

It's super simple to avoid. But oh so tempting to try-especially when you want that beautiful flame patina on copper or bronze. Don't give into the temptation or you will cry. And probably swear. A lot.

-Jen Cameron
Glass Addictions

Sunday, April 20, 2014

A Little Easter Tour

When I think of Easter, I think of warm Spring weather, new growth, fresh pastel colors, and signs of Earth's re-birth. I thought I'd do a little visual tour of artisan jewelry and bead goodness that remind me of today's Easter.


These lovelies are by Leslie Watt of Thea Elements. I just want to dive in! And hey... do you notice something interesting about one of these photos? If you do, post the answer in a comment below!


Nellie Thomas has several yummy spring colors in her shop WoolyWire Etc., and is currently running a Spring sale for 25% off. 


Here are some lovely beads by Genea Crivello-Knable of Genea Beads. By the way, she is having an Easter / Spring sale starting on Monday.


Next is lovely Spring jewelry by Linda Landig of Linda Landig Jewelry. I especially love the bunny bracelet. She looks very content in her little garden of beads. :)


Rebekah Payne of Tree Wing Studio is having a Spring Clearance sale several of her beautiful polymer beads.


She has also introduced this new color, which I love! Really puts one in the mood for Spring.


Diana Ptaszynski of Suburban Girl Beads has these sweet pastel colored ceramic beads in her shop.


Jenny Davies-Reazor has some cute spring critter beads, like these two examples ...


I hope you enjoyed this brief tour. Have a lovely week. :)