Showing posts with label Spring. Show all posts

Wednesday, March 23, 2016

Spring Daisies - Simple Earring Tutorial


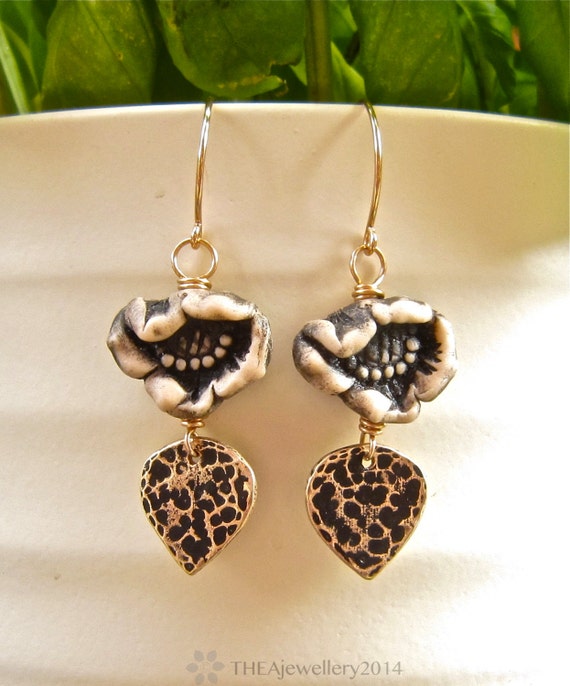
Spring officially arrived in the northern hemisphere last weekend so I'd thought I share this tutorial for my Daisy earrings as published in Belle Armoire - very quick and simple to make and perfect for adding a little spring fever to any outfit.


Materials
2 double drilled daisy connectors (Thea Elements - to order)
2 enamelled leaf charms ( Gardanne Beads )
4 brass tube beads ( Hands of the Hills )
16" waxed linen
Ear wires

Step 1
Cut an 8 inch length of waxed linen and pass it though the hole in an enamelled leaf charm. Bring the ends of the linen together and pass through a hole in the bronze daisy charm from front to back.


Step 2
Bring each end of the strand round to the front and then wrap the linen around itself a few times finishing at the front. Knot to secure.


Step 3
String a tube bead to each strand, knot and trim.


Step 4
Attach ear wire.


Step 5
Repeat steps 1 - 4 for the second earring.

And there you have your new earrings. You can of course substitute any similar components to create your own take on the design - the possibilities are endless.

Enjoy!


Friday, May 1, 2015

All Abloom

"It’s spring fever. That is what the name of it is. And when you’ve got it, you want — oh, you don’t quite know what it is you do want, but it just fairly makes your heart ache, you want it so!" ~Mark Twain
 My heart yearns for warm sunshine and blossoms at this time of year.  And nature fulfills that longing with abundance.  Tulips, daffodils and hellebores.  Lilacs, cherry blossoms and crocus.  A walk through the garden brings such a feast of color and beauty!

For many of us this outpouring of color translates into the urge to create.  I have gathered some jewelry components here to help you fulfill that urge.  Set one of these beauties out on your work table, find out which beads in your stash are clamoring to join the party and let your designer's heart blossom!  

I'm also offering up some finished jewelry that you might enjoy for yourself or perhaps for a Mother's Day or Graduation gift.


This Emerald Amulet Bag with a Stitched Flower would make a great ready-made Mother's Day gift.  It was made by Lindsay Starr of Phantasm Creates.
 
These Dogwood Flower Earrings by Lesley Watt of TheaJewelry features polymer clay flowers by AJE team member  Rebekah Payne.
 
Turquoise and Peach Flower Earrings by yours truly (Linda Landig Jewelry).  These earrings feature bronze flowers by AJE member, Lesley Watt.
I hope you feel inspired now!  If it is warm enough where you live, try sitting in the sun while you are beading.  Wishing you sunshine, blossoms and happiness!  Till next time-
Linda Landig  
Linda Landig Jewelry

.

Tuesday, March 31, 2015

March Hares - the AJE Themed Challenge Reveal


March is often associated with idioms about lions and lambs... but here at AJE it was the month of the Hare. We had discussed this "theme" idea for a good while before deciding to move ahead. And we, as a team, felt there were myriad reasons to give it a try... We wanted the bead makers, the component people to have an opportunity to be involved in a monthly challenge. I mean art beads - am I right? And we wanted to encourage dialogue on inspiration, and shared inspiration. We wanted to demonstrate individual styles of expression, and the diversity of artist offerings within limited parameters. But enough philosophy - on with the reveal!

This month we have many participants - team members, 2 winners and a great list of artists and designers that hopped to the challenge. Take a look. Enjoy.

Happy Spring!

AJE Team
Jenny
Caroline
Lesley
Linda
Niky
Melissa
Rebekah
Lindsay

Guests
Aural - Woodland Bay Native
Heather - Hidden Ridge Studio
Cindy Martin-Shaw
Keren Panthaki
Jackie Ryan
Karin Grosset Grange - Ginko et Coquelicot
Pamela Traub - Klassy Joolz
Paisley Lizard Designs
Karen at Ditsy Blue
Michelle McEnroe ( 4 pieces pinned on the AJE Pinterest page)

Friday, February 27, 2015

AJE COM Theme: March Hares

The *new* AJE Theme challenge!
A variation on our Component of the Month feature!
 

1. A. Durer - Young hare, watercolor, 1502.  2. Lepus Leporidae   3. B. Flanagan - Leaping Hare, 1982 bronze
 4. M. Ohara - Ivory netsuke, mid 19th century
You, our loyal readers, know us. You know that we are constantly evolving, creating, discussing and challenging ourselves. This year the team decided to initiate four themed challenges, loosely aligned with the seasons. We wanted to offer a creative challenge that was broader in scope, drawing in bead makers, component makers, as well as designers/jewelry makers.


The theme for Spring 2015 is the Hare. 


We are creating hares in our respective mediums - from clay to metal, polymer to resin. We invite you to join us: create a bead, a pendant, a finished piece of jewelry. It may be whimsical, naturalistic, or abstract. Just hop to it. (Details on entry/participation at end of post.)

I selected the hare, as its my totem animal of sorts. In myths the world over the hare is associated with fertility, creativity and rebirth. I wanted to share a few stories here, and I will delve deeper into the myth and symbolism on my own blog throughout the month. I am continually inspired by these legends, myths and lore!

Now it IS March... "Mad as a March hare" comes to mind. This is a British idiom, referencing the antics of hares in their Spring breeding season. They are often seen "boxing" as a courtship display. The March Hare is commonly known from Lewis Carroll's "Alice in Wonderland".

Image credits: 1. Boxing hares 2. Boxing hares 3. Tenniel illustration from Alice in Wonderland
4. Cheeky hare by  Simon Litten
   
There are many pre-Christian goddesses associated with hares and springtime, including Kaltes, Freyja and Eostre, the namesake of Easter.  Spring is a time of rebirth and fertility, so the connection with rabbits is clear, and was maintained via the Easter Bunny.
Antique Easter postcard, the Germanic goddess Eostre, an antique chocolate mold. 

The Asian folktales and myths offer a wide range of hares, most often associated with the moon. In China the hare is the consort of moon goddess Chang-O, and grinds the elixir of immortality in a mortar in pestle. In Japan - he's making mochi! The hare is seen in the craters on the moon's surface, forging a tangible link between myth and reality.
1. Lunar rabbit netsuke by Eilchi, late 19th cen. 2 & 3.  Lunar hare in the moon diagram and noren 4. Ivory netsuke  5. Embroidery, Chinese Imperial robes, 18th century


Here is what the team has been up to: (I'll let the pictures do the talking!)


Rebekah's trio - arctic hare, hare, and jackalope! Melissa's molten morsels in progress. 

Caroline's stunning silhouettes in raku. 

Karen has work in progress! Available soon - complete with the iconic spiral of life stamped on these totem beads. 

Lesley has etched, and soldiers, and cast and fired... 

Lesley is glazing these beauties now! Niky, although new to the team, has jumped in, sawing these  pieces/WIP.  

My own old and new: casting a 3d detailed hare, my hare and lunar hare ceramic pendants . 

The *new* theme challenge details:


1. Giveaway - This theme challenge DOES include a giveaway! ( This will vary each time.) 
I will be giving away one hare and one lunar hare pendant - winners selected randomly from comments on this post. 
  • Winners selected Sunday March 1.
  • You must have an active blog. 
  • Email and blog address requested in comments. 

2. Goal - Have fun! Try something different! Hop to it! Be inspired by the creative nature of the hare! Make something that fits within this theme. This can be an artist bead, a component, or a finished piece of jewelry.    

       *You are free to use any artist bead/component in your design -
  • from an AJE team member 
  • of your own creation
  • from another artisan bead maker... 

3. Share/Reveal - Reveal date March 31st! 
If you would like to be included in the blog reveal at month's end, please email Jenny at jen.davies.reazor (at) gmail.com. Since this is open to all, this is the most efficient way to be included. Emails need to be received by March 29th  to be included. 


Rabbit manju


Resources:

Wednesday, May 14, 2014

Spring Flower bead tutorial

Finally the weather is getting warmer. Over here in the UK, we’ve been having some beautiful weather in between the showers, and I’m thinking of seasonal beads made in clay. 

Today I’d like to share how I create my Spring flower beads. They are made from ceramic clay, but I think they’d work equally well in polymer if you don’t have access to a kiln.


To start, grab yourself a lump of clay and roll a sausage. 


Cut the sausage in to equal sized pieces. This will help your beads to be roughly the same size.


Roll each piece in to a ball and flatten.


I do this by squashing the ball in the centre and then gently squeezing around the edge to level the clay. This will give you a square edge.

Next you need a chisel ended tool. This is one of my two most used tools for bead making. I never use the other end, but the chisel tip is great for smoothing, shaping and marking your clay.


Press the tool in to the clay at the edge and then roll the tip towards the centre of the bead to make an indent.


Do this at opposite sides around the edge until you have petals.


Flip the bead and putting your tool in the groove from the first side, roll around to the centre again to create petals on the second side.


Take a skewer or your favourite hole making implement. Pierce centrally in between two petals through to the other side so that the point just pokes through the clay. (I find it’s easier to look at the bead edge on while doing this to make sure the skewer goes through level. 


Take out the skewer and pierce from the opposite side to join the first hole and push all the way through. Working like this gives you a neater hole, and also gives you the chance to correct any lining up mistakes from the first poke.


With the bead still on the skewer, take a ball stylus tool and poke a ring of dots in the centre of the flower. Poke another ring inside that, and continue until the centre is filled.


Leave the clay to harden a little and then if there are any cracks around the hole, you can clean these up with a damp paintbrush before leaving to dry completely.


When they are dry, these go in to the kiln for a bisque firing. Next they are glazed, the glaze is wiped from the front surfaces to create a nice contrast and highlight the centres, and they are fired again to full temperature. 


The dotted centres are quite a simple design, but there are lots of different effects you can go for in the middle, add lines, wiggles, more petals, whatever you like to make them your own!

If you’re trying this in polymer, I think you could get some great effects with inks and pastes, and I’d love to see what you create if you try!

Caroline

http://www.blueberribeads.co.uk