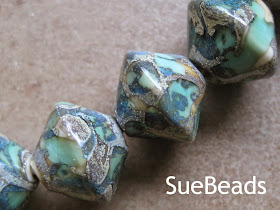
My first Aqua Terra beads on Etsy, Jan. 2009
I thought today I'd give you a tutorial of how to make your own, if you're a lampworker!
Materials Needed:
Rod of Light Ivory (Effetre)
Rod of Light Teal (Effetre)
Sheet of Silver Foil
Marver of your choice
Bead Press of your choice
First, cut your silver foil. I cut the sheet in eighths. This gives a nice portion of silver foil for an 18mm size bead.
Cut your silver sheet into eighths.
Next, get your bead press ready. In this example, I am using a Zoozii's straight-sided lentil press, the middle 18mm size.
Get your bead press tool ready!
First, wind your footprint onto your coated mandrel. Wind it on and hold it above your press, to make sure you are slightly smaller than the diameter of the well you are using.
Gather your glass on your prepared mandrel.
Check the fit of the glass in the well.
Add more glass if needed.
Check your glass in the well again.
You do not have to press your glass into the lentil shape if you think you have enough glass - if you aren't sure you can press the shape.
Press into your shape to make sure you have enough/not too much glass.
At this point, you can take your glass blob back to an olive shape, As you can see, I have my silver foil all ready and waiting for me! Next, you want to slightly heat your glass and roll it in the silver foil, making sure to go all the way around the glass.
Wrap your glass with a piece of silver foil.
Next, burnish in the foil. Burnishing is rubbing the foil into the glass so it sticks very well. You can do this with a tile, a marver, or your torch mounted marver.
Burnish the silver foil into the glass.
Then, you want to put your blob back in the flame, and you slightly melt off the silver foil. This is what it looks like after you burnish and put the glass back in the flame.
Melt the silver foil into the glass at the top end of the flame.
Now, you want to add some squiggles of light teal. As much or as little as you want, keeping in mind you are going to have to press the glass again and don't want to have too much. You can always add more teal, it's harder at this point to take it away!
Add teal glass to silvered glass.
Melt in the teal and press the bead again in the bead press. You can see from the photo below that you will have some chill marks (chill marks are the marks you get on your bead when you press it, and as the bead cools very quickly in the press, you get marks from the press).
Press your bead, check for chill marks.
Flame polish your bead to get rid of the chill marks. If you flame polish too heavily and lose definition on your bead, you may want to heat, press again, and then flame polish again.
Flame polish bead, put in the kiln!
This is the finished bead! Of course you can do these beads in many shapes, as I show below.
Bicone-shaped aqua terra beads
Lentil-shaped aqua terra beads
Ribbed round-shaped aqua terra beads
If you aren't a lampworker but love these beads, I have them available in my etsy store, and I'll be happy to make you some if they sell out!
Thanks for checking out my tutorial today!
Susan Kennedy
SueBeads Etsy Store
SueBeads Web Store
SueBeads Blogspot


How utterly beautiful, I love seeing how you make these Sue and I really love the effect you have achieved!
ReplyDeleteOh Sue, these are gorgeous!!! I've just been to your shop and favorite some, we'll see how long I can resist them! :)
ReplyDeleteHi Sue...well, I don't know the first thing about making art glass beads (and that's probably a good thing, to keep me away from flames and hot-melty-things!)...but you sure did a great job on this tutorial! These beads are beautiful! I especially love the very last picture of the 'ribbed round shape' version...those are awesome. Great post! 💕
ReplyDeleteThese are so gorgeous. I really enjoyed getting an overview of how you make them!
ReplyDeleteAqua terra jasper is my favorite! I have bought so many of the real thing, but yours may even be prettier! I MUST learn to lampwork! Thanks for sharing the process. How about somebody do these with polymer somehow!?
ReplyDeleteThese beads are gorgeous Sue! You've nailed the look of Terra Jasper to a T. Love them!
ReplyDeleteThanx for sharing Sue, I enjoyed seeing your process for making these beautiful beads.
ReplyDeleteThese beads look wonderful! Thanks for the tips, and for enumerating the necessary ingredients to make such fine materials for trinkets or jewelry. Aqua Terra is really a great color for those beads. It’s like capturing a bead of water, and adding intricate designs to it. Simply amazing!
ReplyDeleteRicky Rowe @ Find A Jewelry Expert