I've been having some
fun this last couple of weeks jumping back in to jewellery making. My
ideas have been thin on the ground for some time, but they've come
back with a vengeance. I have ideas spilling out of my ears. Oh for a
bit more time to realise them all!
I've been determined to
try out some new techniques and today it's riveting with wire. I
thought I'd share my first attempts with you and a few pics of how it
went...
I decided to make a
simple pair of earrings just to test out if what I'd read worked in
real life. Apologies for the pics, the weather was pretty gloomy!
To start, I cut strips
of copper and bashed them a bit to get a nice textured finish.
I then spent a good ten
minutes trying to find a matching pair of my lamp work beads... I'm
not very good at pairs! You can see I've marked out where the copper
needs drilling for hanging and for the rivets to go through. The
marks were centre punched and then drilled.
The hole for the rivet
needs to be a snug fit for the wire, so not having the right size
drill bit, I drilled smaller, then slowly opened the hole with a
diamond reamer bit until it fit. As the holes in my beads were quite
large, I used some steel wire which was the thickest I had to hand
(about 3mm)
In everything I'd read,
everyone had a neat little hole in their bench block for inserting
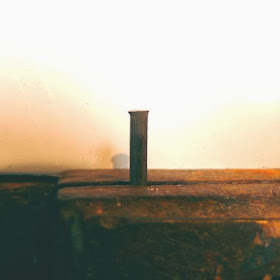
the wire, but I don't. So as a solution I clamped the wire in my vice
and gently tapped the wire around the edges to make it flare out...
Looking good so far!
Next, everything was
fitted together and marked where it needed cutting. This was my
second attempt as I cut it too short on the first go. You need to
leave enough to be able to flare out the metal on the front.
I didn't really need
this picture, but I thought I'd show off my new saw while I'm cutting the wire! It's red and
awesome!
And here they are
finished after flaring out the front of the rivets. I did this really carefully as
I had visions of smashing the bead to bits, but I think they worked
out pretty well... not perfect, but it works!
I tried this with
thinner copper wire too, it was much easier and not quite as scary
joining metal to metal. This is using one of Lesley's bronze
connectors and copper cut with my fancy saw!
I love the look of
metal rivets in jewellery, here's a few pics of what I hope I can
achieve with some more practise!
Ok, so that last one's
a little ambitious, but I can dream!
Thanks for reading...
Caroline


I don't have holes in my bench block either - apart from the ones I've made with missed hammer blows! I think I used my vice when I tried this many moons ago but I wasn't brave enough to try it on glass....maybe now I will as riveting is definitely on my to do list. Thanks for sharing your experience Caroline.
ReplyDeleteOh and I love the way you turned my connector into a tree!
ReplyDeleteWow, what a great design! Love the earrings! Also the linked items are absolutely charming! Thanks for sharing!
ReplyDeleteThanks for sharing your first experiences with riveting. This is on my to do list also!
ReplyDeleteI have done some riveting Lesley and like you, I cut it to short. But I like the look.Well done.
ReplyDeleteI too love the look of riveting but have yet to try it. Thanks for the inspiration, nice work!
ReplyDeleteLove the look of riveting but I've never done it, like Linda it's on my list but unfortunately that's a mighty long list. Love how your earrings turned out and the links you shared as well. Thank you!
ReplyDeleteI've been playing with riveting - love the look and its fun! This is a different approach I haven't tried - thanks!
ReplyDeleteThanks all :) Glad you enjoyed the read!
ReplyDeleteI have a list like that Kristi...
Love this post! Thanks for sharing!
ReplyDelete