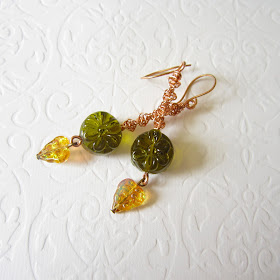
When I submitted these earrings for the AJE challenge a few months ago a lot of people asked me about the the wire macrame technique so I decided to put together a tutorial which you can adapt to your own design. I had a little difficulty photographing this today as it's a two handed technique and my tripod has gone awol but you can find the basic knotting technique here if you need clarification.
Materials
Approx. 6" 0.9mm bronze core wire
Approx. 12" 0.5mm bronze knotting wire
2 focal beads
2 accent beads/dangles
1 pair of earwires
Headpins/wire
2 pairs of pliers
Table vice or something to secure your wire
Note: Different types and gauges of wire can be used for this and these will give different effects but remember that you may need to adjust the length of the wire according to the gauge used.
Step one
Secure your core wire to something that will keep it firmly in place - I use a table top vice but you could also wrap it round a rigid object - don't forget to cut extra wire if you do the latter.
Step 2
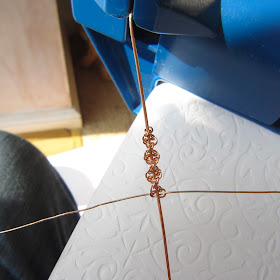
Place your knotting wire beneath the core wire and bring both ends up around the sides. Pass the wire on your left over the wire in your right and back under the core wire and up through the loop of the wire on the right.
Grip both ends of the wire with your pliers and pull to tighten keeping an even tension. Don't be tempted to do this with your hands (especially with bronze wire) - it may not hurt at first but you'll find you have very sore fingers the next day - I know I tried!
Step 3
Repeat step 2 taking care to pass the wire in the same direction as this will create the spiral pattern.
Step 4
When the spiral is the length you want remove it from the vice and wrap one end of the wire around the core wire 3 times, cut off the excess and press against the core wire. Repeat the process with the other end of the wire wrapping it over the first wrap. Trim the excess and file any sharp edges. This will form the top of the earring.
Step 5
Trim the top end of the core wire to remove any vice marks, file the end and turn a simple loop. Gently push the spiral up to sit snugly against the loop.
Step 6
At the other end add your focal bead, trim and file the wire and turn another simple loop or warp a loop if preferred.
Step 7
Add a headpin to an accent bead and turn a simple loop to create a dangle then add this to the bottom of your earring.
Step 9
Add an earwire of your choice.
Step 10
Repeat this process for the second earring to complete the pair.
Step 11
This technique is greatly enhanced by oxidising the wire and polishing back the high points to give added depth and texture. I've done this when the earrings are complete but if your beads are not waterproof you will need to treat the wire before you make up the earrings.
And there you have your wire macrame earrings.
I hope you'll have a go at making these and perhaps we'll see some of them coming up on the AJE Earring Challenge Pinterest board.
Lesley
www.thegossipinggoddess.blogspot.com


HOLY MOLY! That is beautiful, Miss Lesley! I love the intricate texture of the oxidized wire. What a lovely effect. Thank you for sharing this with us! Enjoy the day. Erin
ReplyDeletewhat a great tutorial! thanks Lesley
ReplyDeleteHi Lesley, what gauge did you use for the macrame in this example? They look wonderful and I'd love to try!
ReplyDeleteMary Anne - I use 20 & 22 british wire gauge which I think is 19/21 for american wire gauge... you can check here...http://beadsisters.co.uk/library/pages/wiregauges.htm
DeleteSorry - that should be 24/23 not 22/21.
DeleteNever thought about using wire in macrame. The earrings came out great!
ReplyDeleteThe oxidizing really brings out the spiral! Excellent job Ms. Lesley!
ReplyDeleteLove these so much, thanks for sharing!
ReplyDeleteI am so impressed how you get the wire to work for you like that! Wire hates me. What an amazing tutorial!
ReplyDeleteIt's actually very easy with a bit of practice Kristen - give it a go...
Deletefabulous Leslie....thanks for sharing!
ReplyDeleteThese are beautiful, I want to share the link as soon as I figure out how through buffer! They look so complicated but are quite easy! Thank You so much for sharing! Cara
ReplyDeleteHi Lesley I also just wanted to check Wire gauge conversion I believe .05mm = 20g & .09mm= 24g is this correct ?
ReplyDeleteStill haven't converted over metic system lol. Thanks! Cara
That's correct Cara...
DeleteFabulous!
ReplyDeleteLesley, your earrings are beautiful, and I LOVE the wire macrame technique (it's right up my alley)! Thanks so much for sharing the tutorial! xoxo Meridy
ReplyDeleteWow...it looks so complicated finished, but the steps seem fairly easy....of course I say that now before I try it! Thank you so much for this tutorial. I will certainly be trying my hand at it.
ReplyDeleteThank you Lesley! I can't wait to try this :) Beautiful!
ReplyDeleteWonderful, Lesley... I'm not much of a wire-worker, but I love macramé. I just bought dead-soft for the first time so will definitely give this a try. Thanks for the great tutorial!
ReplyDeleteOj, what a beautiful idea - thank you for sharing thta with us, Lesley!
ReplyDeleteWhat a super idea! I can't wait to try this - thanks for sharing!
ReplyDeleteFantastic tutorial a real must try love these earrings
ReplyDeleteWhat an great idea! Very beautiful, thank you for sharing!
ReplyDeleteThese are awesome Lesley! Thank you so much for sharing!
ReplyDeleteOh, Holy Moses! I love this! I loved it so much I went and told people they need to come see this from my blog! Abso-tively AAAAAWEsome! (warbles out word) I was waffling about learning macrame but now I want to jump right in. Your pics are very clear and, since I'm a visual learner, I think I can pick this up. Woo Hoo!
ReplyDeleteWow! I think I'm going to try this today.
ReplyDeletereally cool!
ReplyDeleteThanks for sharing! (And I believe you when you say don't do this with your hands with bronze wire!!!)
ReplyDeleteI love the look and am thrilled you gave us a tutorial. I'm so careful whose blogs I subscribe to now since I was getting too much email. I am very happy I subscribed to yours. TFS!
ReplyDeleteThey are lovely Lesley! Great tutorial!
ReplyDeleteLoving macramé these days and using it with wire is so brilliant! Thank you much for sharing!
ReplyDeleteFantastic design Lesley, thank you for sharing :0)
ReplyDeleteThese are fabulous Lesley! I'm going to have to give them a try!! Thanks so much for sharing!
ReplyDeleteThis is so cool. Must try! Thanks Lesley!
ReplyDeleteGreat tut. I love the oxidised version. I would love to try this.
ReplyDeleteGreat tutorial! I love the oxidised version. I look forward to trying it. Thank you
ReplyDeleteBeautiful. Thank you for sharing the tutorial :)
ReplyDeleteAbsolutely fabulous!Thanks for sharing ;)
ReplyDelete